Peanut Butter Spider Cookies for Halloween
Peanut Butter Spider Cookies are a hit every time. They start with a wonderfully chewy peanut butter cookie base that’s deeply flavored and satisfying. The real fun, though, comes from turning these simple cookies into little spiders, perfect for Halloween parties or just whenever you want a fun, spooky treat. Kids especially love decorating them with candy eyeballs and mini peanut butter cups. The dough comes together quickly, making them a great bake for a weekend afternoon when you want a fun activity. These aren’t just cookies; they’re a little bit of edible art that tastes as good as it looks. Everyone asks for the recipe for these chewy peanut butter spider cookies.
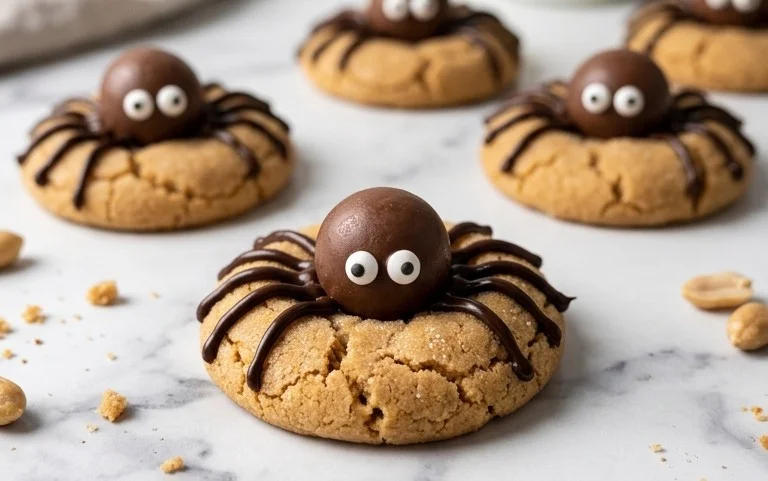
Peanut Butter Spider Cookies
These Peanut Butter Spider Cookies start with a wonderfully chewy peanut butter base. The real fun, though, comes from decorating them to look like little spiders using mini peanut butter cups and candy eyeballs. They’re perfect for Halloween parties or just whenever you want a fun, spooky treat. The dough comes together quickly, making them a great bake for a weekend afternoon.
Ingredients:
- ½ cup (113g) unsalted butter (1 stick, room temperature)
- ½ cup (107g) brown sugar
- ⅓ cup (66g) granulated sugar
- ¾ cup (201g) creamy peanut butter (not natural)
- 1 large egg
- 1 tsp vanilla extract
- 1 ½ cups (180g) all purpose flour
- 1 tsp baking soda
- ½ tsp baking powder
- ½ tsp salt
- Granulated sugar (for rolling the cookies)
- Mini Reese’s Peanut Butter Cups
- ½ cup (85g) semi-sweet chocolate chips (for melting)
- ½ tsp neutral oil (for melting)
- Candy eye balls.
Making the Cookie Dough
The first step to these fun spider cookies is to cream together your softened butter and sugars. I like to use a stand mixer for this, but you can absolutely do it by hand with a sturdy whisk or wooden spoon. Make sure your butter is truly at room temperature, meaning it gives slightly when you press it with your finger, but it’s not melted. This helps it incorporate smoothly with the sugars. Beat the butter with the brown sugar and granulated sugar until the mixture is light and fluffy. This usually takes about 2 to 3 minutes in a mixer.
Next, beat in the creamy peanut butter. It’s important to use a standard creamy peanut butter for this recipe; natural peanut butter, the kind that separates into oil and solids, can sometimes lead to cookies that spread too much or have a different texture. Stir in the large egg and the vanilla extract until everything is well combined and smooth.
Now it’s time for the dry ingredients. In a separate medium bowl, whisk together the all-purpose flour, baking soda, baking powder, and salt. Whisking them together first ensures that the leavening agents and salt are evenly distributed throughout the flour, which means your cookies will bake more evenly. Gradually add the dry ingredients to the wet ingredients, mixing on low speed or by hand until just combined. Be careful not to overmix the dough at this stage; overmixing can develop the gluten in the flour too much, resulting in tougher cookies. Stop mixing as soon as you no longer see streaks of flour.
Shaping and Baking the Cookies
Once the dough is ready, you’ll want to roll it into balls. I use a tablespoon to scoop out portions of dough, then roll them into roughly 1-inch balls between my palms. For that classic peanut butter cookie look and a slightly crispier edge, I like to roll each ball in granulated sugar before placing them on a baking sheet. This sugar coating also helps them develop a nice texture.
Place the dough balls about 2 inches apart on baking sheets lined with parchment paper. The parchment paper is a lifesaver for easy cleanup and prevents the cookies from sticking. You can use a baking sheet with or without a rim, but parchment paper is highly recommended. For the spider body, gently press down on the top of each dough ball with the bottom of a glass or a fork to slightly flatten them. This helps them bake more evenly and creates a good surface for the decoration.
Bake the cookies in a preheated oven at 350°F (175°C) for 9 to 12 minutes. The exact baking time will depend on your oven and the size of your cookies. You’re looking for the edges to be lightly golden brown and the centers to still look a little soft. They will continue to bake and set up as they cool on the baking sheet. Don’t overbake them, or they’ll turn out dry and crumbly. Let them cool on the baking sheet for about 5 minutes before carefully transferring them to a wire rack to cool completely. This resting period on the hot baking sheet is important for the cookies to firm up.
Decorating Your Spiders
This is where the real fun begins! While the cookies are cooling, prepare your spider decorations. To make the spider bodies, you’ll need the Mini Reese’s Peanut Butter Cups. You can gently press one Mini Reese’s Peanut Butter Cup into the center of each warm, slightly cooled cookie. The warmth of the cookie will help it adhere. Don’t press too hard, you don’t want to break the cookie.
Next, you’ll create the spider’s head and eyes. You’ll need to melt the semi-sweet chocolate chips. Place the chocolate chips in a microwave-safe bowl with the ½ teaspoon of neutral oil. Microwave in 30-second intervals, stirring between each interval, until the chocolate is smooth and fully melted. The oil helps the chocolate melt smoothly and gives it a nice sheen. Be careful not to overheat the chocolate, as it can seize up.
Once the chocolate is melted, use a small spoon or a piping bag with a very small tip to draw two small dots of melted chocolate onto the top of the Mini Reese’s Peanut Butter Cup to act as glue for the candy eyeballs. Immediately place two candy eyeballs onto the chocolate dots. You can find candy eyeballs at most craft stores or the baking aisle of your grocery store. They come in various sizes, so choose ones that look proportional to your mini peanut butter cups.
For the spider legs, you have a couple of options. You can pipe eight thin lines of the melted chocolate out from the peanut butter cup onto the cookie, four on each side, to resemble legs. Alternatively, if you want a more structured leg, you can let the melted chocolate cool slightly, then use a toothpick to draw the legs. If you want a bit more pizzazz, you can also use the melted chocolate to create some extra webbing details on the cookie itself. Let all the chocolate set completely before handling or stacking the cookies. You can speed this up by placing the decorated cookies in the refrigerator for a few minutes. These cookies are best enjoyed within a few days of baking and can be stored in an airtight container at room temperature.
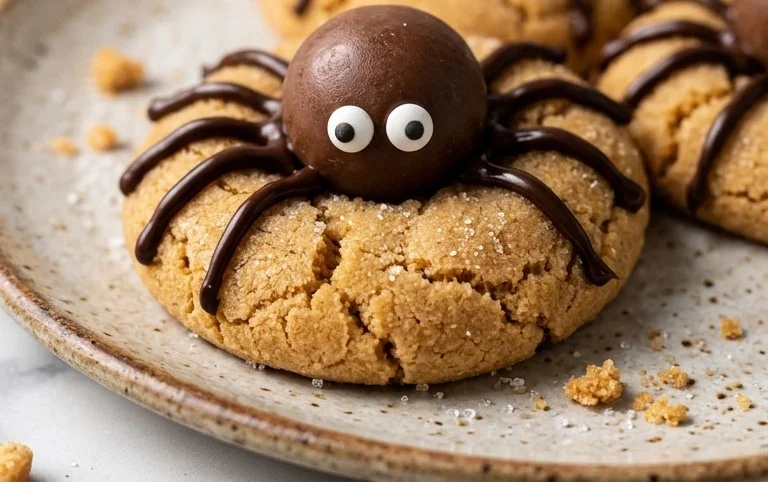
Conclusion:
These Peanut Butter Spider Cookies are a fantastic way to bring some spooky fun to your baking. The chewy peanut butter cookie is delicious on its own, but turning it into a spider with candy eyeballs and mini peanut butter cups makes it a real showstopper, especially for Halloween. They’re simple enough for kids to help decorate, making it a great family activity. Once baked, these cookies are wonderful served with a cold glass of milk, or even crumbled over ice cream. For a fun twist, try adding a pinch of cinnamon to the cookie dough for a little extra warmth, or experiment with different colors of candy eyeballs for a more varied spider collection.
Frequently Asked Questions:
Q: Can I use natural peanut butter?
A: It’s best to use creamy, commercial peanut butter (like Jif or Skippy) for this recipe. Natural peanut butter has a different oil consistency that can make the cookies spread too much and result in a greasy texture. Stick to the creamy kind for the best chewy results.
Q: How should I store these cookies?
A: Store your Peanut Butter Spider Cookies in an airtight container at room temperature for up to 3-4 days. They stay wonderfully chewy when stored properly. If you stack them, place a piece of parchment paper between layers to prevent sticking.
Q: Can I make the dough ahead of time?
A: Yes, you can definitely make the cookie dough ahead of time. Once the dough is made, wrap it tightly in plastic wrap and refrigerate for up to 2 days. You might need to let it sit at room temperature for about 15-20 minutes before scooping and baking, as it will be quite firm.
Peanut Butter Spider Cookies
Spooky and delicious peanut butter cookies decorated to look like spiders, perfect for Halloween or any fun occasion.
Ingredients
-
{‘@type’: ‘HowToStep’, ‘text’: ‘½ cup (113g) unsalted butter (1 stick, room temperature)’}
-
{‘@type’: ‘HowToStep’, ‘text’: ‘½ cup (107g) brown sugar’}
-
{‘@type’: ‘HowToStep’, ‘text’: ‘⅓ cup (66g) granulated sugar’}
-
{‘@type’: ‘HowToStep’, ‘text’: ‘¾ cup (201g) creamy peanut butter (not natural)’}
-
{‘@type’: ‘HowToStep’, ‘text’: ‘1 large egg’}
-
{‘@type’: ‘HowToStep’, ‘text’: ‘1 tsp vanilla extract’}
-
{‘@type’: ‘HowToStep’, ‘text’: ‘1 ½ cups (180g) all purpose flour’}
-
{‘@type’: ‘HowToStep’, ‘text’: ‘1 tsp baking soda’}
-
{‘@type’: ‘HowToStep’, ‘text’: ‘½ tsp baking powder’}
-
{‘@type’: ‘HowToStep’, ‘text’: ‘½ tsp salt’}
-
{‘@type’: ‘HowToStep’, ‘text’: ‘Granulated sugar (for rolling the cookies)’}
-
{‘@type’: ‘HowToStep’, ‘text’: ‘Mini Reese’s Peanut Butter Cups’}
-
{‘@type’: ‘HowToStep’, ‘text’: ‘½ cup (85g) semi-sweet chocolate chips (for melting)’}
-
{‘@type’: ‘HowToStep’, ‘text’: ‘½ tsp neutral oil (for melting)’}
-
{‘@type’: ‘HowToStep’, ‘text’: ‘Candy eye balls.’}
Instructions
-
Step 1
Preheat oven to 375°F (190°C). Line baking sheets with parchment paper. -
Step 2
In a large bowl, cream together the softened butter, brown sugar, and granulated sugar until light and fluffy. -
Step 3
Beat in the peanut butter, then the egg and vanilla extract until well combined. -
Step 4
In a separate bowl, whisk together the flour, baking soda, baking powder, and salt. Gradually add the dry ingredients to the wet ingredients, mixing until just combined. -
Step 5
Roll dough into 1-inch balls and then roll each ball in granulated sugar. Place on the prepared baking sheets. -
Step 6
Bake for 9-11 minutes, or until the edges are lightly golden. Let cool on the baking sheets for a few minutes before transferring to a wire rack to cool completely. -
Step 7
To assemble the spiders, gently press a Mini Reese’s Peanut Butter Cup into the top of each cooled cookie to form the spider’s body. -
Step 8
Melt the semi-sweet chocolate chips with the neutral oil in a microwave-safe bowl, stirring every 30 seconds until smooth. Transfer to a small piping bag or a zip-top bag with a corner snipped off. -
Step 9
Pipe eight “legs” extending from the Mini Reese’s Peanut Butter Cup onto the cookie. Place two candy eye balls onto the Reese’s cup for the spider’s face.
Important Information
Nutrition Facts (Per Serving)
It is important to consider this information as approximate and not to use it as definitive health advice.
Allergy Information
Please check ingredients for potential allergens and consult a health professional if in doubt.