Kitchen Sink Christmas Cookies Chewy Salty Sweet
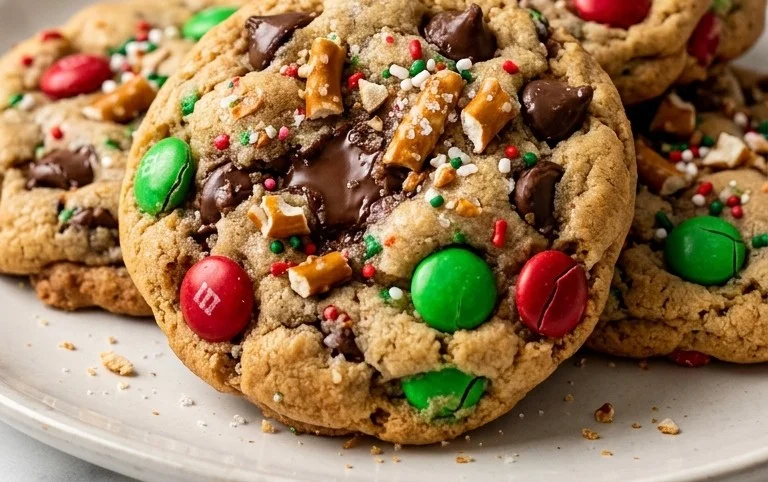
Kitchen Sink Christmas Cookies are my absolute favorite for Christmas. They’re called "Kitchen Sink" for a reason – you throw in everything delicious, and the result is pure holiday magic. The salty crunch of pretzels and potato chips cuts through the sweetness of the chocolate and caramel notes from the brown sugar, while the M&M's add that festive pop of color. They’re a little sweet, a little salty, and perfectly chewy. This recipe is super forgiving, so don't stress too much about exact measurements for the mix-ins. Just have fun with it!
Ingredients:
- 2 3/4 cup All purpose flour (spooned and leveled )
- 1/2 tsp Baking powder
- 1/2 tsp Baking soda
- 1/2 tsp Salt
- 8 oz Unsalted butter (melted and cooled )
- 1 1/4 cup Dark brown sugar
- 3/4 cup White granulated sugar
- 2 Large eggs (room temperature )
- 2 tsp Vanilla extract
- 1 cup M&M's (red and green, plus more for topping )
- 1/2 cup White chocolate chips (plus more for topping )
- 1/2 cup Pretzels (broken into small pieces, plus more for topping )
- 1/3 cup Potato chips, salted (crushed, plus more for topping )
- 2 tbsp Holiday sprinkles (jimmies works best )
Making the Dough
First things first, let's get our dry ingredients sorted. In a medium-sized bowl, whisk together the all-purpose flour, baking powder, baking soda, and salt. Whisking them together ensures that the leavening agents and salt are evenly distributed throughout the flour, which is key for consistent cookie texture and rise. Set this bowl aside for now.
Now for the wet ingredients. In a large bowl, combine the melted and slightly cooled butter with both the dark brown sugar and white granulated sugar. Use a whisk or a sturdy spatula to mix them until they are well combined and form a somewhat smooth paste. Don't worry if it's not perfectly smooth; the lumps of brown sugar add character. Next, beat in the two large eggs one at a time, mixing well after each addition. Stir in the vanilla extract until everything is just combined. This combination of sugars and butter forms the base for that delightful chewy texture we're aiming for in our Kitchen Sink Christmas Cookies.
Gradually add the dry ingredients to the wet ingredients. Mix on low speed with an electric mixer, or stir with a spatula, until just combined. Be careful not to overmix at this stage; overmixing can develop the gluten in the flour too much, leading to tougher cookies. Stop mixing when you still see a few streaks of flour remaining. The dough will be thick and sticky.
Now for the fun part – adding the mix-ins. Gently fold in the M&M's, white chocolate chips, broken pretzels, crushed potato chips, and holiday sprinkles. Use a spatula or your hands for this. Distribute them evenly throughout the dough. Remember, this is a kitchen sink cookie, so feel free to add a little more or less of any of these items based on your preference. The goal is to have a little bit of everything in each bite. Make sure the chips and pretzels aren't crushed into dust; you want some texture.

Kitchen Sink Christmas Cookies
These cookies are my absolute favorite for Christmas. They’re called “Kitchen Sink” for a reason – you throw in everything delicious, and the result is pure holiday magic. The salty crunch of pretzels and potato chips cuts through the sweetness of the chocolate and caramel notes from the brown sugar, while the M&M’s add that festive pop of color. They’re a little sweet, a little salty, and perfectly chewy. This recipe is super forgiving, so don’t stress too much about exact measurements for the mix-ins. Just have fun with it!
Ingredients:
- 2 3/4 cup All purpose flour (spooned and leveled )
- 1/2 tsp Baking powder
- 1/2 tsp Baking soda
- 1/2 tsp Salt
- 8 oz Unsalted butter (melted and cooled )
- 1 1/4 cup Dark brown sugar
- 3/4 cup White granulated sugar
- 2 Large eggs (room temperature )
- 2 tsp Vanilla extract
- 1 cup M&M’s (red and green, plus more for topping )
- 1/2 cup White chocolate chips (plus more for topping )
- 1/2 cup Pretzels (broken into small pieces, plus more for topping )
- 1/3 cup Potato chips, salted (crushed, plus more for topping )
- 2 tbsp Holiday sprinkles (jimmies works best )
Making the Dough
First things first, let’s get our dry ingredients sorted. In a medium-sized bowl, whisk together the all-purpose flour, baking powder, baking soda, and salt. Whisking them together ensures that the leavening agents and salt are evenly distributed throughout the flour, which is key for consistent cookie texture and rise. Set this bowl aside for now.
Now for the wet ingredients. In a large bowl, combine the melted and cooled unsalted butter with both the dark brown sugar and the white granulated sugar. You want the butter to be cooled so it doesn’t scramble the eggs later. The combination of brown and white sugar is what gives these cookies their classic chewy texture and rich flavor. Cream these together until they’re well combined and look a little fluffy. An electric mixer makes this super easy, but a sturdy whisk and some elbow grease work just as well. Next, add the two large eggs, making sure they’re at room temperature. Room temperature eggs emulsify better into the batter, leading to a smoother, more uniform cookie. Follow that with the vanilla extract for that essential warm aroma. Beat everything together until it’s smooth and homogenous.
Combining and Adding the Goodies
Now it’s time to bring it all together. Gradually add the dry ingredients to the wet ingredients, mixing on a low speed if you’re using a mixer, or stirring with a spatula. Mix just until the flour streaks disappear. Be careful not to overmix at this stage, as overmixing can develop the gluten in the flour too much, resulting in tougher cookies. We want a tender cookie, so a gentle hand is best.
This is where the fun really begins! Gently fold in your mix-ins. This includes the red and green M&M’s, white chocolate chips, broken pretzels, and crushed potato chips. I like to save a handful of each to press onto the tops of the cookies before baking, so they look extra festive. Make sure you distribute everything as evenly as possible. If you have any particularly large pretzel pieces, break them down further so they don’t create awkward lumps in the cookies.
Baking the Cookies
Preheat your oven to 375 degrees Fahrenheit (190 degrees Celsius). Line your baking sheets with parchment paper. This is a simple step, but it makes a world of difference in preventing cookies from sticking and makes cleanup a breeze. Use a cookie scoop or two spoons to drop rounded balls of dough onto the prepared baking sheets. Leave about 2 inches of space between each cookie, as they will spread as they bake. If you saved extra M&M’s, white chocolate chips, pretzels, or potato chips, now’s the time to gently press a few onto the tops of each cookie dough ball. For extra holiday flair, sprinkle some of your holiday jimmies over the top as well.
Bake the cookies for 9 to 12 minutes, or until the edges are golden brown and the centers still look slightly soft. They will continue to cook on the baking sheet after you remove them from the oven. For a chewier cookie, aim for the shorter baking time. If you prefer a crispier cookie, bake them a minute or two longer. Keep an eye on them, especially the first batch, as oven temperatures can vary. Once they look done, carefully remove the baking sheets from the oven.
Cooling and Enjoying
Let the cookies cool on the baking sheets for about 5 minutes before transferring them to a wire rack to cool completely. This resting period on the hot baking sheet is important for the cookies to set properly. If you try to move them too soon, they might fall apart. Once they’re on the wire rack, they can cool completely, or you can enjoy them while they’re still slightly warm – my personal favorite way to eat them!
These cookies are fantastic stored in an airtight container at room temperature for up to 5 days. They also freeze beautifully, so you can make a big batch ahead of time for any holiday gatherings or unexpected cookie cravings. Just make sure they are completely cooled before freezing. Thaw them at room temperature. These kitchen sink cookies are a guaranteed crowd-pleaser, perfect for cookie exchanges, holiday parties, or just enjoying with a glass of milk.
Conclusion:
These Kitchen Sink Christmas Cookies truly live up to their name, offering a delightful medley of textures and flavors that capture the spirit of the holidays. The combination of sweet chocolate, salty pretzels and chips, and festive M&M's makes each bite an adventure. They are wonderfully chewy with just the right amount of crisp from the mix-ins, and the whole process is incredibly forgiving, making them perfect for bakers of all levels. You can whip up a batch and have them ready for unexpected guests or to share at holiday gatherings.
For serving, these cookies are fantastic on their own with a glass of cold milk or a warm cup of coffee. They also pair beautifully with a scoop of vanilla ice cream for a decadent dessert. If you want to add even more festive flair, consider a drizzle of melted white or dark chocolate over the cooled cookies, or sprinkle them with extra M&M's and holiday sprinkles right after they come out of the oven.
Variations: Feel free to swap out the white chocolate chips for milk or dark chocolate, or add other favorite candies and nuts like chopped pecans or butterscotch chips. For a different holiday feel, use different colored M&M's or sprinkles. You could also add a touch of peppermint extract to the dough for a minty twist.
Frequently Asked Questions:
Can I make these cookies ahead of time?
Yes, absolutely. You can prepare the dough and refrigerate it for up to 3 days before baking. Just allow it to sit at room temperature for about 15-20 minutes before scooping, or bake straight from the fridge, adding a couple of extra minutes to the baking time.
How should I store leftover cookies?
Store cooled cookies in an airtight container at room temperature for up to 5 days. Placing a slice of bread in the container can help keep them soft and chewy.
What if I don’t have potato chips?
You can omit the potato chips or substitute them with another salty snack, like crushed butter crackers or even some extra pretzels. The key is adding that salty contrast to the sweetness.
Kitchen Sink Christmas Cookies
A festive and decadent Christmas cookie loaded with a delightful mix of sweet and salty ingredients.
Ingredients
-
2 3/4 cup All purpose flour (spooned and leveled )
-
1/2 tsp Baking powder
-
1/2 tsp Baking soda
-
1/2 tsp Salt
-
8 oz Unsalted butter (melted and cooled )
-
1 1/4 cup Dark brown sugar
-
3/4 cup White granulated sugar
-
2 Large eggs (room temperature )
-
2 tsp Vanilla extract
-
1 cup M&M’s (red and green, plus more for topping )
-
1/2 cup White chocolate chips (plus more for topping )
-
1/2 cup Pretzels (broken into small pieces, plus more for topping )
-
1/3 cup Potato chips, salted (crushed, plus more for topping )
-
2 tbsp Holiday sprinkles (jimmies works best )
Instructions
-
Step 1
In a medium bowl, whisk together the flour, baking powder, baking soda, and salt. Set aside. -
Step 2
In a large bowl, whisk together the melted and cooled butter, dark brown sugar, and white granulated sugar until well combined. -
Step 3
Beat in the eggs one at a time, then stir in the vanilla extract. -
Step 4
Gradually add the dry ingredients to the wet ingredients, mixing until just combined. -
Step 5
Gently fold in the M&M’s, white chocolate chips, pretzels, potato chips, and holiday sprinkles. -
Step 6
Drop rounded spoonfuls of dough onto prepared baking sheets, pressing down slightly and topping with extra M&M’s, chocolate chips, pretzels, potato chips, and sprinkles. -
Step 7
Bake at 375°F (190°C) for 8-10 minutes, or until the edges are golden brown and the centers are still slightly soft. -
Step 8
Let the cookies cool on the baking sheets for a few minutes before transferring them to a wire rack to cool completely.
Important Information
Nutrition Facts (Per Serving)
It is important to consider this information as approximate and not to use it as definitive health advice.
Allergy Information
Please check ingredients for potential allergens and consult a health professional if in doubt.