Strawberry Santa Hats Holiday Treats
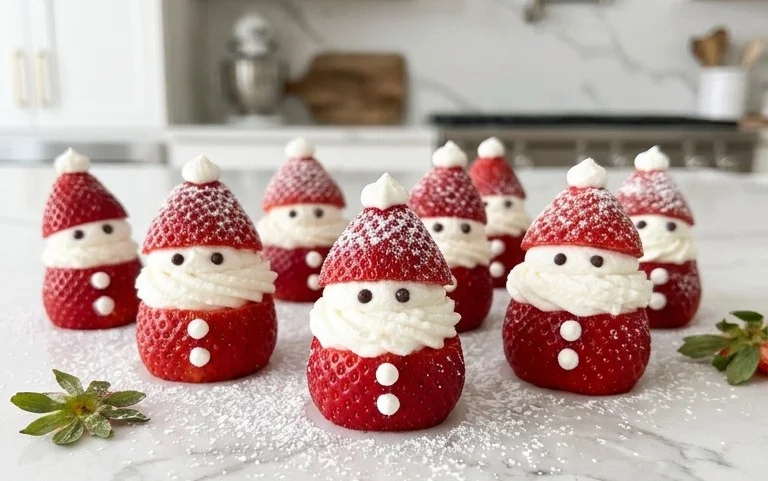
The bright red of ripe strawberries makes them look like they’re already dressed for the holidays. These Strawberry Santas are a festive treat that uses simple ingredients you probably already have. They’re incredibly fun to make, especially with kids, because the decorating part is very forgiving. You get a beautiful little Santa hat shape just by cutting off the top of a strawberry. The cream cheese filling inside is sweet and smooth, a perfect complement to the juicy berry. It’s a treat that looks like it took a lot of effort but is actually quite straightforward. Plus, who doesn’t love a bite-sized dessert that’s both pretty and tasty? Making them is a lovely way to add some homemade cheer to your Christmas table or a holiday party. The key is to choose strawberries that are firm and have a good conical shape for that iconic Santa hat look. Getting the filling just right is also important for the overall taste and texture of your Strawberry Santas.
Ingredients:
- 12 large strawberries
- 1 cup whipped cream cheese
- 2 tablespoons powdered sugar
- 1/4 teaspoon vanilla
- Decorative red and black icing for the face
Making Strawberry Santas
These little Strawberry Santas are such a fun and simple treat, perfect for holiday gatherings or just to brighten up an afternoon. The sweetness of the strawberries combined with the creamy filling and a touch of festive decoration really makes them special. I love making these with my kids because they’re so forgiving and everyone can get involved in decorating. The key is using nice, plump strawberries for the best Santa hat shape.
Preparing the Cream Cheese Filling
The filling is what makes these Santa hats really creamy and delicious. It’s super easy to mix up, and you can even make it ahead of time.
First, you’ll need your whipped cream cheese. Make sure it’s softened a bit so it mixes smoothly. If it’s too cold, you might end up with lumps. Just let it sit on the counter for about 20-30 minutes before you start.
In a medium bowl, combine the softened whipped cream cheese, powdered sugar, and vanilla extract. I like to use powdered sugar because it dissolves easily and doesn’t make the filling grainy. You can adjust the amount of powdered sugar slightly if you prefer a sweeter filling, but this amount gives a nice balance.
Now, grab a whisk or an electric mixer if you have one. You want to beat these ingredients together until everything is well combined and the mixture is light and fluffy. You’re looking for a smooth, creamy consistency that will hold its shape when piped. Avoid overmixing, especially if you’re using an electric mixer, as you don’t want to make the cream cheese too runny. Once it’s smooth, cover the bowl and pop it in the refrigerator to chill for at least 15-20 minutes. This chilling step is important because it makes the filling much easier to handle and pipe, preventing it from oozing out too much.
Assembling the Santa Hats
This is where the magic really happens and your strawberries start to transform into adorable little Santas.
First, you need to wash your strawberries very gently. Give them a rinse under cool water and pat them completely dry with paper towels. It’s really important that they are dry, otherwise, the cream cheese won’t stick properly, and your Santas might end up looking a bit messy. After washing, you’ll need to prepare the strawberries for their Santa transformation. With a small, sharp knife, carefully cut off the green leafy tops of the strawberries. You want to cut just enough so that you have a flat surface where the “hat” will sit. Be careful not to cut too deep, as you still want to retain the conical shape of the strawberry for the hat. Save those green tops, though! You can chop them up finely and use them to garnish a dessert or sprinkle them into a smoothie – no waste!
Once the tops are removed and your strawberries are dry, it’s time to get the cream cheese filling ready. Take your chilled cream cheese mixture out of the refrigerator. If you have a piping bag with a star or round tip, this is the perfect time to use it. Fill your piping bag with the cream cheese mixture. If you don’t have a piping bag, you can simply use a spoon, but a piping bag will give you much neater and more defined “hats.”
Now, pipe or spoon a generous dollop of the cream cheese mixture onto the flat, cut side of each strawberry. You want to create a fluffy “hat” shape. Think of it as building a little white cloud on top of the red strawberry. Don’t be shy with the cream cheese – this is the Santa’s hat and beard! If you’re using a piping bag, start in the center and pipe outwards in a circular motion, building up the height and fullness of the hat. If you’re using a spoon, scoop a good amount onto the strawberry and gently shape it with the back of the spoon to resemble a fluffy hat.
Decorating the Faces
This is the most fun part and where your creativity can really shine. Even if you’re not an artist, these are designed to be simple and charming.
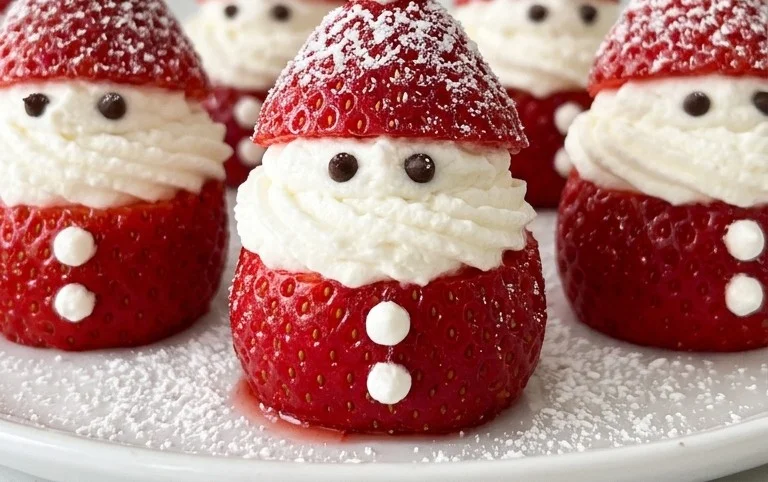
For each Strawberry Santa, you’ll need to add the little details that make them instantly recognizable. Take your decorative red icing. You’ll use this to create Santa’s little rosy cheeks. Just add two small dots of red icing on the strawberry, just below the cream cheese “hat,” on each side. These give them a cheerful, flushed look.
Next, it’s time for the eyes and mouth. Using the black icing, carefully draw two small dots for the eyes above the red cheeks. Again, keep it simple; small, round dots are perfect. Then, draw a little curved line for Santa’s smile just below the eyes. You can also add a tiny dot or two for a nose if you like, though the red cheeks often suffice. If you find the icing is too thick to pipe easily, you can often warm it up very slightly by placing the tube in a cup of warm water for a minute or two. Just be careful not to make it too hot or it will become runny.
If you want to add a little extra touch, you can also pipe a small swirl of white cream cheese or a tiny dot of white icing on the very tip of the red hat for Santa’s pom-pom. This is entirely optional, but it adds a lovely finishing touch.
Finishing Touches and Serving
Once all your Strawberry Santas are decorated, it’s time to admire your work! It’s best to serve these treats soon after decorating, as the strawberries can become a bit soft over time, especially if they sit out at room temperature for too long.
If you need to make them a little in advance, you can prepare the strawberries and the cream cheese filling ahead of time. Keep the cut strawberries in an airtight container in the refrigerator. Keep the cream cheese filling chilled in its covered bowl. Then, just before serving, assemble and decorate them. This way, the strawberries remain firm and the cream cheese filling is perfectly chilled.
These are wonderful as a light dessert after a holiday meal, or as part of a festive platter. They also make a charming addition to a children’s party snack table. Their small size and sweet flavor are always a hit with everyone, big and small. Enjoy sharing these adorable little Santas!
Conclusion:
These Strawberry Santas are a charming and simple dessert that brings a lot of festive cheer with minimal fuss. The combination of fresh strawberries and creamy, sweet filling makes them a hit with both kids and adults. They look so festive on a holiday dessert table and are a wonderful activity to do with children during the Christmas season. You can make the filling ahead of time, which really simplifies assembly when you’re ready to serve. Don’t be afraid to get creative with the decorations; even a simple dab of icing makes them look like Santa! For variations, you could add a tiny bit of orange zest to the cream cheese filling for a citrusy note, or even dip the strawberry tips in melted white chocolate before adding the red icing for a “furry” trim. These Strawberry Santas are best enjoyed fresh, but you can store any leftovers in the refrigerator for a day or two. They are a fun way to add a homemade touch to your holiday celebrations.
Frequently Asked Questions:
Can I make the cream cheese filling ahead of time?
Yes, you can definitely make the cream cheese filling up to 2 days in advance. Store it in an airtight container in the refrigerator. Let it sit at room temperature for about 10-15 minutes before piping or spooning it into the strawberries to make it easier to work with.
What kind of strawberries work best?
Firm, large strawberries with a nice, pointy shape work best for Strawberry Santas. They hold their shape well and provide a good surface for decorating. Avoid very soft or bruised strawberries.
How should I store leftover Strawberry Santas?
Store any leftover Strawberry Santas in an airtight container in the refrigerator. It’s best to eat them within 1-2 days for optimal freshness and texture, as the strawberries can become a bit watery over time.
Strawberry Santas
Adorable and festive Santa Claus figures made from strawberries, perfect for holiday parties.
Ingredients
-
12 large strawberries
-
1 cup whipped cream cheese
-
2 tablespoons powdered sugar
-
1/4 teaspoon vanilla extract
-
Decorative red icing
-
Decorative black icing
Instructions
-
Step 1
Wash and thoroughly dry the strawberries. Cut off the green tops (leaves) of about 8 of the strawberries; these will be the bodies. Cut the remaining 4 strawberries in half lengthwise; these will be the hats. -
Step 2
In a medium bowl, combine the whipped cream cheese, powdered sugar, and vanilla extract. Mix until smooth and well combined. -
Step 3
Place the cream cheese mixture into a piping bag with a star tip or a resealable plastic bag with a corner snipped off. This will be Santa’s beard and hat trim. -
Step 4
Take the strawberries with the tops cut off (the bodies). Pipe a generous swirl of cream cheese mixture onto the cut end of each strawberry to create Santa’s beard. Leave a small space at the tip for the hat. -
Step 5
Pipe a dollop of cream cheese mixture onto the pointy end of the strawberry bodies for Santa’s hat trim. Then, place one of the halved strawberry tops onto this dollop to form the hat. -
Step 6
Using the decorative red icing, add a small pom-pom at the tip of each hat. Using the decorative black icing, draw two small eyes and a small dot for Santa’s nose.
Important Information
Nutrition Facts (Per Serving)
It is important to consider this information as approximate and not to use it as definitive health advice.
Allergy Information
Please check ingredients for potential allergens and consult a health professional if in doubt.