Easy Christmas Shortbread Cookies Recipe
Easy Christmas Shortbread Cookies are a staple in my house from late November through December. Their buttery richness and tender crumb are just what the holidays call for. The beauty of shortbread lies in its simplicity; a few good ingredients, like quality butter and powdered sugar, handled with care, create something truly special. This recipe starts with a classic shortbread base, then we get a little festive by dividing some of the dough. We’ll color and flavor a portion to give our cookies that signature Christmas look, making them perfect for cookie platters or as thoughtful homemade gifts. The aroma of shortbread baking is one of my favorite holiday scents, filling the kitchen with warmth and anticipation. These are the kind of cookies that bring a smile to everyone’s face, whether they’re enjoying them with a cup of tea or hot cocoa.
Ingredients:
- 8 ounces butter (2 sticks), softened
- 1/2 cup powdered sugar
- 1 teaspoon vanilla extract
- 1 ¾ cups all-purpose flour
- 1/4 cup cornstarch
- 2 cups powdered sugar (for the glaze)
- 4 tablespoons half and half (or milk) (maybe more, for the glaze)
- 1/4 to 1 teaspoon peppermint extract (for the glaze, adjust to your taste)
- 1 tablespoon very soft butter (for the green frosting)
- 1 cup powdered sugar (for the green frosting)
- 1 1/2 to 2 tablespoons half and half (or milk) (for the green frosting)
- 1/2 teaspoon peppermint extract (for the green frosting)
- 3-4 drops green food coloring
Making the Shortbread Dough
The base of our shortbread is quite straightforward. You’ll want to start with softened butter. This means it should be pliable but not melted. If you forgot to take your butter out of the fridge in time, you can cut it into smaller cubes and let it sit on the counter for about 20-30 minutes, or gently warm it in the microwave for about 10 seconds at a time, checking frequently. In a large bowl,

Easy Christmas Shortbread Cookies
Shortbread is wonderfully simple, and this version is perfect for Christmas. It’s buttery, tender, and has just the right amount of sweetness. The secret to good shortbread is usually just a few quality ingredients handled properly. We’re going to make a batch of classic shortbread and then divide some of it to color and flavor for a festive look. These are the kind of cookies that make the kitchen smell amazing and bring a smile to everyone’s face.
Ingredients:
- 8 ounces butter (2 sticks), softened
- 1/2 cup powdered sugar
- 1 teaspoon vanilla extract
- 1 ¾ cups all-purpose flour
- 1/4 cup cornstarch
- 2 cups powdered sugar (for the glaze)
- 4 tablespoons half and half (or milk) (maybe more, for the glaze)
- 1/4 to 1 teaspoon peppermint extract (for the glaze, adjust to your taste)
- 1 tablespoon very soft butter (for the green frosting)
- 1 cup powdered sugar (for the green frosting)
- 1 1/2 to 2 tablespoons half and half (or milk) (for the green frosting)
- 1/2 teaspoon peppermint extract (for the green frosting)
- 3-4 drops green food coloring
Making the Shortbread Dough
The base of our shortbread is quite straightforward. You’ll want to start with softened butter. This means it should be pliable but not melted. If you forgot to take your butter out of the fridge in time, you can cut it into smaller cubes and let it sit on the counter for about 20-30 minutes, or gently warm it in the microwave for about 10 seconds at a time, checking frequently.
In a large bowl, cream together the softened butter and 1/2 cup of powdered sugar. Beat them until the mixture is light and fluffy. This step is important because it incorporates air, which helps with the texture of the cookies. Add the vanilla extract and mix until just combined.
Now, in a separate medium bowl, whisk together the all-purpose flour and the cornstarch. Cornstarch might seem a bit unusual in shortbread for some, but it’s a secret weapon here. It helps to make the cookies incredibly tender and crumbly in the best way possible, preventing them from becoming tough.
Gradually add the dry ingredients to the wet ingredients, mixing on low speed or by hand until a dough just begins to form. Be careful not to overmix at this stage. Overmixing can develop the gluten in the flour, leading to a tougher cookie. You want to mix just until there are no dry streaks of flour remaining. The dough will be crumbly at first but should hold together when you press it.
Shaping and Baking the Shortbread
Turn the dough out onto a lightly floured surface and gently bring it together into a ball. You can either roll the dough out to about 1/2 inch thickness and cut it into shapes using cookie cutters, or you can press the dough into an 8×8 inch baking pan, smoothing the top evenly. For a classic shortbread look, pressing it into a pan and scoring it into wedges before baking is also a lovely option. If you are using cookie cutters, chill the dough for about 20-30 minutes before cutting. This makes it much easier to handle and prevents the shapes from spreading too much during baking.
Preheat your oven to 325 degrees Fahrenheit (160 degrees Celsius). Line baking sheets with parchment paper if you’re cutting out shapes. If you’re baking in a pan, you can just bake directly in the pan.
Bake the shortbread for 20-25 minutes if cut into shapes, or 25-30 minutes if baked in a pan. You’re looking for the edges to be lightly golden brown. The centers should still look pale; they will firm up as they cool. Be careful not to overbake them, as this is the quickest way to tough shortbread. Once baked, let the cookies cool on the baking sheet for about 5-10 minutes before transferring them to a wire rack to cool completely. If you baked in a pan, let it cool for about 10 minutes, then cut into wedges if you haven’t already, and then transfer to a wire rack to cool completely.
Decorating for Christmas Cheer
Once the cookies are completely cool, it’s time for the festive touches. We’re making a simple glaze and a pretty green frosting.
White Peppermint Glaze
In a medium bowl, whisk together 2 cups of powdered sugar, 4 tablespoons of half and half (or milk), and 1/4 to 1 teaspoon of peppermint extract. Start with 1/4 teaspoon of peppermint extract and taste it. You can add more, up to a full teaspoon, depending on how strong you like the peppermint flavor. If the glaze is too thick, add more half and half or milk, a teaspoon at a time, until it reaches a pourable, but not watery, consistency. If it’s too thin, add more powdered sugar. Drizzle this over your cooled shortbread cookies.
Green Peppermint Frosting
For the green accents, in a small bowl, beat together 1 tablespoon of very soft butter with 1 cup of powdered sugar and 1 1/2 to 2 tablespoons of half and half (or milk) and 1/2 teaspoon of peppermint extract. Add the green food coloring, starting with 3 drops and adding more if you want a deeper green. Beat until smooth and creamy. You can use a piping bag with a small tip to create designs, or simply use a small spoon or offset spatula to spread a thin layer of frosting on some of the cookies.
Let the glaze and frosting set completely before storing the cookies. This usually takes about an hour.
Storage and Serving
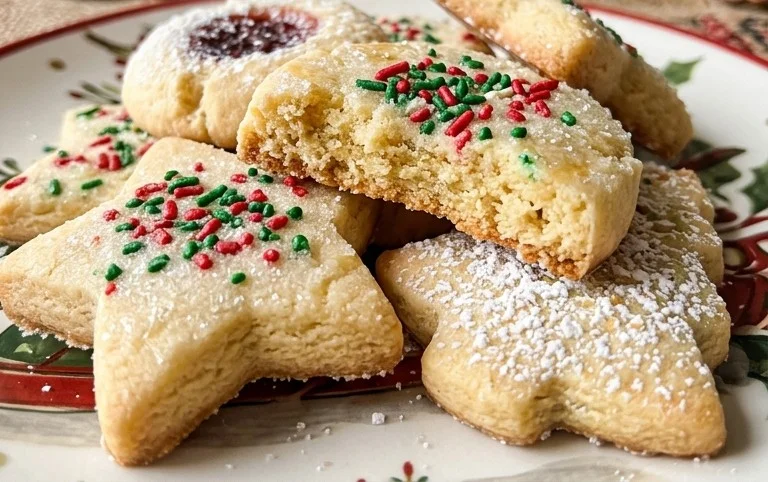
Store your Easy Christmas Shortbread Cookies in an airtight container at room temperature for up to a week. They don’t need to be refrigerated. These cookies are wonderful on their own with a cup of tea or coffee, or served with a glass of cold milk. They also make fantastic edible gifts. Package them in festive tins or cellophane bags tied with ribbon for a personal touch. The combination of the buttery shortbread and the subtle peppermint flavor with the festive colors makes them a truly delightful holiday treat.
Conclusion:
Whipping up these Easy Christmas Shortbread Cookies is a wonderfully satisfying way to bring a touch of homemade charm to your holiday season. Their crisp yet tender texture, rich buttery flavor, and simple elegance make them a perfect addition to any festive gathering or a thoughtful handmade gift. They are simple enough for a beginner baker but impressive enough to share with anyone. The ability to customize the glaze and frosting allows for endless creativity, ensuring your cookies look as good as they taste. Don’t hesitate to get the kids involved in decorating; it’s a fun activity for all ages!
For serving, shortbread cookies are fantastic on their own, paired with a cup of tea or coffee, or as part of a larger cookie assortment. They also pair beautifully with hot chocolate during winter evenings. You can easily vary the extract in the glaze, perhaps trying almond or orange instead of peppermint, or even leaving it plain. For a different look, try cutting the dough into festive shapes using cookie cutters before baking. Store cooled cookies in an airtight container at room temperature for up to a week; they tend to stay fresh and delicious.
Frequently Asked Questions
-
Can I make the shortbread dough ahead of time?
Yes, you can absolutely make the shortbread dough in advance. Once it’s made and chilled, it can be stored in the refrigerator for up to 3 days. Let it soften slightly at room temperature for about 15-20 minutes before shaping and baking. This can be a real time-saver during busy holiday preparations.
-
How do I get a smooth glaze?
To achieve a smooth glaze, ensure your powdered sugar is well-sifted to remove any lumps. Start with the smaller amount of liquid (half and half or milk) and add more gradually, whisking constantly, until you reach your desired drizzling consistency. If it becomes too thin, you can add a little more sifted powdered sugar to thicken it up.
Easy Christmas Shortbread Cookies
Delicious and easy-to-make shortbread cookies perfect for the holiday season. This recipe yields buttery shortbread with a festive green swirl and a hint of peppermint.
Ingredients
-
8 ounces butter, softened
-
1/2 cup powdered sugar
-
1 teaspoon vanilla extract
-
1 ¾ cups all-purpose flour
-
¼ cup cornstarch
-
2 cups powdered sugar
-
4 tablespoons half and half
-
1/4 teaspoon peppermint extract
-
1 tablespoon very soft butter
-
1 cup powdered sugar
-
1 1/2 tablespoons half and half
-
1/2 teaspoon peppermint extract
-
3 drops green food coloring
Instructions
-
Step 1
Cream together 8 ounces of softened butter and 1/2 cup of powdered sugar until light and fluffy. Stir in 1 teaspoon of vanilla extract. -
Step 2
In a separate bowl, whisk together 1 ¾ cups of all-purpose flour and ¼ cup of cornstarch. Gradually add the flour mixture to the butter mixture, mixing until just combined. -
Step 3
Divide the dough into two portions. To one portion, add 2 cups of powdered sugar, 4 tablespoons of half and half, and ¼ teaspoon of peppermint extract. Mix well. If the mixture is too dry, add a little more half and half, one teaspoon at a time, until it forms a soft dough. -
Step 4
To the other portion of dough, add 1 tablespoon of very soft butter, 1 cup of powdered sugar, 1 ½ tablespoons of half and half, ½ teaspoon of peppermint extract, and 3 drops of green food coloring. Mix until the color is evenly distributed and a soft dough forms. Adjust the green food coloring for desired shade. -
Step 5
On a lightly floured surface, roll out the green dough into a rectangle. Spread the white dough evenly over the green dough. Tightly roll the dough from the long side into a log. -
Step 6
Wrap the log in parchment paper and chill in the refrigerator for at least 20 minutes, or until firm enough to slice. -
Step 7
Preheat oven to 325°F (160°C). Line baking sheets with parchment paper. Slice the chilled dough into ¼-inch thick cookies and place them on the prepared baking sheets. -
Step 8
Bake for 10-12 minutes, or until the edges are lightly golden. Let the cookies cool on the baking sheets for a few minutes before transferring them to a wire rack to cool completely.
Important Information
Nutrition Facts (Per Serving)
It is important to consider this information as approximate and not to use it as definitive health advice.
Allergy Information
Please check ingredients for potential allergens and consult a health professional if in doubt.