Wendys Chili: Craving that warm, hearty bowl of chili that tastes just like Wendy’s, but without the drive-thru line? You’re in the right place! I’ve cracked the code to bring that iconic flavor right to your kitchen. Forget those bland, watery chili recipes; this one is packed with rich, savory goodness that will have everyone asking for seconds.
Chili, in its essence, is a dish born from resourcefulness and a desire for comfort. While the exact origins are debated, its roots are deeply intertwined with the American Southwest, particularly Texas. It’s a dish that embodies community, often shared at gatherings and celebrations. Over time, regional variations have emerged, each with its own unique twist. Wendy’s Chili, with its distinctive blend of ground beef, beans, and spices, has become a beloved fast-food staple, offering a taste of that classic comfort in a convenient package.
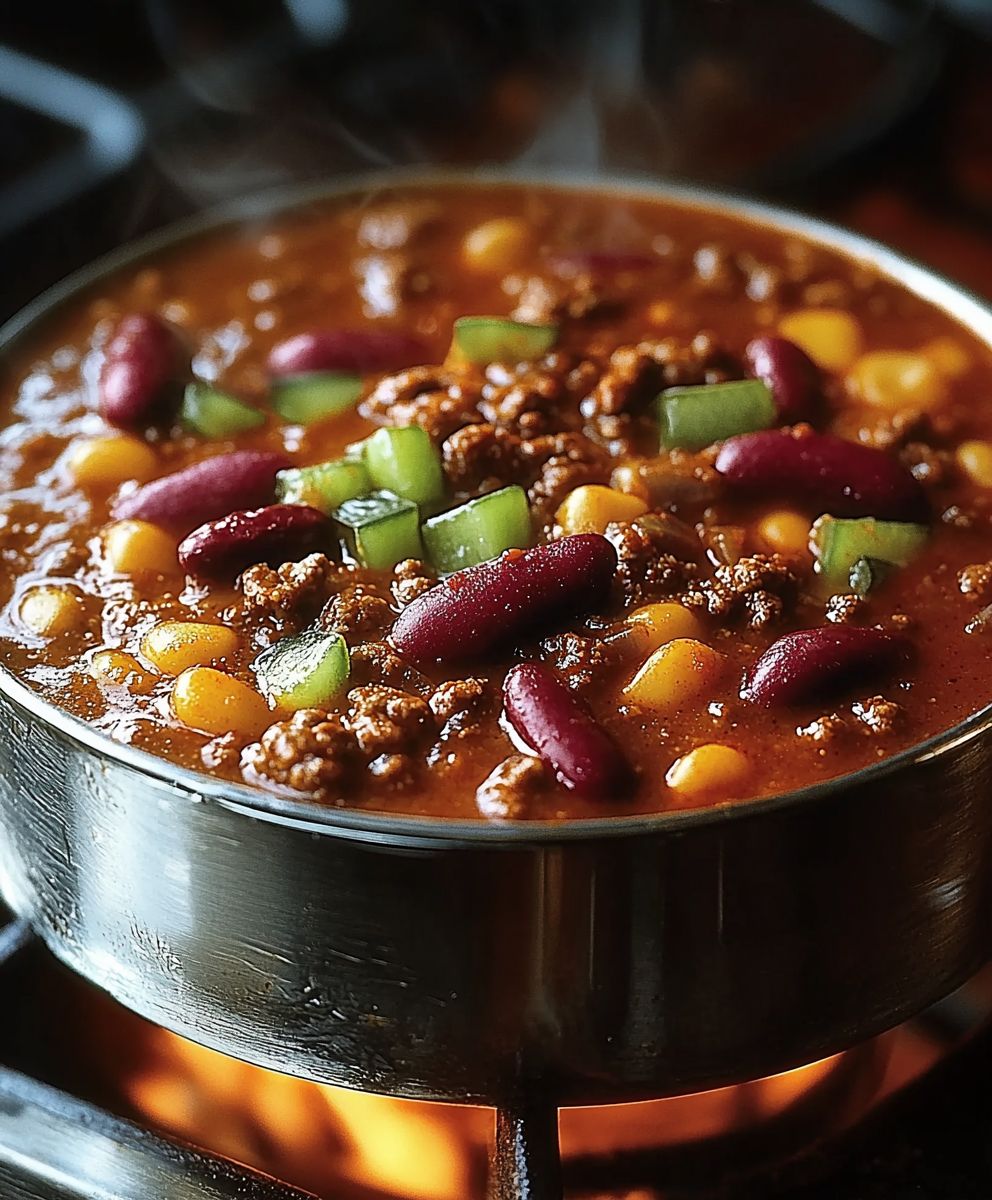
What makes Wendys Chili so irresistible? It’s the perfect balance of textures tender ground beef, soft beans, and a slightly chunky consistency that’s incredibly satisfying. The flavor profile is a symphony of savory, slightly spicy, and subtly sweet notes that dance on your palate. Plus, it’s incredibly versatile! Enjoy it straight from the bowl, top it with cheese and sour cream, or use it as a delicious topping for baked potatoes or nachos. This recipe is not only delicious but also a fantastic way to use up leftover cooked ground beef, making it a budget-friendly and time-saving option for busy weeknights. Get ready to experience chili perfection!
Ingredients:
- 2 pounds ground beef (80/20 blend recommended)
- 1 large yellow onion, chopped
- 2 green bell peppers, chopped
- 2 cloves garlic, minced
- 1 (28 ounce) can crushed tomatoes
- 1 (15 ounce) can tomato sauce
- 1 (15 ounce) can diced tomatoes, undrained
- 1 (15 ounce) can kidney beans, drained and rinsed
- 1 (15 ounce) can pinto beans, drained and rinsed
- 1 (15 ounce) can chili beans, undrained
- 1 cup beef broth
- 2 tablespoons chili powder
- 1 tablespoon cumin
- 1 teaspoon smoked paprika
- 1 teaspoon oregano
- 1/2 teaspoon cayenne pepper (or more, to taste)
- 1/2 teaspoon garlic powder
- 1/2 teaspoon onion powder
- 1/4 teaspoon ground black pepper
- 1/4 teaspoon salt (or more, to taste)
- 1 tablespoon apple cider vinegar
- Optional toppings: shredded cheddar cheese, sour cream, chopped green onions, hot sauce
Browning the Beef and Sautéing Vegetables
- Brown the Ground Beef: In a large, heavy-bottomed pot or Dutch oven, brown the ground beef over medium-high heat. Break it up with a spoon as it cooks. You want to get a nice, even browning on the beef. Don’t overcrowd the pot; if necessary, brown the beef in batches to ensure proper browning. This step is crucial for developing a rich, deep flavor in your chili.
- Drain Excess Grease: Once the beef is browned, carefully drain off any excess grease. Leaving too much grease in the pot will make the chili greasy and less appealing. I usually tilt the pot and use a spoon to hold back the beef while pouring off the grease into a heat-safe container.
- Sauté the Onion and Bell Pepper: Add the chopped onion and green bell pepper to the pot with the browned beef. Cook, stirring occasionally, until the vegetables are softened and translucent, about 5-7 minutes. This step helps to build a flavorful base for the chili. The onions should become slightly sweet and the bell peppers should lose their crispness.
- Add the Garlic: Stir in the minced garlic and cook for another minute, until fragrant. Be careful not to burn the garlic, as it can become bitter. The aroma of the garlic will fill your kitchen, signaling that you’re on the right track!
Adding the Tomatoes, Beans, and Broth
- Incorporate the Tomatoes: Add the crushed tomatoes, tomato sauce, and diced tomatoes (undrained) to the pot. Stir well to combine all the ingredients. The tomatoes will provide the liquid base for the chili and contribute to its rich, tangy flavor.
- Add the Beans: Add the drained and rinsed kidney beans and pinto beans, along with the undrained chili beans, to the pot. Stir to distribute the beans evenly throughout the mixture. Using a variety of beans adds texture and complexity to the chili. The chili beans already have a flavorful sauce, so don’t drain them!
- Pour in the Beef Broth: Pour in the beef broth. This will add moisture and depth of flavor to the chili. You can use low-sodium beef broth to control the salt content of the final dish.
Seasoning and Simmering the Chili
- Add the Spices: Add the chili powder, cumin, smoked paprika, oregano, cayenne pepper, garlic powder, onion powder, black pepper, and salt to the pot. Stir well to ensure that the spices are evenly distributed throughout the chili. This is where you can really customize the flavor of your chili. Adjust the amount of cayenne pepper to your desired level of spiciness.
- Simmer the Chili: Bring the chili to a simmer over medium heat, then reduce the heat to low, cover the pot, and simmer for at least 1 hour, or up to 2-3 hours, stirring occasionally. The longer the chili simmers, the more the flavors will meld together and the richer it will become. If the chili becomes too thick during simmering, add a little more beef broth or water to thin it out.
- Add Apple Cider Vinegar: Stir in the apple cider vinegar during the last 15 minutes of simmering. This adds a touch of acidity that brightens the flavors of the chili and balances the richness.
- Taste and Adjust Seasoning: Taste the chili and adjust the seasoning as needed. You may want to add more salt, pepper, chili powder, or cayenne pepper to suit your taste. Remember that the flavors will continue to develop as the chili sits, so don’t over-season it initially.
Serving the Chili
- Serve Hot: Ladle the chili into bowls and serve hot.
- Add Toppings (Optional): Offer a variety of toppings, such as shredded cheddar cheese, sour cream, chopped green onions, and hot sauce, for your guests to customize their chili. These toppings add texture, flavor, and visual appeal to the dish.
- Enjoy! Enjoy your homemade Wendy’s-style chili! It’s perfect for a cold winter day or any time you’re craving a hearty and flavorful meal.
Tips and Variations:
- For a thicker chili: You can mash some of the beans with a fork or potato masher to thicken the chili. Alternatively, you can mix a tablespoon of cornstarch with a tablespoon of cold water and stir it into the chili during the last 30 minutes of simmering.
- For a spicier chili: Add more cayenne pepper or a pinch of red pepper flakes. You can also use a hotter variety of chili powder.
- For a sweeter chili: Add a tablespoon of brown sugar or molasses.
- For a vegetarian chili: Substitute the ground beef with plant-based ground meat or an additional can of beans. Use vegetable broth instead of beef broth.
- Slow Cooker Option: You can also make this chili in a slow cooker. Brown the ground beef and sauté the vegetables as directed, then transfer everything to the slow cooker. Cook on low for 6-8 hours or on high for 3-4 hours.
- Freezing Instructions: Chili freezes well. Let the chili cool completely before transferring it to freezer-safe containers or bags. Freeze for up to 3 months. Thaw overnight in the refrigerator before reheating.
Make it your own!
This recipe is a great starting point, but feel free to experiment with different ingredients and seasonings to create your own signature chili. Don’t be afraid to try new things and have fun in the kitchen!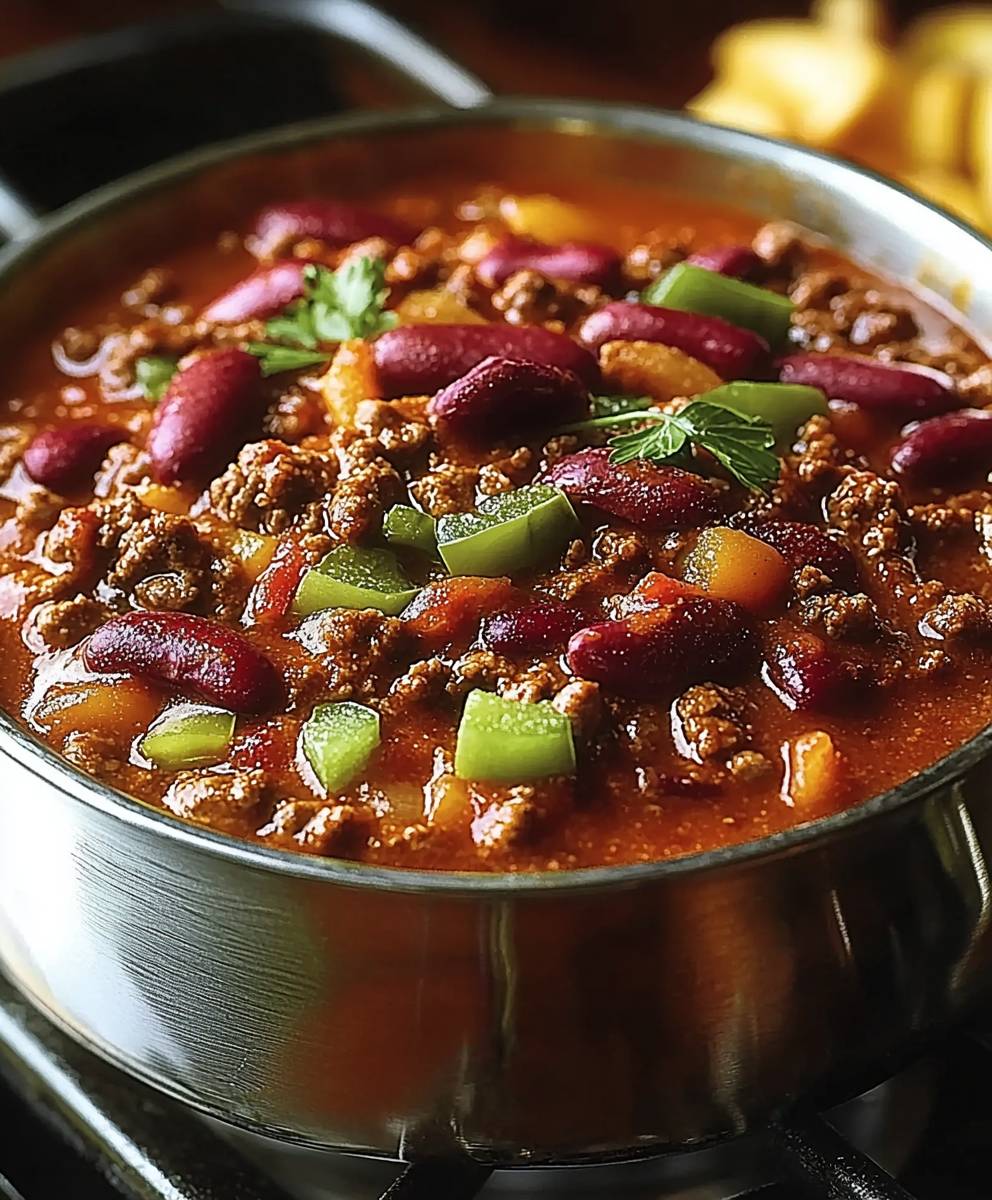
Conclusion:
So, there you have it! This Wendy’s Chili recipe is more than just a copycat; it’s a warm, comforting hug in a bowl, a flavor explosion that will transport you straight back to those cozy Wendy’s moments. But honestly, it’s even better because you made it yourself, with love (and maybe a little bit of spice!). Why is this a must-try? Because it’s incredibly easy, budget-friendly, and delivers that authentic Wendy’s Chili taste without ever leaving your kitchen. Forget those last-minute fast-food runs; now you can whip up a batch of this deliciousness whenever the craving hits. And the best part? It’s incredibly versatile! Looking for serving suggestions? Oh, I have plenty! A classic dollop of sour cream and a sprinkle of shredded cheddar cheese are always a winning combination. But don’t stop there! Try adding a swirl of hot sauce for an extra kick, or a sprinkle of chopped green onions for a fresh, vibrant flavor. A side of warm, crusty bread or some buttery crackers is perfect for soaking up every last drop of that savory chili goodness. But the variations are where the real fun begins! Feeling adventurous? Add a can of drained and rinsed black beans for a heartier chili. Want to sneak in some extra veggies? Finely diced bell peppers or zucchini blend seamlessly into the mix. For a richer, smokier flavor, try using smoked paprika instead of regular paprika. And if you’re a meat lover, consider adding a pound of browned ground sausage along with the ground beef. The possibilities are truly endless! You can even make it vegetarian by substituting the ground beef with plant-based crumbles and using vegetable broth. This recipe is also fantastic for meal prepping. Make a big batch on Sunday and enjoy it for lunch or dinner throughout the week. It reheats beautifully and tastes even better the next day as the flavors meld together. Plus, it’s a great way to use up leftover cooked ground beef, making it a sustainable and economical choice. I’ve poured my heart into perfecting this recipe, and I truly believe you’ll love it as much as I do. It’s the perfect weeknight meal, a crowd-pleasing party dish, or a comforting treat on a chilly day. It’s a recipe that’s sure to become a staple in your household. So, what are you waiting for? Gather your ingredients, put on your apron, and get ready to create some chili magic! I’m confident that you’ll be amazed at how easy and delicious this Wendy’s Chili recipe is. Now, for the most important part: I want to hear about your experience! Did you try the recipe? What variations did you make? What did your family and friends think? Share your photos, comments, and suggestions in the comments section below. I’m always eager to learn from your culinary adventures and see how you’ve made this recipe your own. Don’t be shy; let’s create a community of chili lovers and share our passion for this classic comfort food! Happy cooking! Print
Wendy’s Chili: The Ultimate Guide to Ingredients, Taste, and More
- Total Time: 200 minutes
- Yield: 6–8 servings 1x
Description
Hearty, flavorful homemade chili, reminiscent of Wendy’s, packed with ground beef, beans, and savory spices. Perfect for a comforting meal.
Ingredients
- 2 pounds ground beef (80/20 blend recommended)
- 1 large yellow onion, chopped
- 2 green bell peppers, chopped
- 2 cloves garlic, minced
- 1 (28 ounce) can crushed tomatoes
- 1 (15 ounce) can tomato sauce
- 1 (15 ounce) can diced tomatoes, undrained
- 1 (15 ounce) can kidney beans, drained and rinsed
- 1 (15 ounce) can pinto beans, drained and rinsed
- 1 (15 ounce) can chili beans, undrained
- 1 cup beef broth
- 2 tablespoons chili powder
- 1 tablespoon cumin
- 1 teaspoon smoked paprika
- 1 teaspoon oregano
- 1/2 teaspoon cayenne pepper (or more, to taste)
- 1/2 teaspoon garlic powder
- 1/2 teaspoon onion powder
- 1/4 teaspoon ground black pepper
- 1/4 teaspoon salt (or more, to taste)
- 1 tablespoon apple cider vinegar
Instructions
- Brown the Ground Beef: In a large, heavy-bottomed pot or Dutch oven, brown the ground beef over medium-high heat. Break it up with a spoon as it cooks. Drain off any excess grease.
- Sauté the Onion and Bell Pepper: Add the chopped onion and green bell pepper to the pot with the browned beef. Cook, stirring occasionally, until the vegetables are softened and translucent, about 5-7 minutes.
- Add the Garlic: Stir in the minced garlic and cook for another minute, until fragrant.
- Incorporate the Tomatoes: Add the crushed tomatoes, tomato sauce, and diced tomatoes (undrained) to the pot. Stir well to combine all the ingredients.
- Add the Beans: Add the drained and rinsed kidney beans and pinto beans, along with the undrained chili beans, to the pot. Stir to distribute the beans evenly throughout the mixture.
- Pour in the Beef Broth: Pour in the beef broth.
- Add the Spices: Add the chili powder, cumin, smoked paprika, oregano, cayenne pepper, garlic powder, onion powder, black pepper, and salt to the pot. Stir well to ensure that the spices are evenly distributed throughout the chili.
- Simmer the Chili: Bring the chili to a simmer over medium heat, then reduce the heat to low, cover the pot, and simmer for at least 1 hour, or up to 2-3 hours, stirring occasionally. If the chili becomes too thick during simmering, add a little more beef broth or water to thin it out.
- Add Apple Cider Vinegar: Stir in the apple cider vinegar during the last 15 minutes of simmering.
- Taste and Adjust Seasoning: Taste the chili and adjust the seasoning as needed.
- Serve Hot: Ladle the chili into bowls and serve hot.
- Add Toppings (Optional): Offer a variety of toppings, such as shredded cheddar cheese, sour cream, chopped green onions, and hot sauce, for your guests to customize their chili.
Notes
- For a thicker chili: Mash some of the beans or add a cornstarch slurry (1 tbsp cornstarch + 1 tbsp cold water).
- For a spicier chili: Add more cayenne pepper or red pepper flakes.
- For a sweeter chili: Add a tablespoon of brown sugar or molasses.
- For a vegetarian chili: Substitute the ground beef with plant-based ground meat or an additional can of beans. Use vegetable broth instead of beef broth.
- Slow Cooker Option: Brown beef and saute vegetables, then transfer everything to the slow cooker. Cook on low for 6-8 hours or on high for 3-4 hours.
- Freezing Instructions: Let the chili cool completely before transferring it to freezer-safe containers or bags. Freeze for up to 3 months. Thaw overnight in the refrigerator before reheating.
- Prep Time: 20 minutes
- Cook Time: 60 minutes