Small batch peanut butter cookies, warm from the oven, are a simple pleasure that can brighten even the dreariest day. Imagine sinking your teeth into a soft, chewy cookie, the rich peanut butter flavor melting on your tongue. Is your mouth watering yet? Mine is!
Peanut butter cookies have a special place in American baking history, gaining popularity in the early 20th century. While the exact origin is debated, they quickly became a beloved treat, especially during the Great Depression when peanut butter was an affordable and readily available source of protein. These cookies offered a comforting and satisfying indulgence during challenging times.
What makes these cookies so irresistible? It’s the perfect combination of sweet and salty, the delightful chewiness, and the nostalgic feeling they evoke. But sometimes, you don’t need a whole batch staring back at you, tempting you to overindulge. That’s where this recipe for small batch peanut butter cookies comes in! It’s perfect for satisfying a craving without the guilt of having dozens of cookies around. This recipe yields just the right amount for a small family or a solo treat, ensuring every bite is as fresh and delicious as the last. So, let’s get baking and enjoy these delightful little gems!

Ingredients:
- 1/2 cup (1 stick) unsalted butter, softened
- 1/2 cup creamy peanut butter
- 1/2 cup granulated sugar
- 1/2 cup packed light brown sugar
- 1 large egg
- 1 teaspoon vanilla extract
- 1 1/4 cups all-purpose flour
- 3/4 teaspoon baking soda
- 1/4 teaspoon salt
- Optional: Granulated sugar, for rolling
- Optional: Chocolate chips or chopped peanuts, for topping
Preparing the Dough:
- Cream Together the Butter and Sugars: In a large bowl, or the bowl of your stand mixer, cream together the softened butter, peanut butter, granulated sugar, and brown sugar until light and fluffy. This usually takes about 3-5 minutes. Make sure to scrape down the sides of the bowl occasionally to ensure everything is evenly incorporated. The mixture should be pale and airy. This step is crucial for achieving a tender cookie.
- Incorporate the Egg and Vanilla: Beat in the egg and vanilla extract until well combined. Again, scrape down the sides of the bowl to ensure everything is mixed evenly. The mixture should be smooth and homogenous.
- Dry Ingredients: In a separate medium bowl, whisk together the all-purpose flour, baking soda, and salt. Whisking ensures that the baking soda and salt are evenly distributed throughout the flour, which is important for proper leavening and flavor.
- Combine Wet and Dry: Gradually add the dry ingredients to the wet ingredients, mixing on low speed until just combined. Be careful not to overmix! Overmixing can develop the gluten in the flour, resulting in tough cookies. Mix until the flour is just incorporated and no streaks of flour remain.
- Chill the Dough (Important!): Cover the bowl with plastic wrap and chill the dough in the refrigerator for at least 30 minutes, or up to 2 hours. Chilling the dough prevents the cookies from spreading too much during baking and allows the flavors to meld together. It also makes the dough easier to handle.
Baking the Cookies:
- Preheat the Oven: Preheat your oven to 375°F (190°C). Line a baking sheet with parchment paper or a silicone baking mat. Parchment paper helps prevent the cookies from sticking and makes cleanup easier.
- Shape the Cookies: Remove the chilled dough from the refrigerator. Using a cookie scoop or a spoon, scoop out rounded tablespoons of dough. Roll each scoop into a ball.
- Optional: Roll in Sugar: If desired, roll each ball of dough in granulated sugar before placing it on the baking sheet. This adds a nice sparkle and extra sweetness to the cookies.
- Arrange on Baking Sheet: Place the dough balls on the prepared baking sheet, leaving about 2 inches between each cookie to allow for spreading.
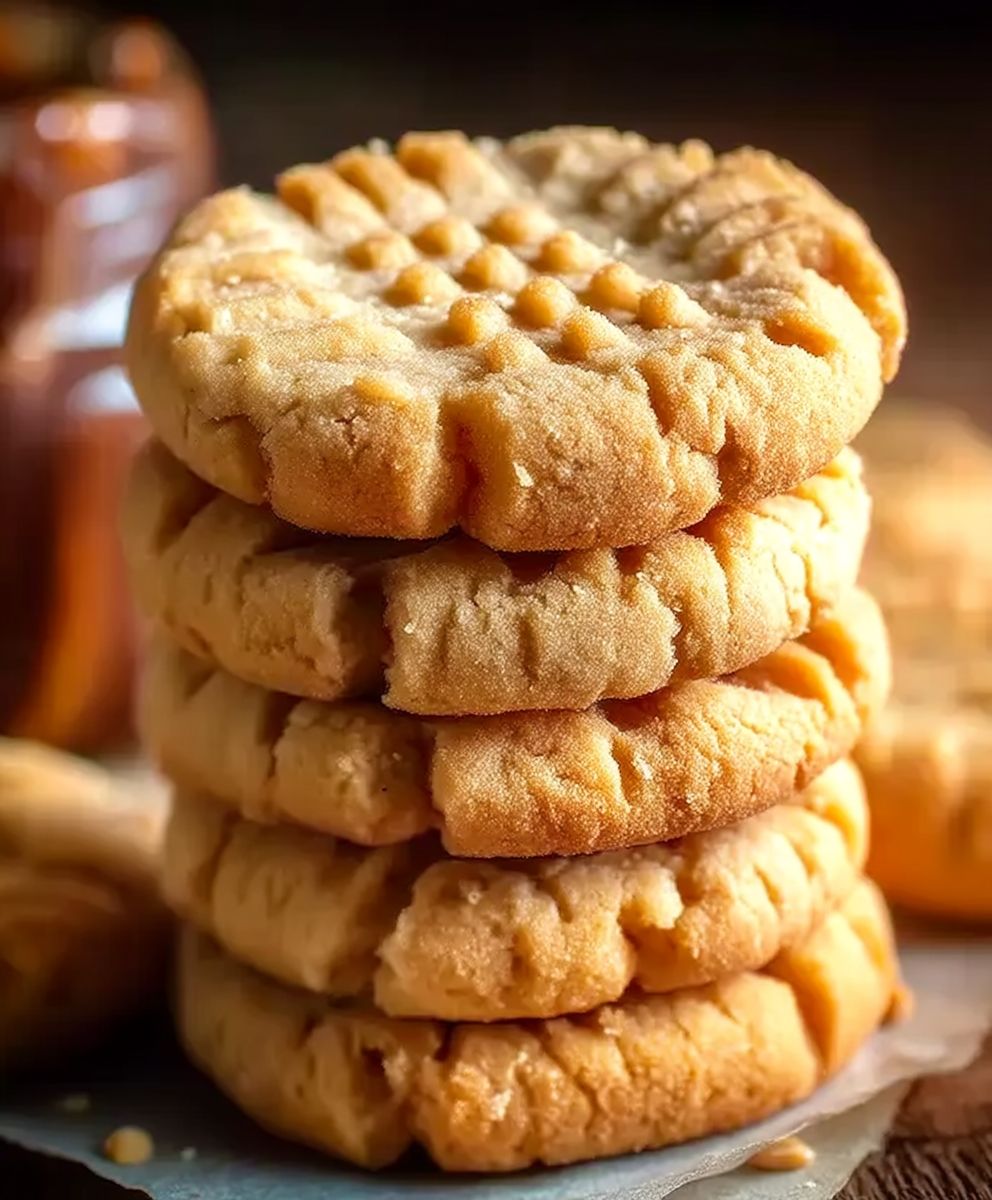
- Flatten with a Fork: Use a fork to gently flatten each cookie in a criss-cross pattern. This helps the cookies bake evenly and creates the classic peanut butter cookie look. Dip the fork in sugar between cookies to prevent it from sticking.
- Add Toppings (Optional): If desired, press chocolate chips or chopped peanuts into the tops of the cookies before baking.
- Bake: Bake for 8-10 minutes, or until the edges are lightly golden brown and the centers are set. Be careful not to overbake, as this can result in dry cookies.
- Cool: Remove the baking sheet from the oven and let the cookies cool on the baking sheet for a few minutes before transferring them to a wire rack to cool completely. This allows the cookies to firm up slightly and prevents them from breaking.
Tips for Perfect Peanut Butter Cookies:
- Use Room Temperature Ingredients: Using room temperature butter and eggs helps the ingredients emulsify properly, resulting in a smoother batter and more tender cookies.
- Don’t Overmix: Overmixing the dough can develop the gluten in the flour, leading to tough cookies. Mix until the flour is just incorporated.
- Chill the Dough: Chilling the dough is crucial for preventing the cookies from spreading too much during baking. It also allows the flavors to meld together.
- Don’t Overbake: Overbaking can result in dry cookies. Bake until the edges are lightly golden brown and the centers are set.
- Adjust Baking Time: Baking times may vary depending on your oven. Keep a close eye on the cookies and adjust the baking time as needed.
- Storage: Store the cooled cookies in an airtight container at room temperature for up to 5 days.
- Freezing: You can freeze the unbaked cookie dough for up to 2 months. Simply scoop the dough into balls, place them on a baking sheet, and freeze until solid. Then, transfer the frozen dough balls to a freezer bag. When ready to bake, bake from frozen, adding a few extra minutes to the baking time. You can also freeze the baked cookies for up to 2 months.
- Variations: Get creative with your peanut butter cookies! Try adding chocolate chips, chopped peanuts, or a sprinkle of sea salt to the tops of the cookies before baking. You can also use different types of peanut butter, such as crunchy peanut butter, for a different texture.
- Troubleshooting: Flat Cookies: If your cookies are spreading too much, make sure you are chilling the dough for long enough. You can also try adding a tablespoon or two of flour to the dough.
- Troubleshooting: Dry Cookies: If your cookies are dry, make sure you are not overbaking them. You can also try adding a tablespoon of milk or sour cream to the dough.
Peanut Butter Cookie Variations:
- Chocolate Chip Peanut Butter Cookies: Add 1 cup of chocolate chips to the dough before chilling.
- Peanut Butter Cup Cookies: Press a mini peanut butter cup into the center of each cookie after baking.
- Double Peanut Butter Cookies: Use crunchy peanut butter and add chopped peanuts to the dough.
- Peanut Butter Oatmeal Cookies: Substitute 1/2 cup of the flour with 1/2 cup of rolled oats.
- Peanut Butter Blossoms: Roll the dough balls in granulated sugar and bake. After baking, press a Hershey’s Kiss into the center of each cookie.
Why This Recipe Works:
This small-batch peanut butter cookie recipe is perfect for when you want a sweet treat without making a huge batch. The use of both granulated and brown sugar creates a perfect balance of sweetness and chewiness. Chilling the dough is essential for preventing the cookies from spreading too much and ensures a soft, chewy texture. The addition of baking soda helps the cookies rise and become light and airy. The classic fork marks not only look great but also help the cookies bake evenly.
Serving Suggestions:
These peanut butter cookies are delicious on their own, but they also pair well with a variety of beverages. Enjoy them with a glass of cold milk, a cup of hot coffee, or a scoop of vanilla ice cream. They are also a great addition to a cookie platter or a dessert buffet.
Nutritional Information (Approximate):
Please note that the nutritional information is an estimate and may vary depending on the specific ingredients used.
- Calories: Approximately 150-200 per cookie
- Fat: Approximately 8-12 grams per cookie
- Protein: Approximately 3-4 grams per cookie
- Carbohydrates: Approximately 15-20 grams per cookie
Enjoy Your Homemade Peanut Butter Cookies!
I hope you enjoy this small-batch peanut butter cookie recipe as much as I do! They are easy to make, incredibly delicious, and perfect for satisfying your sweet cravings. Happy baking!
Conclusion:
And there you have it! These small batch peanut butter cookies are truly a must-try for anyone craving that classic, comforting flavor without being overwhelmed by dozens of cookies tempting you from the counter. I know Ive made my fair share of huge batches, only to end up eating way more than I intended! This recipe solves that problem perfectly.
But why are these cookies so special? It’s the perfect balance of sweet and salty, the delightful chewiness, and that unmistakable peanut butter aroma that fills your kitchen as they bake. Plus, the small batch aspect makes them incredibly convenient for a quick weeknight treat or a spontaneous weekend baking session. No need to worry about having all day to dedicate to baking!
Beyond the sheer deliciousness and convenience, these cookies are also incredibly versatile. Want to elevate them even further? Consider adding a sprinkle of sea salt on top before baking for an extra layer of flavor complexity. Or, for a chocolatey twist, press a few chocolate chips into the dough just after they come out of the oven. The warmth will melt the chocolate slightly, creating a gooey, irresistible addition.
Serving suggestions are endless! These small batch peanut butter cookies are fantastic on their own with a cold glass of milk or a warm cup of coffee. They also make a wonderful addition to an ice cream sundae, crumbled on top for added texture and flavor. For a truly decadent treat, try making peanut butter cookie ice cream sandwiches! Simply sandwich a scoop of your favorite vanilla or chocolate ice cream between two cookies and enjoy. You can even get creative with the ice cream flavors peanut butter cup ice cream would be a match made in heaven!
Another fun variation is to experiment with different types of peanut butter. While I personally love using creamy peanut butter for its smooth texture, you could also try using chunky peanut butter for added crunch. Or, for a more intense peanut butter flavor, use natural peanut butter (just be sure to stir it well before using). You can even try using different nut butters altogether, such as almond butter or cashew butter, for a unique twist.
I truly believe that this recipe for small batch peanut butter cookies will become a staple in your baking repertoire. It’s simple, quick, and yields incredibly satisfying results. The small batch size is perfect for portion control and prevents food waste, while the versatility of the recipe allows you to customize it to your own preferences.
So, what are you waiting for? Preheat your oven, gather your ingredients, and get ready to experience the joy of baking these delightful cookies. Im confident that youll love them as much as I do.
And most importantly, I would absolutely love to hear about your experience! Did you try any of the variations I suggested? Did you add your own unique twist? Share your photos and stories in the comments below. Let’s create a community of peanut butter cookie lovers and inspire each other with our baking adventures! Happy baking!
Small Batch Peanut Butter Cookies: The Perfect Recipe
Classic, soft, and chewy peanut butter cookies. This small-batch recipe is perfect for satisfying your sweet tooth!
Ingredients
- 1/2 cup (1 stick) unsalted butter, softened
- 1/2 cup creamy peanut butter
- 1/2 cup granulated sugar
- 1/2 cup packed light brown sugar
- 1 large egg
- 1 teaspoon vanilla extract
- 1 1/4 cups all-purpose flour
- 3/4 teaspoon baking soda
- 1/4 teaspoon salt
- Optional: Granulated sugar, for rolling
- Optional: Chocolate chips or chopped peanuts, for topping
Instructions
- Cream Together the Butter and Sugars: In a large bowl, or the bowl of your stand mixer, cream together the softened butter, peanut butter, granulated sugar, and brown sugar until light and fluffy. This usually takes about 3-5 minutes. Scrape down the sides of the bowl occasionally to ensure everything is evenly incorporated. The mixture should be pale and airy.
- Incorporate the Egg and Vanilla: Beat in the egg and vanilla extract until well combined. Scrape down the sides of the bowl to ensure everything is mixed evenly. The mixture should be smooth and homogenous.
- Dry Ingredients: In a separate medium bowl, whisk together the all-purpose flour, baking soda, and salt.
- Combine Wet and Dry: Gradually add the dry ingredients to the wet ingredients, mixing on low speed until just combined. Be careful not to overmix! Mix until the flour is just incorporated and no streaks of flour remain.
- Chill the Dough (Important!): Cover the bowl with plastic wrap and chill the dough in the refrigerator for at least 30 minutes, or up to 2 hours.
- Preheat the Oven: Preheat your oven to 375°F (190°C). Line a baking sheet with parchment paper or a silicone baking mat.
- Shape the Cookies: Remove the chilled dough from the refrigerator. Using a cookie scoop or a spoon, scoop out rounded tablespoons of dough. Roll each scoop into a ball.
- Optional: Roll in Sugar: If desired, roll each ball of dough in granulated sugar before placing it on the baking sheet.
- Arrange on Baking Sheet: Place the dough balls on the prepared baking sheet, leaving about 2 inches between each cookie to allow for spreading.
- Flatten with a Fork: Use a fork to gently flatten each cookie in a criss-cross pattern. Dip the fork in sugar between cookies to prevent it from sticking.
- Add Toppings (Optional): If desired, press chocolate chips or chopped peanuts into the tops of the cookies before baking.
- Bake: Bake for 8-10 minutes, or until the edges are lightly golden brown and the centers are set. Be careful not to overbake.
- Cool: Remove the baking sheet from the oven and let the cookies cool on the baking sheet for a few minutes before transferring them to a wire rack to cool completely.
Notes
- Use room temperature butter and eggs for best results.
- Don’t overmix the dough.
- Chilling the dough is crucial for preventing spreading.
- Don’t overbake the cookies.
- Baking times may vary depending on your oven.
- Store cooled cookies in an airtight container at room temperature for up to 5 days.
- Freeze unbaked dough or baked cookies for up to 2 months.
- Get creative with variations! Add chocolate chips, chopped nuts, or sea salt.
- If cookies are spreading too much, chill the dough longer or add a bit more flour.
- If cookies are dry, don’t overbake them, or add a touch of milk or sour cream to the dough.