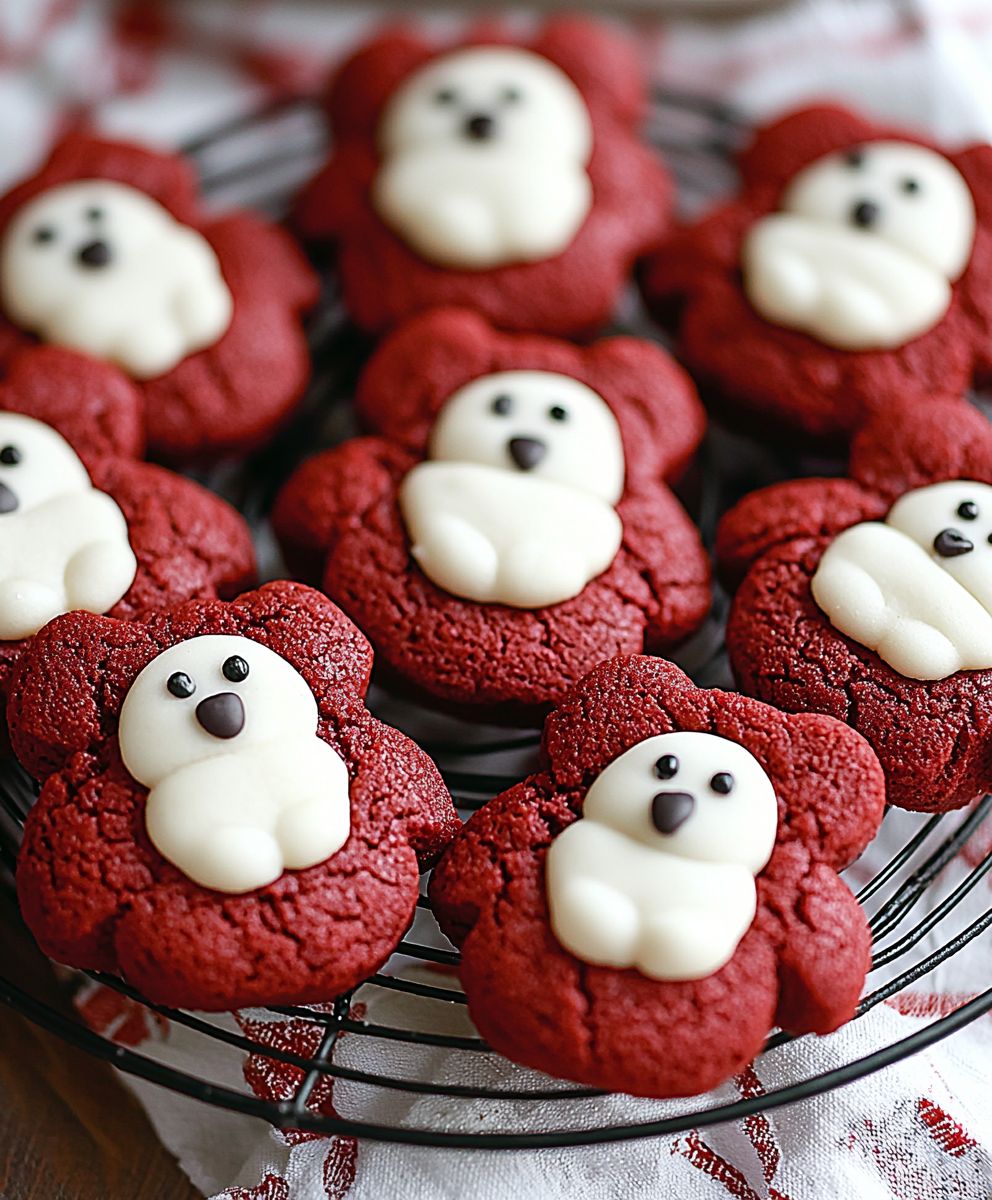
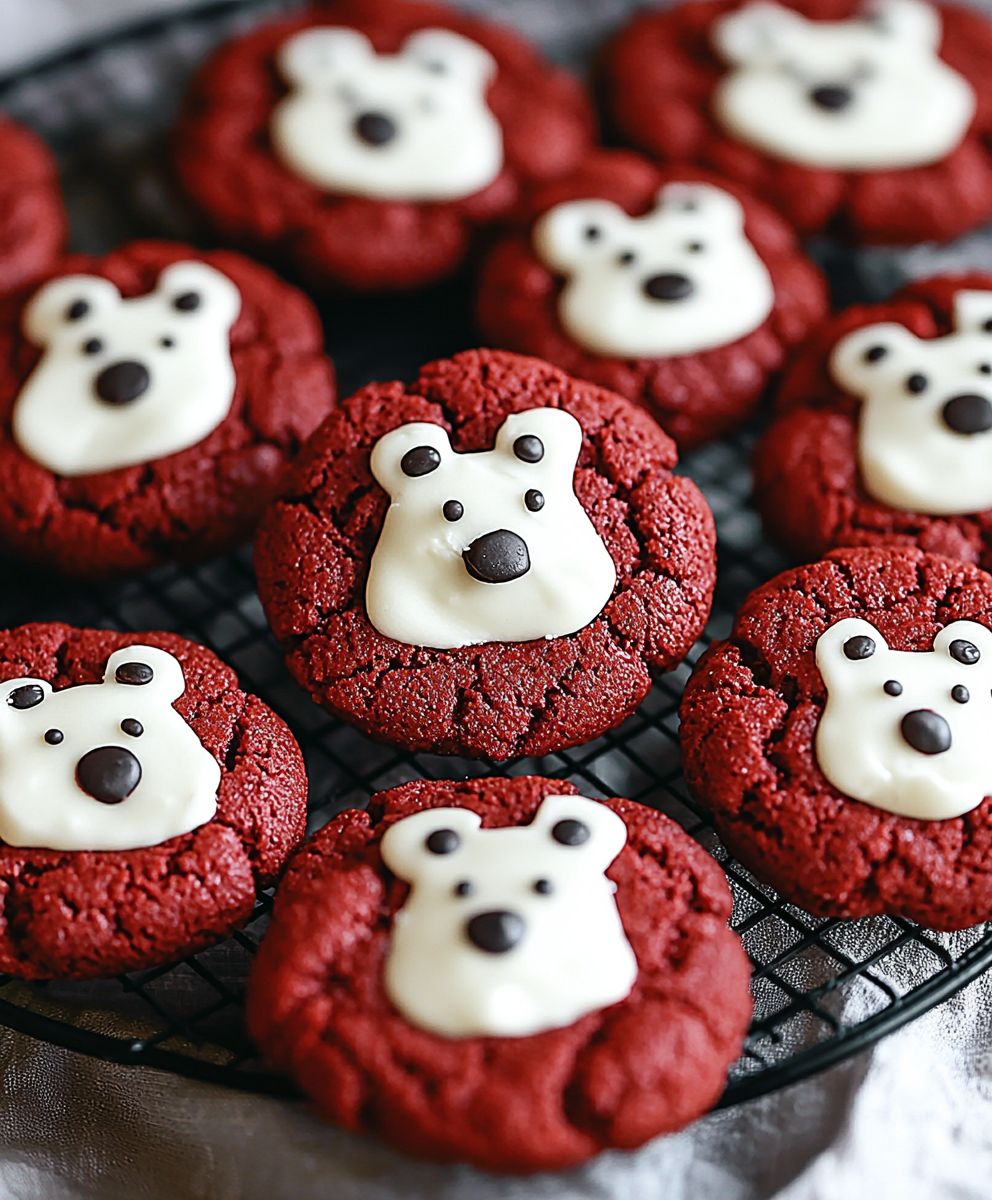
Red Velvet Bear Cookies: Prepare to fall in love with the most adorable and delicious treat you’ll bake all year! Imagine sinking your teeth into a soft, chewy cookie with that signature tangy-sweet red velvet flavor, all while enjoying its charming bear shape. These aren’t just cookies; they’re edible works of art that are guaranteed to bring a smile to everyone’s face.
Red velvet, with its intriguing history, has always been shrouded in a bit of mystery. Some say it originated in the Victorian era, while others claim it gained popularity during the Great Depression as a way to make cakes more appealing with limited ingredients. Regardless of its true origins, the combination of cocoa, buttermilk, and vinegar creates a unique flavor profile that’s both comforting and sophisticated. The vibrant red hue, traditionally achieved with beet juice or now more commonly with food coloring, adds to its allure.
What makes Red Velvet Bear Cookies so irresistible? It’s the perfect balance of flavors and textures. The slight tang of the red velvet complements the sweetness of the cookie, while the soft, almost cake-like texture melts in your mouth. Plus, who can resist a cookie shaped like a cute little bear? They’re perfect for holidays, birthdays, or simply as a fun baking project with the kids. Get ready to create some unforgettable memories with these delightful treats!
Ingredients:
- For the Red Velvet Cookie Dough:
- 2 ½ cups all-purpose flour
- ¼ cup unsweetened cocoa powder
- 1 teaspoon baking soda
- ½ teaspoon salt
- 1 cup (2 sticks) unsalted butter, softened
- 1 ½ cups granulated sugar
- 2 large eggs
- 1 teaspoon vanilla extract
- 1 tablespoon red food coloring (gel is recommended for vibrant color)
- 1 teaspoon white vinegar
- 1 cup buttermilk
- For the Bear Decorations:
- 1 cup semi-sweet chocolate chips, melted
- ½ cup white chocolate chips, melted
- Optional: Mini chocolate chips for eyes and nose
Preparing the Red Velvet Cookie Dough
- Combine Dry Ingredients: In a medium bowl, whisk together the flour, cocoa powder, baking soda, and salt. This ensures that the baking soda and cocoa are evenly distributed throughout the dough, which is crucial for the texture and flavor. Set aside this dry mixture.
- Cream Butter and Sugar: In a large bowl (or the bowl of a stand mixer), cream together the softened butter and granulated sugar until light and fluffy. This process usually takes about 3-5 minutes. The mixture should become noticeably paler and increase in volume. This step is vital for incorporating air into the dough, resulting in a tender cookie. Don’t rush this step!
- Add Eggs and Vanilla: Beat in the eggs one at a time, mixing well after each addition. Then, stir in the vanilla extract. Make sure each egg is fully incorporated before adding the next to prevent the mixture from curdling.
- Mix Wet Ingredients Separately: In a small bowl, whisk together the red food coloring, white vinegar, and buttermilk. The vinegar helps to activate the red food coloring and enhances the red velvet flavor. The buttermilk adds a subtle tang and contributes to the cookie’s moistness.
- Alternate Wet and Dry Ingredients: Gradually add the dry ingredients to the wet ingredients, alternating with the buttermilk mixture. Begin and end with the dry ingredients. This means you’ll add about a third of the dry ingredients, then half of the buttermilk mixture, then another third of the dry ingredients, then the remaining buttermilk mixture, and finally the last third of the dry ingredients. Mix until just combined. Be careful not to overmix the dough, as this can lead to tough cookies. Overmixing develops the gluten in the flour, resulting in a less tender texture.
- Chill the Dough: Cover the bowl with plastic wrap and refrigerate the dough for at least 2 hours, or preferably overnight. Chilling the dough allows the gluten to relax, which prevents the cookies from spreading too much during baking. It also allows the flavors to meld together, resulting in a more flavorful cookie. The longer you chill the dough, the better the texture and flavor will be.
Shaping the Bear Cookies
- Preheat Oven and Prepare Baking Sheets: Preheat your oven to 350°F (175°C). Line baking sheets with parchment paper or silicone baking mats. Parchment paper prevents the cookies from sticking and makes cleanup easier.
- Roll Out the Dough: On a lightly floured surface, roll out the chilled dough to about ¼ inch thickness. If the dough is sticking, add a little more flour to the surface.
- Cut Out Cookie Shapes: Use a bear-shaped cookie cutter to cut out the cookies. If you don’t have a bear-shaped cutter, you can use a round cutter and then shape the dough slightly to resemble a bear.
- Place Cookies on Baking Sheets: Carefully transfer the cut-out cookies to the prepared baking sheets, leaving about 1-2 inches of space between each cookie. This allows for even baking and prevents the cookies from sticking together.
- Bake the Cookies: Bake for 8-10 minutes, or until the edges are set and the centers are slightly soft. The baking time may vary depending on your oven, so keep a close eye on the cookies.
- Cool the Cookies: Remove the baking sheets from the oven and let the cookies cool on the baking sheets for a few minutes before transferring them to a wire rack to cool completely. This prevents the cookies from breaking while they are still warm and soft.
Decorating the Bear Cookies
- Melt the Chocolate: Melt the semi-sweet chocolate chips and white chocolate chips separately in microwave-safe bowls. Microwave in 30-second intervals, stirring after each interval, until smooth. Be careful not to overheat the chocolate, as it can burn. You can also melt the chocolate using a double boiler.
- Dip the Ears: Dip the top portion of each cookie (the “ears” of the bear) into the melted semi-sweet chocolate. Gently shake off any excess chocolate.
- Add White Chocolate Muzzle: Using a small spoon or piping bag, add a dollop of melted white chocolate to the center of the cookie to create the bear’s muzzle.
- Add Eyes and Nose: While the white chocolate is still wet, add mini chocolate chips for the eyes and nose. Alternatively, you can use a toothpick to create small dots of melted semi-sweet chocolate for the eyes and nose.
- Let the Chocolate Set: Allow the chocolate to set completely before serving or storing the cookies. You can speed up the setting process by placing the cookies in the refrigerator for a few minutes.
Tips and Tricks for Perfect Red Velvet Bear Cookies
- Use Gel Food Coloring: Gel food coloring provides a more vibrant and concentrated color than liquid food coloring. This is especially important for red velvet cookies, as the color can fade during baking.
- Don’t Overmix the Dough: Overmixing the dough develops the gluten in the flour, resulting in tough cookies. Mix until just combined.
- Chill the Dough: Chilling the dough is crucial for preventing the cookies from spreading too much during baking. It also allows the flavors to meld together.
- Use Parchment Paper or Silicone Baking Mats: Parchment paper or silicone baking mats prevent the cookies from sticking and make cleanup easier.
- Bake Evenly: Rotate the baking sheets halfway through baking to ensure that the cookies bake evenly.
- Cool Completely: Allow the cookies to cool completely before decorating to prevent the chocolate from melting.
- Storage: Store the cookies in an airtight container at room temperature for up to 3 days.
Variations and Substitutions
- Cream Cheese Frosting: Instead of decorating with melted chocolate, you can frost the cookies with cream cheese frosting.
- Different Cookie Cutters: Use different cookie cutters to create different shapes.
- Nuts: Add chopped nuts to the cookie dough for added texture and flavor.
- Chocolate Chunks: Add chocolate chunks to the cookie dough for a richer chocolate flavor.
- Gluten-Free: Substitute the all-purpose flour with a gluten-free all-purpose flour blend.
- Vegan: Substitute the butter with vegan butter, the eggs with flax eggs (1 tablespoon ground flaxseed mixed with 3 tablespoons water per egg), and the buttermilk with plant-based milk mixed with 1 tablespoon of lemon juice or vinegar.
Troubleshooting
- Cookies are Spreading Too Much: This is usually caused by not chilling the dough enough or using too much butter. Make sure to chill the dough for at least 2 hours and use the correct amount of butter.
- Cookies are Too Dry: This is usually caused by overbaking the cookies. Reduce the baking time or lower the oven temperature.
- Cookies are Too Tough: This is usually caused by overmixing the dough. Mix until just combined.
- Chocolate is Not Melting Smoothly: This is usually caused by overheating the chocolate. Microwave in 30-second intervals, stirring after each interval, until smooth.
Conclusion:
And there you have it! These Red Velvet Bear Cookies are more than just a cute treat; they’re a delightful experience from start to finish. The rich, slightly tangy red velvet flavor combined with the adorable bear shape makes them irresistible to both kids and adults. I truly believe this recipe is a must-try for anyone looking to add a touch of whimsy and deliciousness to their baking repertoire. Why is this recipe a winner? Well, beyond the undeniable cuteness factor, these cookies boast a perfect balance of textures. The edges are slightly crisp, while the centers remain soft and chewy, delivering a satisfying bite every time. The subtle cocoa notes of the red velvet are perfectly complemented by the sweetness of the frosting, creating a harmonious flavor profile that will leave you wanting more. Plus, the recipe is surprisingly straightforward, even for novice bakers. I’ve broken down each step to ensure success, so you can confidently create these charming cookies in your own kitchen. But the fun doesn’t stop there! Feel free to get creative with your serving suggestions and variations. These Red Velvet Bear Cookies are fantastic on their own, of course, but they also pair beautifully with a cold glass of milk, a warm cup of coffee, or even a scoop of vanilla ice cream. Imagine serving them at a children’s birthday party they’re guaranteed to be a hit! Or, package them up in a pretty box and give them as a homemade gift to friends and family. Looking for variations? Consider adding chocolate chips to the dough for an extra dose of chocolatey goodness. White chocolate chips would be particularly lovely, complementing the red velvet flavor perfectly. You could also experiment with different extracts, such as almond or peppermint, to create unique flavor combinations. For a festive touch, decorate the bears with edible glitter or sprinkles. And if you’re feeling adventurous, try using different food coloring to create a rainbow of bear cookies! Another fun idea is to use different cookie cutters. While the bear shape is undeniably adorable, you could easily adapt this recipe to create cookies in any shape you desire. Hearts for Valentine’s Day, stars for the Fourth of July, or pumpkins for Halloween the possibilities are endless! Just be sure to adjust the baking time accordingly, as smaller cookies will bake faster than larger ones. I’m so excited for you to try this recipe and experience the joy of baking these delightful Red Velvet Bear Cookies. I’ve poured my heart into creating a recipe that is both delicious and easy to follow, and I truly believe you’ll love the results. So, what are you waiting for? Gather your ingredients, preheat your oven, and get ready to embark on a baking adventure! And most importantly, don’t forget to have fun! Baking should be a relaxing and enjoyable experience, so put on some music, pour yourself a drink, and let your creativity flow. Once you’ve made these cookies, I would absolutely love to hear about your experience. Did you make any variations? What did your family and friends think? Share your photos and stories with me in the comments below! I can’t wait to see your creations and hear all about your baking adventures. Happy baking! I hope you enjoy these Red Velvet Bear Cookies as much as I do! Print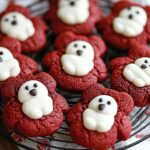
Red Velvet Bear Cookies: A Delicious & Adorable Recipe
- Total Time: 160 minutes
- Yield: 24 cookies 1x
Description
Adorable red velvet bear cookies decorated with chocolate! These soft and chewy cookies are perfect for any occasion.
Ingredients
- 2 ½ cups all-purpose flour
- ¼ cup unsweetened cocoa powder
- 1 teaspoon baking soda
- ½ teaspoon salt
- 1 cup (2 sticks) unsalted butter, softened
- 1 ½ cups granulated sugar
- 2 large eggs
- 1 teaspoon vanilla extract
- 1 tablespoon red food coloring (gel is recommended for vibrant color)
- 1 teaspoon white vinegar
- 1 cup buttermilk
- 1 cup semi-sweet chocolate chips, melted
- ½ cup white chocolate chips, melted
- Optional: Mini chocolate chips for eyes and nose
Instructions
- Combine Dry Ingredients: In a medium bowl, whisk together the flour, cocoa powder, baking soda, and salt. Set aside.
- Cream Butter and Sugar: In a large bowl (or the bowl of a stand mixer), cream together the softened butter and granulated sugar until light and fluffy (3-5 minutes).
- Add Eggs and Vanilla: Beat in the eggs one at a time, mixing well after each addition. Then, stir in the vanilla extract.
- Mix Wet Ingredients Separately: In a small bowl, whisk together the red food coloring, white vinegar, and buttermilk.
- Alternate Wet and Dry Ingredients: Gradually add the dry ingredients to the wet ingredients, alternating with the buttermilk mixture. Begin and end with the dry ingredients. Mix until just combined.
- Chill the Dough: Cover the bowl with plastic wrap and refrigerate the dough for at least 2 hours, or preferably overnight.
- Preheat Oven and Prepare Baking Sheets: Preheat your oven to 350°F (175°C). Line baking sheets with parchment paper or silicone baking mats.
- Roll Out the Dough: On a lightly floured surface, roll out the chilled dough to about ¼ inch thickness.
- Cut Out Cookie Shapes: Use a bear-shaped cookie cutter to cut out the cookies.
- Place Cookies on Baking Sheets: Carefully transfer the cut-out cookies to the prepared baking sheets, leaving about 1-2 inches of space between each cookie.
- Bake the Cookies: Bake for 8-10 minutes, or until the edges are set and the centers are slightly soft.
- Cool the Cookies: Remove the baking sheets from the oven and let the cookies cool on the baking sheets for a few minutes before transferring them to a wire rack to cool completely.
- Melt the Chocolate: Melt the semi-sweet chocolate chips and white chocolate chips separately in microwave-safe bowls in 30-second intervals, stirring after each interval, until smooth.
- Dip the Ears: Dip the top portion of each cookie (the “ears” of the bear) into the melted semi-sweet chocolate. Gently shake off any excess chocolate.
- Add White Chocolate Muzzle: Using a small spoon or piping bag, add a dollop of melted white chocolate to the center of the cookie to create the bear’s muzzle.
- Add Eyes and Nose: While the white chocolate is still wet, add mini chocolate chips for the eyes and nose.
- Let the Chocolate Set: Allow the chocolate to set completely before serving or storing the cookies.
Notes
- Use gel food coloring for a vibrant red color.
- Don’t overmix the dough.
- Chilling the dough is crucial.
- Store in an airtight container at room temperature for up to 3 days.
- Prep Time: 30 minutes
- Cook Time: 8 minutes