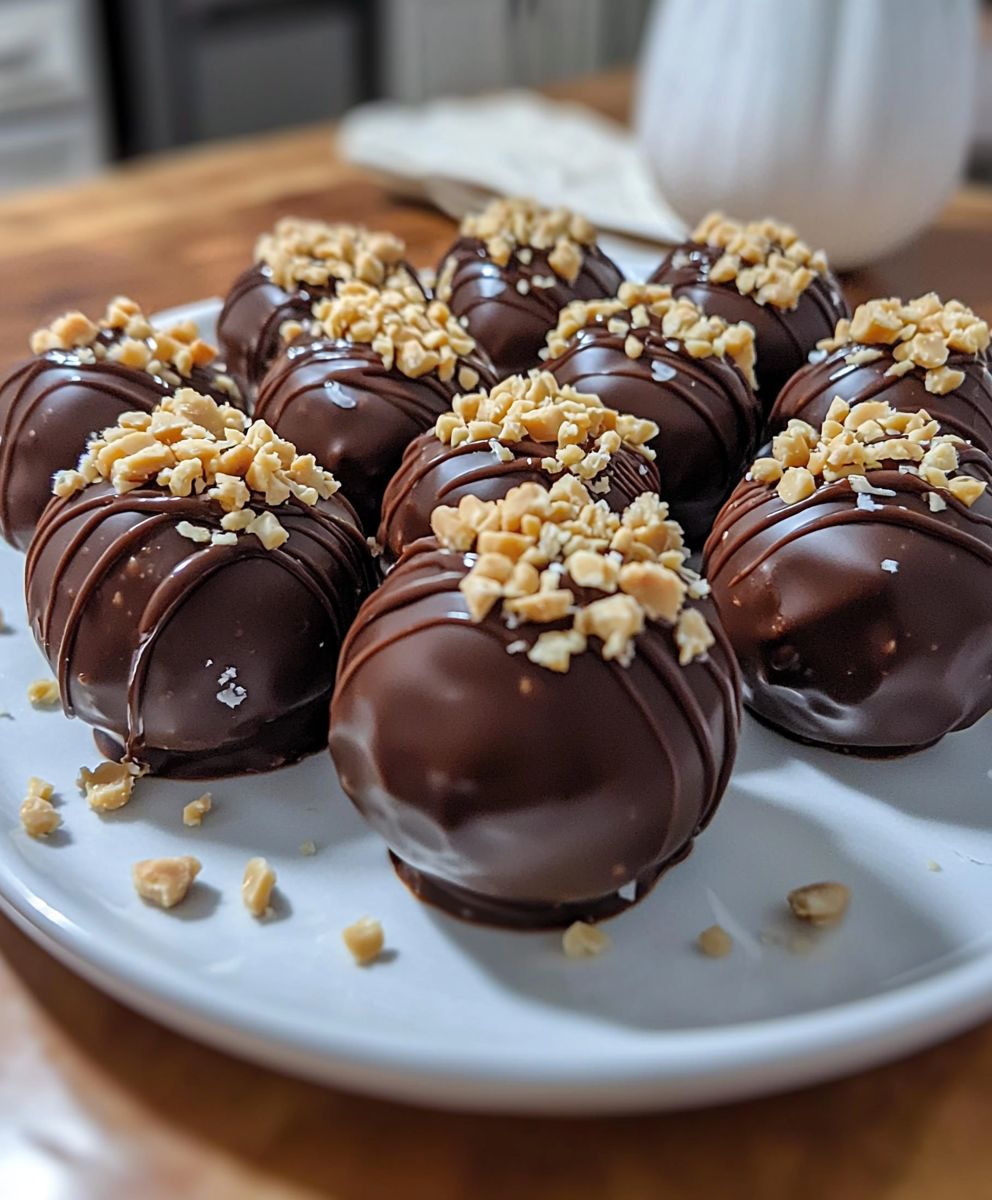
Peanut Butter Cheesecake Balls: Prepare to be amazed by the easiest, most decadent dessert you’ll make all year! Imagine biting into a creamy, dreamy sphere of peanut butter cheesecake, coated in rich chocolate and bursting with flavor. These little bites of heaven are so addictive, they practically disappear before your eyes. Im telling you, they are a guaranteed crowd-pleaser!
While the exact origins of this no-bake treat are a bit of a mystery, the combination of peanut butter and cream cheese has been a beloved pairing in American desserts for decades. Think about it: the tangy richness of cream cheese perfectly complements the nutty, salty sweetness of peanut butter. It’s a match made in dessert heaven! This particular iteration, the Peanut Butter Cheesecake Balls, takes that classic combination and elevates it to bite-sized perfection.
People adore this dish for so many reasons. First, the taste is simply irresistible. The creamy, melt-in-your-mouth texture combined with the sweet and salty flavor profile is a symphony for your taste buds. Second, they are incredibly convenient to make. With just a few simple ingredients and minimal effort, you can whip up a batch of these delightful treats in no time. And finally, they are perfect for any occasion, from casual gatherings to elegant parties. So, get ready to indulge in the ultimate peanut butter and cheesecake experience!

Ingredients:
- 16 ounces cream cheese, softened
- 1 cup creamy peanut butter
- 1 cup powdered sugar
- 1 teaspoon vanilla extract
- 1/4 teaspoon salt
- 12 ounces chocolate candy coating (milk, dark, or white), melted
- Optional toppings: chopped peanuts, sprinkles, mini chocolate chips, sea salt
Making the Peanut Butter Cheesecake Filling
Okay, let’s get started! The heart of these delicious Peanut Butter Cheesecake Balls is, of course, the creamy, dreamy filling. It’s super easy to make, and I promise you’ll be sneaking spoonfuls before you even get to the rolling part. Trust me, I’ve been there!
- Cream Together the Cream Cheese and Peanut Butter: In a large bowl, add your softened cream cheese and peanut butter. It’s crucial that the cream cheese is properly softened, otherwise you’ll end up with lumps. Nobody wants lumpy cheesecake balls! Use an electric mixer (either a stand mixer or a hand mixer) to beat the cream cheese and peanut butter together until they are completely smooth and well combined. This usually takes about 2-3 minutes. Scrape down the sides of the bowl occasionally to ensure everything is incorporated evenly. You want a homogenous mixture that’s light and fluffy.
- Add the Powdered Sugar: Gradually add the powdered sugar to the cream cheese and peanut butter mixture. I recommend adding it in about 1/2 cup increments. This will prevent a powdered sugar cloud from erupting in your kitchen (we’ve all been there!). After each addition, mix on low speed until just combined. Be careful not to overmix at this stage, as overmixing can lead to a tough filling. We want these cheesecake balls to be melt-in-your-mouth good!
- Incorporate the Vanilla Extract and Salt: Add the vanilla extract and salt to the bowl. The vanilla extract enhances the peanut butter flavor, and the salt balances the sweetness. Mix on low speed until everything is well combined. Again, don’t overmix! Just a quick blend to incorporate the wet ingredients.
- Chill the Mixture: This is a crucial step! Cover the bowl with plastic wrap and refrigerate the peanut butter cheesecake mixture for at least 30 minutes, or even better, for an hour. Chilling the mixture makes it much easier to roll into balls. If you skip this step, the mixture will be too sticky and difficult to handle. I know it’s tempting to skip ahead, but trust me, patience is key here!
Rolling and Shaping the Cheesecake Balls
Now for the fun part rolling the chilled filling into perfect little spheres of peanut butter bliss! This can get a little messy, but that’s part of the charm, right?
- Prepare Your Workspace: Line a baking sheet with parchment paper or a silicone baking mat. This will prevent the cheesecake balls from sticking to the baking sheet. Having a clean and organized workspace will make the rolling process much smoother.
- Scoop and Roll: Using a small cookie scoop (about 1 tablespoon size) or a spoon, scoop out portions of the chilled peanut butter cheesecake mixture. Roll each portion between your palms to form a smooth ball. Don’t worry if they’re not perfectly round; a little imperfection adds character! Place the rolled balls onto the prepared baking sheet.
- Chill Again (Optional but Recommended): Once all the cheesecake balls are rolled, place the baking sheet back into the refrigerator for another 15-20 minutes. This will help them firm up even more, making them easier to dip in the chocolate. This step is optional, but I highly recommend it, especially if your kitchen is warm.
Dipping and Decorating the Cheesecake Balls
This is where you can really get creative! The chocolate coating adds a beautiful sheen and a delicious contrast to the peanut butter filling. And the toppings? Well, they’re just the icing on the cake (or the sprinkles on the cheesecake ball!).
- Melt the Chocolate Candy Coating: There are a few ways to melt the chocolate candy coating. My preferred method is using a double boiler or a heatproof bowl set over a simmering pot of water. Make sure the bottom of the bowl doesn’t touch the water. Stir the chocolate frequently until it’s completely melted and smooth. You can also melt the chocolate in the microwave in 30-second intervals, stirring in between each interval, until melted. Be careful not to overheat the chocolate, as it can seize up. If the chocolate is too thick, you can add a teaspoon of vegetable oil or shortening to thin it out.
- Dipping Time!: Remove the chilled cheesecake balls from the refrigerator. Using a fork or dipping tools, carefully dip each ball into the melted chocolate, making sure it’s completely coated. Gently tap off any excess chocolate.
- Decorate (Before the Chocolate Sets!): Immediately after dipping, place the chocolate-covered cheesecake ball back onto the parchment-lined baking sheet and sprinkle with your desired toppings. Chopped peanuts, sprinkles, mini chocolate chips, and a sprinkle of sea salt are all great options. You can even drizzle with a contrasting color of melted chocolate for an extra touch of elegance. Work quickly, as the chocolate will start to set relatively fast.
- Let the Chocolate Set: Once all the cheesecake balls are dipped and decorated, place the baking sheet back into the refrigerator for at least 15-20 minutes, or until the chocolate is completely set. This will ensure that the chocolate coating is firm and doesn’t melt when you handle them.
Storing Your Peanut Butter Cheesecake Balls
These Peanut Butter Cheesecake Balls are best stored in an airtight container in the refrigerator. They will keep for up to a week, but I doubt they’ll last that long! You can also freeze them for longer storage. To freeze, place the cheesecake balls in a single layer on a baking sheet and freeze until solid. Then, transfer them to a freezer-safe bag or container. They can be frozen for up to 2 months. When ready to eat, thaw them in the refrigerator overnight.
Tips and Variations:
- Use High-Quality Ingredients: The better the quality of your ingredients, the better the taste of your cheesecake balls. Use a good quality cream cheese, peanut butter, and chocolate candy coating.
- Experiment with Different Flavors: Get creative with your flavor combinations! Try using different types of peanut butter, such as crunchy peanut butter or chocolate peanut butter. You can also add other extracts, such as almond extract or peppermint extract.
- Add a Cookie Crumb Coating: Instead of dipping in chocolate, try rolling the cheesecake balls in crushed graham crackers, Oreo cookies, or Nilla wafers.
- Make Them Gluten-Free: Use gluten-free graham crackers or cookies for the coating to make these cheesecake balls gluten-free.
- Adjust the Sweetness: If you prefer a less sweet cheesecake ball, reduce the amount of powdered sugar.
- Make Mini Cheesecake Bites: Use a smaller cookie scoop to make mini cheesecake bites. These are perfect for parties and gatherings.
Conclusion:
And there you have it! These Peanut Butter Cheesecake Balls are truly a must-try recipe, and I’m not just saying that because I created it! The combination of creamy cheesecake filling, rich peanut butter flavor, and that satisfying chocolate coating is simply irresistible. They’re the perfect no-bake treat for any occasion, from a casual weeknight dessert to a more festive gathering. Seriously, prepare to be amazed at how quickly these disappear! What makes these little bites of heaven so special? It’s the simplicity, really. No complicated baking techniques, no fancy ingredients just straightforward deliciousness. The creamy texture melts in your mouth, followed by the salty-sweet peanut butter and the snap of the chocolate. It’s a symphony of flavors and textures that will leave you wanting more. Plus, they’re incredibly easy to customize to your liking. Looking for serving suggestions? These Peanut Butter Cheesecake Balls are fantastic on their own, of course. But you can also get creative! Try serving them on a platter with other bite-sized desserts for a party. Or, for a more elegant presentation, arrange them on a dessert plate with a drizzle of melted chocolate and a sprinkle of chopped peanuts. They’re also amazing served chilled straight from the freezer for a refreshing treat on a hot day. And speaking of customization, the possibilities are endless! Want to add a little crunch? Mix some crushed pretzels or chopped nuts into the cheesecake filling. Feeling adventurous? Try using different types of chocolate for the coating dark chocolate, white chocolate, or even a combination of both! You could also experiment with different nut butters, like almond butter or cashew butter, for a unique twist. For a festive touch, roll the balls in sprinkles or edible glitter. Get creative and make them your own! Here are a few more variation ideas to get your creative juices flowing: * Peanut Butter Cup Cheesecake Balls: Mix in chopped peanut butter cups into the cheesecake filling before rolling. * Oreo Cheesecake Balls: Crush some Oreos and mix them into the filling for a cookies and cream vibe. * Salted Caramel Cheesecake Balls: Drizzle with salted caramel sauce after coating in chocolate. * Espresso Cheesecake Balls: Add a teaspoon of instant espresso powder to the cheesecake filling for a coffee kick. I truly believe that this recipe is a winner, and I can’t wait for you to try it! It’s the perfect balance of sweet and salty, creamy and crunchy, and it’s guaranteed to be a crowd-pleaser. So, gather your ingredients, put on some music, and get ready to have some fun in the kitchen. Once you’ve made these amazing Peanut Butter Cheesecake Balls, I would absolutely love to hear about your experience! Did you make any variations? What did your friends and family think? Share your photos and comments with me I’m always excited to see what you create. Happy baking (or, in this case, no-baking)! Let me know if you have any questions, and most importantly, enjoy every single bite! I’m confident that this will become a go-to recipe for you, just as it has for me. Enjoy! Print
Peanut Butter Cheesecake Balls: Easy No-Bake Recipe
- Total Time: 90 minutes
- Yield: 30–36 cheesecake balls 1x
Description
Creamy peanut butter cheesecake filling rolled into balls, dipped in chocolate, and topped with sprinkles! These no-bake treats are easy and perfect for any occasion.
Ingredients
- 16 ounces cream cheese, softened
- 1 cup creamy peanut butter
- 1 cup powdered sugar
- 1 teaspoon vanilla extract
- 1/4 teaspoon salt
- 12 ounces chocolate candy coating (milk, dark, or white), melted
- Optional toppings: chopped peanuts, sprinkles, mini chocolate chips, sea salt
Instructions
- In a large bowl, beat together softened cream cheese and peanut butter until smooth.
- Gradually add powdered sugar, mixing on low speed until just combined after each addition.
- Stir in vanilla extract and salt until well combined.
- Cover and chill the mixture in the refrigerator for at least 30 minutes (or up to an hour).
- Line a baking sheet with parchment paper.
- Scoop out portions of the chilled filling (about 1 tablespoon each) and roll into balls. Place on the prepared baking sheet.
- Chill the rolled balls for another 15-20 minutes (optional, but recommended).
- Melt the chocolate candy coating using a double boiler or microwave (in 30-second intervals).
- Remove the chilled cheesecake balls from the refrigerator. Dip each ball into the melted chocolate, tapping off excess.
- Immediately place the dipped ball back onto the parchment-lined baking sheet and sprinkle with your desired toppings.
- Let the chocolate set in the refrigerator for at least 15-20 minutes.
- Store in an airtight container in the refrigerator for up to a week, or freeze for up to 2 months.
Notes
- Make sure the cream cheese is properly softened to avoid lumps.
- Add powdered sugar gradually to prevent a mess.
- Chilling the mixture is crucial for easy rolling.
- Don’t overheat the chocolate when melting.
- Work quickly when decorating, as the chocolate sets fast.
- Use high-quality ingredients for the best flavor.
- Experiment with different flavors and toppings!
- For gluten-free, use gluten-free graham crackers or cookies for coating.
- Adjust the sweetness by reducing the amount of powdered sugar.
- Make mini cheesecake bites using a smaller cookie scoop.
- Prep Time: 20 minutes
- Cook Time: 5 minutes