No Knead Pizza Dough: the words alone conjure up images of bubbling cheese, perfectly charred crusts, and the sheer joy of homemade pizza without the fuss. Forget spending hours kneading and proofing; this recipe is your express ticket to pizza perfection, even on the busiest weeknights. Have you ever dreamt of creating restaurant-quality pizza in your own kitchen, but felt intimidated by the dough-making process? Well, dream no more!
Pizza, in its various forms, has a rich and fascinating history, tracing its roots back to ancient flatbreads. However, the pizza we know and love today truly blossomed in Naples, Italy, where it became a street food staple for the working class. Over time, pizza has evolved and spread across the globe, adapting to local tastes and ingredients. But the core appeal remains the same: a delicious, customizable, and satisfying meal that brings people together.
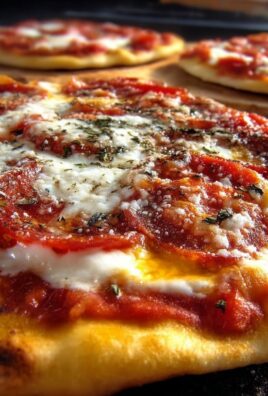
What makes pizza so universally beloved? It’s the symphony of flavors and textures, the crispy crust giving way to a soft, chewy interior, topped with a tangy sauce, creamy cheese, and your favorite toppings. And with this No Knead Pizza Dough recipe, you can achieve that perfect balance with minimal effort. People adore this dish because it’s incredibly easy to make, requiring only a few simple ingredients and minimal hands-on time. The result is a flavorful, versatile dough that can be used for everything from classic Margherita to gourmet creations. Plus, the convenience of a no-knead recipe means you can have fresh, homemade pizza on the table in a fraction of the time it takes with traditional methods. So, ditch the delivery menus and get ready to experience the magic of homemade pizza with this foolproof recipe!

Ingredients:
- 3 cups (384g) all-purpose flour, plus more for dusting
- 1 3/4 teaspoons (7g) kosher salt
- 1/2 teaspoon (2g) active dry yeast
- 1 1/2 cups (360ml) lukewarm water (around 105-115°F or 40-46°C)
- 1 tablespoon olive oil, plus more for greasing the bowl
Preparing the Dough:
- Combine Dry Ingredients: In a large bowl, whisk together the flour, salt, and yeast until well combined. Make sure the yeast is evenly distributed throughout the flour mixture. This ensures proper activation and even rising.
- Add Water and Mix: Pour the lukewarm water into the bowl with the dry ingredients. Using a wooden spoon or your hand, mix until just combined. The dough will be shaggy and sticky don’t worry, that’s exactly what we want! Avoid overmixing at this stage.
- First Rise (Bulk Fermentation): Cover the bowl tightly with plastic wrap or a lid. Let the dough rise at room temperature for at least 12 hours, or up to 18 hours. The longer it rises, the more flavorful it will become. You’ll notice the dough will more than double in size and become bubbly. This long fermentation process is what develops the incredible flavor and airy texture of no-knead pizza dough.
Shaping and Second Rise:
- Prepare the Dough: After the first rise, gently deflate the dough in the bowl. It will be very soft and airy. Don’t punch it down aggressively; just gently release some of the air.
- Divide the Dough (Optional): If you want to make multiple smaller pizzas, divide the dough in half or into smaller portions. For a single large pizza, leave the dough as is.
- Shape the Dough: On a well-floured surface, gently shape the dough into a round or oval. Be careful not to overwork the dough, as this can deflate it and result in a tougher crust. Use your fingertips to gently stretch and shape the dough.
- Second Rise (Proofing): Place the shaped dough on a piece of parchment paper that’s been lightly dusted with flour or cornmeal. This will prevent the dough from sticking and make it easier to transfer to the baking surface. Cover loosely with plastic wrap or a clean kitchen towel and let it rise for another 30-60 minutes. This second rise allows the dough to relax and become even more airy.
Preparing to Bake:
- Preheat Oven and Baking Surface: This is crucial for achieving a crispy crust! Preheat your oven to the highest temperature it can reach, ideally 500-550°F (260-290°C). Place a pizza stone or baking steel in the oven while it preheats. The stone or steel will retain heat and transfer it directly to the pizza crust, resulting in a perfectly crisp bottom. If you don’t have a pizza stone or steel, you can use a baking sheet, but the crust may not be as crispy.
- Prepare Toppings: While the oven is preheating and the dough is proofing, prepare your desired pizza toppings. This is where you can get creative! Some popular options include:
- Tomato sauce (use a good quality sauce for the best flavor)
- Fresh mozzarella cheese (shredded or sliced)
- Pepperoni
- Sausage
- Mushrooms
- Onions
- Peppers
- Olives
- Fresh basil
- Grated Parmesan cheese
Assembling and Baking the Pizza:
- Assemble the Pizza: Carefully slide the parchment paper with the dough onto a pizza peel (or a rimless baking sheet). If you don’t have a pizza peel, you can assemble the pizza directly on the parchment paper on a baking sheet.
- Add Sauce: Spread a thin layer of tomato sauce evenly over the dough, leaving a small border for the crust. Don’t use too much sauce, as this can make the crust soggy.
- Add Cheese: Sprinkle a generous amount of mozzarella cheese over the sauce.
- Add Toppings: Arrange your desired toppings over the cheese.
- Bake the Pizza: Carefully slide the pizza (with the parchment paper) onto the preheated pizza stone or baking steel in the oven. If you’re using a baking sheet, simply place the baking sheet with the pizza directly into the oven.
- Baking Time: Bake for 10-15 minutes, or until the crust is golden brown and the cheese is melted and bubbly. Keep a close eye on the pizza, as baking times may vary depending on your oven.
- Check the Bottom Crust: To ensure the bottom crust is crispy, lift a corner of the pizza with a spatula. If it’s still pale, bake for a few more minutes.
Finishing Touches:
- Remove from Oven: Carefully remove the pizza from the oven using the pizza peel or baking sheet.
- Garnish (Optional): Sprinkle with fresh basil leaves, grated Parmesan cheese, or a drizzle of olive oil.
- Slice and Serve: Let the pizza cool for a few minutes before slicing and serving. Enjoy your delicious homemade no-knead pizza!
Tips for Success:
- Use High-Quality Ingredients: The quality of your ingredients will directly impact the flavor of your pizza. Use good quality flour, tomato sauce, and cheese for the best results.
- Don’t Overwork the Dough: Overworking the dough can result in a tough crust. Be gentle when shaping the dough and avoid kneading it.
- Preheat the Oven Properly: Preheating the oven to a high temperature is essential for achieving a crispy crust. Make sure your pizza stone or baking steel is also preheated.
- Don’t Overload the Pizza with Toppings: Too many toppings can make the crust soggy. Use a moderate amount of toppings to ensure the crust stays crispy.
- Experiment with Toppings: Don’t be afraid to get creative with your toppings! Try different combinations of cheeses, meats, vegetables, and herbs to create your own signature pizza.
- Adjust Baking Time as Needed: Baking times may vary depending on your oven. Keep a close eye on the pizza and adjust the baking time as needed to ensure the crust is golden brown and the cheese is melted and bubbly.
- Use a Pizza Stone or Baking Steel: A pizza stone or baking steel will help to create a crispy crust by retaining heat and transferring it directly to the pizza.
- Let the Dough Rise Properly: The long fermentation process is what develops the incredible flavor and airy texture of no-knead pizza dough. Make sure to let the dough rise for the recommended amount of time.
- Use Lukewarm Water: The water should be lukewarm, not hot, to activate the yeast properly.
- Store Leftovers Properly: Store leftover pizza in an airtight container in the refrigerator. Reheat in the oven or microwave.
Troubleshooting:
- Dough is too sticky: If the dough is too sticky to handle, add a little more flour, one tablespoon at a time, until it becomes easier to manage.
- Dough is not rising: Make sure your yeast is fresh and active. Also, the temperature of the water should be lukewarm, not hot. If the room is too cold, the dough may take longer to rise.
- Crust is not crispy: Make sure your oven is preheated to a high temperature and that you are using a pizza stone or baking steel. You can also try baking the pizza on the bottom rack of the oven.
- Toppings are burning: If the toppings are burning before the crust is cooked, you can lower the oven temperature slightly or cover the pizza loosely with foil.

Conclusion:
This No Knead Pizza Dough recipe isn’t just another dough recipe; it’s your express ticket to pizza perfection, right in your own kitchen. I’ve shared this recipe with countless friends and family, and the response is always the same: amazement at how simple it is to create such a delicious and authentic pizza base. Forget complicated kneading techniques and hours of proofing this method is designed for busy lives and pizza cravings that strike at a moment’s notice.
Why is this a must-try? Because it delivers incredible flavor and texture with minimal effort. The long, slow fermentation process develops a complex, slightly tangy flavor that you just can’t get with quick dough recipes. The crust bakes up beautifully crispy on the outside, soft and chewy on the inside, providing the perfect foundation for your favorite toppings. Plus, the hands-off approach means you can focus on other things while the magic happens in your bowl.
But the beauty of this recipe lies not only in its simplicity and flavor but also in its versatility. Feel free to experiment with different flours. Try using a blend of all-purpose and bread flour for an extra chewy crust, or add a touch of whole wheat flour for a nuttier flavor. You can also adjust the hydration level slightly to achieve your desired consistency. If you prefer a thinner crust, use a little less water; for a thicker, more airy crust, add a tablespoon or two more.
Beyond pizza, this dough is a fantastic base for other baked goods. Use it to make focaccia, adding herbs, olives, and sea salt before baking. Or, shape it into calzones filled with ricotta, mozzarella, and your favorite pizza toppings. You can even use it to make garlic knots or breadsticks the possibilities are endless!
Serving suggestions? Keep it classic with a simple Margherita pizza, showcasing the dough’s delicious flavor with fresh tomatoes, mozzarella, and basil. Or, get creative with your toppings! Try a white pizza with ricotta, spinach, and garlic, or a spicy pepperoni pizza with a drizzle of hot honey. Don’t be afraid to experiment and find your perfect pizza combination. I personally love using this dough for a gourmet mushroom pizza with truffle oil and parmesan.
I truly believe that everyone deserves to experience the joy of homemade pizza, and this recipe makes it accessible to all. So, I urge you to give this No Knead Pizza Dough a try. You won’t be disappointed. It’s a game-changer for weeknight dinners, weekend gatherings, or anytime you’re craving a slice of pizza heaven.
Once you’ve tried it, I’d love to hear about your experience! Share your photos, your topping combinations, and any variations you’ve made. Let me know what you think of the flavor and texture, and if you have any questions, don’t hesitate to ask. Happy baking, and happy pizza making! I’m confident that this will become your go-to pizza dough recipe, just as it has become mine. Enjoy!
No Knead Pizza Dough: The Easiest Recipe for Perfect Pizza
Easy no-knead pizza dough that requires minimal effort and delivers a flavorful, crispy crust. Perfect for a weeknight pizza night!
Ingredients
- 3 cups (384g) all-purpose flour, plus more for dusting
- 1 3/4 teaspoons (7g) kosher salt
- 1/2 teaspoon (2g) active dry yeast
- 1 1/2 cups (360ml) lukewarm water (around 105-115°F or 40-46°C)
- 1 tablespoon olive oil, plus more for greasing the bowl
Instructions
- Combine Dry Ingredients: In a large bowl, whisk together the flour, salt, and yeast until well combined.
- Add Water and Mix: Pour the lukewarm water into the bowl with the dry ingredients. Using a wooden spoon or your hand, mix until just combined. The dough will be shaggy and sticky.
- First Rise (Bulk Fermentation): Cover the bowl tightly with plastic wrap or a lid. Let the dough rise at room temperature for at least 12 hours, or up to 18 hours.
- Prepare the Dough: After the first rise, gently deflate the dough in the bowl.
- Divide the Dough (Optional): If you want to make multiple smaller pizzas, divide the dough in half or into smaller portions. For a single large pizza, leave the dough as is.
- Shape the Dough: On a well-floured surface, gently shape the dough into a round or oval.
- Second Rise (Proofing): Place the shaped dough on a piece of parchment paper that’s been lightly dusted with flour or cornmeal. Cover loosely with plastic wrap or a clean kitchen towel and let it rise for another 30-60 minutes.
- Preheat Oven and Baking Surface: Preheat your oven to the highest temperature it can reach, ideally 500-550°F (260-290°C). Place a pizza stone or baking steel in the oven while it preheats.
- Prepare Toppings: While the oven is preheating and the dough is proofing, prepare your desired pizza toppings.
- Assemble the Pizza: Carefully slide the parchment paper with the dough onto a pizza peel (or a rimless baking sheet).
- Add Sauce: Spread a thin layer of tomato sauce evenly over the dough, leaving a small border for the crust.
- Add Cheese: Sprinkle a generous amount of mozzarella cheese over the sauce.
- Add Toppings: Arrange your desired toppings over the cheese.
- Bake the Pizza: Carefully slide the pizza (with the parchment paper) onto the preheated pizza stone or baking steel in the oven.
- Baking Time: Bake for 10-15 minutes, or until the crust is golden brown and the cheese is melted and bubbly.
- Check the Bottom Crust: To ensure the bottom crust is crispy, lift a corner of the pizza with a spatula. If it’s still pale, bake for a few more minutes.
- Remove from Oven: Carefully remove the pizza from the oven using the pizza peel or baking sheet.
- Garnish (Optional): Sprinkle with fresh basil leaves, grated Parmesan cheese, or a drizzle of olive oil.
- Slice and Serve: Let the pizza cool for a few minutes before slicing and serving.
Notes
- For best results, use high-quality ingredients.
- Don’t overwork the dough.
- Preheat the oven properly for a crispy crust.
- Don’t overload the pizza with toppings.
- Experiment with different toppings to create your own signature pizza.
- Adjust baking time as needed.
- A pizza stone or baking steel will help create a crispy crust.
- Let the dough rise properly for the best flavor and texture.
- Use lukewarm water to activate the yeast.
- Store leftovers in an airtight container in the refrigerator.