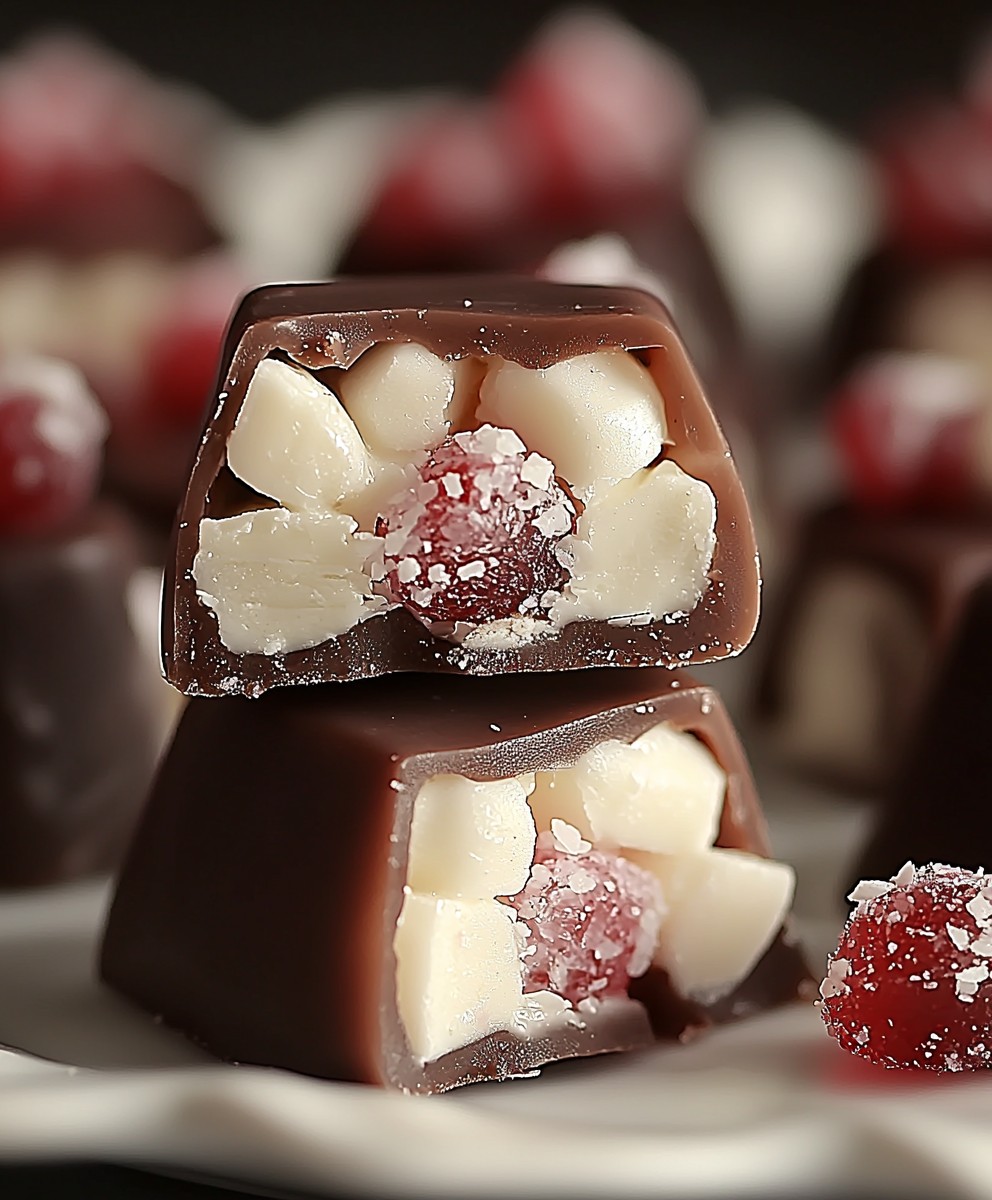
Martha Washington Candy, a confection as elegant and intriguing as the First Lady herself, is a delightful treat that deserves a place on your dessert table. Imagine biting into a creamy, melt-in-your-mouth center, perfectly balanced between sweet and slightly salty, all encased in a delicate chocolate shell. It’s a symphony of textures and flavors that will leave you craving more!
While the exact origins are debated, this Southern classic is often associated with Martha Washington due to its refined taste and presentation. Some believe it was a favorite of hers, while others suggest it was simply named in her honor to evoke a sense of sophistication and tradition. Regardless of its true history, Martha Washington Candy has become a beloved staple in many households, particularly during the holidays.
What makes this candy so irresistible? It’s the perfect combination of creamy, coconutty goodness with the satisfying crunch of pecans, all enrobed in rich chocolate. Plus, it’s surprisingly easy to make at home! Forget complicated recipes and hours in the kitchen; this recipe is straightforward and yields impressive results. Whether you’re looking for a unique homemade gift, a crowd-pleasing dessert, or simply a sweet indulgence for yourself, Martha Washington Candy is sure to delight. Let’s get started!

Ingredients:
- 1 pound confectioners’ sugar, sifted
- 1/2 cup sweetened condensed milk
- 1/4 cup butter, softened
- 1 teaspoon vanilla extract
- 1/4 teaspoon salt
- 1 pound semi-sweet chocolate, chopped
- 1 tablespoon shortening (vegetable or coconut oil)
- Pecans halves for garnish (optional)
Making the Candy Centers
Alright, let’s get started on these delightful Martha Washington Candies! The first step is creating the creamy, melt-in-your-mouth centers. This part is super easy, so don’t worry if you’re a beginner baker you’ve got this!
- Combine the Ingredients: In a large bowl, add the sifted confectioners’ sugar, sweetened condensed milk, softened butter, vanilla extract, and salt. It’s really important to sift the confectioners’ sugar to avoid any lumps in your candy. Lumps can make the texture a bit grainy, and we want these candies to be perfectly smooth.
- Mix Until Smooth: Using an electric mixer (a stand mixer or a hand mixer works great!), beat the ingredients together on low speed until they are well combined. Gradually increase the speed to medium and continue mixing until the mixture is smooth and creamy. Be careful not to overmix, as this can make the candy centers tough. You’re looking for a consistency similar to playdough pliable and easy to work with.
- Check the Consistency: The mixture should be firm enough to hold its shape. If it’s too soft, add a little more confectioners’ sugar, a tablespoon at a time, until you reach the desired consistency. If it’s too dry, add a tiny bit more sweetened condensed milk, a teaspoon at a time. Remember, small adjustments are key!
- Shape the Candy Centers: Now comes the fun part! Take a small amount of the mixture (about a tablespoon) and roll it into a ball. You can make them any size you like, but I find that about 1-inch in diameter is perfect. Place the formed balls on a baking sheet lined with parchment paper or wax paper. This will prevent them from sticking.
- Chill the Candy Centers: Once all the candy centers are formed, place the baking sheet in the refrigerator and chill for at least 30 minutes, or even better, for an hour. This chilling time is crucial because it helps the centers firm up, making them easier to dip in the chocolate later. Trust me, you don’t want to skip this step!
Melting the Chocolate
Next up, we’re going to melt the chocolate. This is where things can get a little tricky, but with a few tips and tricks, you’ll be a chocolate-melting pro in no time!
- Prepare the Chocolate: Chop the semi-sweet chocolate into small, even pieces. This will help it melt more evenly and prevent burning. You can also use chocolate chips if you prefer, but I find that chopped chocolate melts a bit smoother.
- Choose Your Melting Method: You have two main options for melting the chocolate: the double boiler method or the microwave method.
- Double Boiler Method: This is my preferred method because it gives you more control over the melting process and reduces the risk of burning the chocolate. Fill a saucepan with about an inch of water and bring it to a simmer. Place a heat-safe bowl (glass or stainless steel) on top of the saucepan, making sure the bottom of the bowl doesn’t touch the water. Add the chopped chocolate and shortening to the bowl. Stir occasionally until the chocolate is completely melted and smooth.
- Microwave Method: This method is faster, but you need to be extra careful not to overheat the chocolate. Place the chopped chocolate and shortening in a microwave-safe bowl. Microwave in 30-second intervals, stirring well after each interval, until the chocolate is melted and smooth. It’s really important to stir frequently to distribute the heat and prevent burning.
- Add Shortening: Whether you use the double boiler or the microwave method, adding a tablespoon of shortening (vegetable or coconut oil) to the chocolate helps to thin it out and gives it a nice, glossy shine.
- Check the Consistency: The melted chocolate should be smooth and easily coat a spoon. If it’s too thick, add a tiny bit more shortening, a teaspoon at a time, until you reach the desired consistency.
Dipping and Decorating
Now for the grand finale dipping the chilled candy centers in the melted chocolate! This is where your Martha Washington Candies really come to life.
- Prepare Your Dipping Station: Line a baking sheet with fresh parchment paper or wax paper. This will be where you place the dipped candies to set.
- Dip the Candy Centers: Take a chilled candy center and carefully dip it into the melted chocolate, making sure it’s completely coated. You can use a fork, dipping tools, or even your fingers (just make sure your hands are clean!).
- Remove Excess Chocolate: Gently lift the dipped candy center out of the chocolate and tap the fork or dipping tool against the edge of the bowl to remove any excess chocolate. You want a nice, even coating without too much dripping.
- Place on Baking Sheet: Place the dipped candy center on the prepared baking sheet.
- Garnish (Optional): While the chocolate is still wet, you can add a pecan half to the top of each candy for a classic Martha Washington Candy look. You can also sprinkle them with chopped nuts, sea salt, or even a drizzle of white chocolate. Get creative and have fun with it!
- Repeat: Repeat the dipping and decorating process with the remaining candy centers and melted chocolate.
- Chill to Set: Once all the candies are dipped and decorated, place the baking sheet in the refrigerator and chill for at least 30 minutes, or until the chocolate is completely set. This will help the chocolate harden and prevent it from melting when you handle the candies.
Storage
Once the chocolate is set, your Martha Washington Candies are ready to be enjoyed! Store them in an airtight container in the refrigerator for up to a week. They can also be frozen for longer storage (up to a month). Just make sure to thaw them in the refrigerator before serving.
Tips for Success
- Use High-Quality Chocolate: The quality of the chocolate will greatly affect the taste of your candies. I recommend using a good-quality semi-sweet chocolate for the best flavor.
- Don’t Overheat the Chocolate: Overheated chocolate can become grainy and difficult to work with. Be patient and melt the chocolate slowly and gently.
- Keep the Chocolate Warm: As you’re dipping the candies, the chocolate may start to cool and thicken. If this happens, you can gently reheat it in the microwave or over a double boiler.
- Get Creative with Decorations: Don’t be afraid to experiment with different toppings and decorations. Chopped nuts, sprinkles, sea salt, and white chocolate drizzles are all great options.
- Have Fun! Making Martha Washington Candies should be a fun and enjoyable experience. Don’t stress too much about making them perfect. Just relax and enjoy the process!
Troubleshooting
- Chocolate is Seizing: If your chocolate seizes (becomes thick and grainy), it’s usually because it has come into contact with water. Try adding a tablespoon of shortening and stirring vigorously. If that doesn’t work, you may need to start over with fresh chocolate.
- Candy Centers are Too Soft: If your candy centers are too soft to roll into balls, add a little more confectioners’ sugar, a tablespoon at a time, until you reach the desired consistency.
- Chocolate is Too Thick: If your melted chocolate is too thick to dip easily, add a tiny bit more shortening, a teaspoon at a time, until you reach the desired consistency.
And there you have it a complete guide to making delicious Martha Washington Candies! I hope you enjoy this recipe as much as I do. Happy baking!
Conclusion:
And there you have it! Our journey into the sweet, melt-in-your-mouth world of Martha Washington Candy has come to an end, but your own adventure is just beginning. I truly believe this recipe is a must-try for anyone who appreciates classic confections and enjoys creating something special in the kitchen. It’s more than just a candy; it’s a taste of history, a connection to tradition, and a guaranteed crowd-pleaser.
Why is it a must-try? Because it’s incredibly delicious, surprisingly easy to make, and offers a unique textural experience that you won’t find in many other candies. The creamy, coconutty center, perfectly balanced with the sweetness of the powdered sugar and the richness of the chocolate coating, is simply divine. Plus, it’s a fantastic conversation starter! Imagine serving these at your next holiday gathering or gifting them to friends and family. They’ll be impressed by your culinary skills and intrigued by the story behind this iconic treat.
But the best part? You can easily customize this recipe to suit your own preferences. For a festive twist, try adding a few drops of peppermint extract to the coconut mixture during the holiday season. Or, if you’re a fan of nuts, incorporate some chopped pecans or walnuts into the center for added crunch and flavor. You could even experiment with different types of chocolate for the coating dark chocolate for a more intense flavor, or white chocolate for a sweeter, more delicate finish.
Serving Suggestions and Variations:
* Serve these candies chilled for the best texture and flavor.
* Arrange them beautifully on a platter for a sophisticated presentation.
* Package them in small boxes or bags for thoughtful homemade gifts.
* Drizzle melted white chocolate over the dark chocolate coating for an elegant touch.
* Sprinkle chopped nuts or shredded coconut on top of the chocolate before it sets.
* For a boozy variation, add a tablespoon of your favorite liqueur (like rum or bourbon) to the coconut mixture.
I’m so excited for you to try this recipe and experience the joy of making your own Martha Washington Candy. It’s a rewarding process that will leave you with a batch of delicious treats to share (or keep all to yourself I won’t judge!).
Don’t be intimidated by the name or the history. This recipe is truly accessible to bakers of all skill levels. Just follow the instructions carefully, and you’ll be amazed at how easily these candies come together.
And now, the most important part: I want to hear about your experience! Did you try the recipe? Did you make any variations? What did your friends and family think? Please, share your thoughts, photos, and tips in the comments below. I’m always eager to learn from your experiences and see your creative interpretations of this classic recipe. Your feedback is invaluable and helps me continue to improve and share recipes that you’ll love. So, go ahead, get in the kitchen, and create some magic! I can’t wait to hear all about it. Happy baking!
Martha Washington Candy: A Deliciously Decadent Recipe
Creamy, melt-in-your-mouth Martha Washington Candies with a sweet center and rich chocolate coating. Perfect for holidays or any special occasion!
Ingredients
- 1 pound confectioners’ sugar, sifted
- 1/2 cup sweetened condensed milk
- 1/4 cup butter, softened
- 1 teaspoon vanilla extract
- 1/4 teaspoon salt
- 1 pound semi-sweet chocolate, chopped
- 1 tablespoon shortening (vegetable or coconut oil)
- Pecan halves for garnish (optional)
Instructions
- In a large bowl, add the sifted confectioners’ sugar, sweetened condensed milk, softened butter, vanilla extract, and salt.
- Using an electric mixer, beat the ingredients together on low speed until well combined. Gradually increase the speed to medium and continue mixing until the mixture is smooth and creamy.
- The mixture should be firm enough to hold its shape. If it’s too soft, add more confectioners’ sugar, a tablespoon at a time. If it’s too dry, add a tiny bit more sweetened condensed milk, a teaspoon at a time.
- Take a small amount of the mixture (about a tablespoon) and roll it into a ball (about 1-inch in diameter). Place the formed balls on a baking sheet lined with parchment paper or wax paper.
- Place the baking sheet in the refrigerator and chill for at least 30 minutes, or for an hour.
- Chop the semi-sweet chocolate into small, even pieces.
- Fill a saucepan with about an inch of water and bring it to a simmer. Place a heat-safe bowl on top of the saucepan, making sure the bottom of the bowl doesn’t touch the water. Add the chopped chocolate and shortening to the bowl. Stir occasionally until the chocolate is completely melted and smooth.
- Place the chopped chocolate and shortening in a microwave-safe bowl. Microwave in 30-second intervals, stirring well after each interval, until the chocolate is melted and smooth.
- Add a tablespoon of shortening (vegetable or coconut oil) to the chocolate to help thin it out and give it a glossy shine.
- The melted chocolate should be smooth and easily coat a spoon. If it’s too thick, add a tiny bit more shortening, a teaspoon at a time.
- Line a baking sheet with fresh parchment paper or wax paper.
- Take a chilled candy center and carefully dip it into the melted chocolate, making sure it’s completely coated.
- Gently lift the dipped candy center out of the chocolate and tap the fork or dipping tool against the edge of the bowl to remove any excess chocolate.
- Place the dipped candy center on the prepared baking sheet.
- While the chocolate is still wet, you can add a pecan half to the top of each candy.
- Repeat the dipping and decorating process with the remaining candy centers and melted chocolate.
- Place the baking sheet in the refrigerator and chill for at least 30 minutes, or until the chocolate is completely set.
Notes
- Use high-quality chocolate for the best flavor.
- Don’t overheat the chocolate. Melt it slowly and gently.
- Keep the chocolate warm while dipping.
- Get creative with decorations!
- Store in an airtight container in the refrigerator for up to a week, or freeze for up to a month. Thaw in the refrigerator before serving.
- If chocolate seizes, try adding a tablespoon of shortening and stirring vigorously.
- If candy centers are too soft, add more confectioners’ sugar, a tablespoon at a time.
- If chocolate is too thick, add more shortening, a teaspoon at a time.