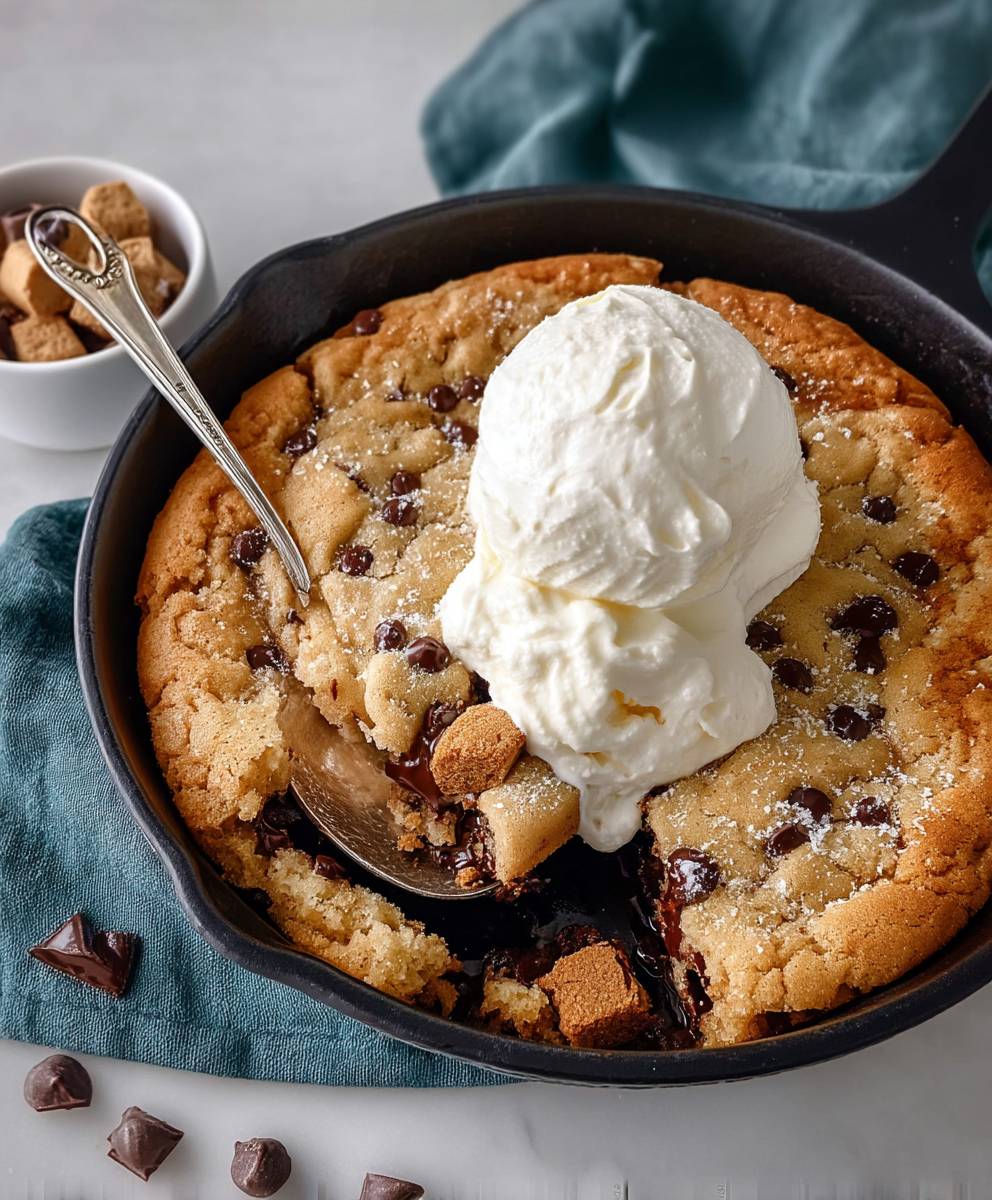
Homemade Pizookie, that irresistible combination of pizza and cookie, is about to become your new favorite dessert! Imagine sinking your spoon into a warm, gooey chocolate chip cookie, baked in a skillet until the edges are perfectly crisp and the center is decadently soft. Topped with a scoop of vanilla ice cream that melts into every crevice, it’s a symphony of textures and temperatures that will leave you craving more.
While the exact origins of the Pizookie are shrouded in a bit of mystery, it’s widely believed to have originated at BJ’s Restaurant & Brewhouse. Since its introduction, this dessert mashup has captured hearts (and stomachs!) across the nation. Its playful name and even more playful combination of flavors make it a crowd-pleaser for all ages.
What makes a homemade Pizookie so universally loved? It’s the perfect blend of comfort and indulgence. The warm, freshly baked cookie provides a comforting base, while the ice cream adds a refreshing coolness. The contrast between the crisp edges and the gooey center creates a delightful textural experience. Plus, its incredibly easy to customize with your favorite cookie dough flavors and ice cream toppings. Get ready to experience dessert bliss!

Ingredients:
- For the Cookie Dough:
- 1 cup (2 sticks) unsalted butter, softened
- ¾ cup granulated sugar
- ¾ cup packed brown sugar
- 2 large eggs
- 1 teaspoon vanilla extract
- 2 ¼ cups all-purpose flour
- 1 teaspoon baking soda
- 1 teaspoon salt
- 1 cup chocolate chips (milk, semi-sweet, or dark your choice!)
- For Serving:
- Vanilla ice cream
- Chocolate sauce (optional)
- Caramel sauce (optional)
- Sprinkles (optional)
Preparing the Cookie Dough
- Cream the Butter and Sugars: In a large bowl (or the bowl of your stand mixer), cream together the softened butter, granulated sugar, and brown sugar until light and fluffy. This usually takes about 3-5 minutes. Make sure to scrape down the sides of the bowl occasionally to ensure everything is evenly mixed. The mixture should be pale and airy. This step is crucial for a soft and chewy pizookie!
- Add the Eggs and Vanilla: Beat in the eggs one at a time, mixing well after each addition. Then, stir in the vanilla extract. Ensure each egg is fully incorporated before adding the next. This prevents the batter from curdling.
- Combine Dry Ingredients: In a separate medium bowl, whisk together the all-purpose flour, baking soda, and salt. Whisking is important to evenly distribute the baking soda and salt throughout the flour. This ensures proper leavening and flavor in the final pizookie.
- Gradually Add Dry Ingredients to Wet Ingredients: Gradually add the dry ingredients to the wet ingredients, mixing on low speed until just combined. Be careful not to overmix! Overmixing develops the gluten in the flour, which can result in a tough pizookie. Mix until you no longer see streaks of flour.
- Stir in Chocolate Chips: Gently fold in the chocolate chips until they are evenly distributed throughout the dough. I like to use a rubber spatula for this to avoid overmixing. You can also add other mix-ins at this point, such as chopped nuts, M&Ms, or peanut butter chips.
- Chill the Dough (Optional but Recommended): Cover the bowl with plastic wrap and chill the dough in the refrigerator for at least 30 minutes, or up to 2 hours. Chilling the dough helps to prevent the pizookie from spreading too thin while baking and also enhances the flavor. If you’re short on time, you can skip this step, but the pizookie might be a bit flatter.
Baking the Pizookie
- Preheat Oven and Prepare Baking Dish: Preheat your oven to 350°F (175°C). Grease a 9-inch cast iron skillet or a similar oven-safe dish. You can also use a cake pan or even individual ramekins for smaller pizookies. Greasing the dish well is essential to prevent the pizookie from sticking.
- Press Dough into Baking Dish: Press the cookie dough evenly into the prepared baking dish. You can use your fingers or the back of a spoon to spread the dough. Try to make the surface as smooth as possible for even baking.
- Bake the Pizookie: Bake for 20-25 minutes, or until the edges are golden brown and the center is still slightly soft. The baking time may vary depending on your oven and the thickness of the dough. Keep a close eye on it to prevent it from burning. A toothpick inserted into the center should come out with moist crumbs attached.
- Let Cool Slightly: Remove the pizookie from the oven and let it cool in the skillet for a few minutes before serving. This allows the center to set up a bit more. Be careful, as the skillet will be very hot!
Serving and Enjoying Your Pizookie
- Add Ice Cream: While the pizookie is still warm, top it with a generous scoop (or two!) of vanilla ice cream. The contrast between the warm cookie and the cold ice cream is what makes a pizookie so irresistible. Don’t be shy with the ice cream!
- Drizzle with Sauce (Optional): Drizzle with chocolate sauce, caramel sauce, or both! You can also add other toppings like sprinkles, chopped nuts, or whipped cream. Get creative and customize your pizookie to your liking!
- Serve Immediately: Serve immediately and enjoy! The pizookie is best enjoyed warm and gooey. Grab a spoon and dig in!
Tips for the Perfect Pizookie:
- Don’t Overbake: The key to a soft and chewy pizookie is to not overbake it. The center should still be slightly soft when you take it out of the oven. It will continue to cook as it cools.
- Use Room Temperature Ingredients: Using room temperature butter and eggs will help the ingredients to combine more easily and create a smoother batter.
- Chill the Dough: Chilling the dough is optional, but it helps to prevent the pizookie from spreading too thin and also enhances the flavor.
- Customize Your Toppings: Get creative with your toppings! You can use any kind of ice cream, sauce, or sprinkles that you like.
- Individual Pizookies: For individual servings, divide the dough into smaller portions and bake in ramekins. Reduce the baking time accordingly.
- Storage: Leftover pizookie can be stored in an airtight container at room temperature for up to 2 days. Reheat in the microwave for a few seconds before serving.
- Variations: Try adding different extracts to the dough, such as almond extract or peppermint extract. You can also add different types of chocolate chips, such as white chocolate chips or peanut butter chips.
Troubleshooting:
- Pizookie is too dry: You may have overbaked it. Try reducing the baking time next time. Also, make sure you are using enough butter and sugar in the dough.
- Pizookie is too flat: You may have used too much butter or not enough flour. Try chilling the dough for longer before baking.
- Pizookie is too hard: You may have overmixed the dough. Be careful not to overmix the dough when adding the dry ingredients.
- Pizookie is burning on the edges: Your oven may be too hot. Try reducing the oven temperature by 25 degrees.
This recipe is a guaranteed crowd-pleaser! Enjoy your homemade pizookie!
Conclusion:
Okay, friends, let’s be honest: you’ve scrolled this far because you know, deep down, that you need this Homemade Pizookie in your life. And trust me, you’re not wrong! This isn’t just another dessert recipe; it’s a warm, gooey, chocolate-chip-studded hug in a skillet. It’s the kind of treat that makes you forget about your worries and just savor the moment. It’s the perfect ending to any meal, or honestly, a perfectly acceptable meal all on its own (no judgment here!).
But why is this Homemade Pizookie a must-try? Well, for starters, it’s incredibly easy to make. We’re talking minimal ingredients and even less effort. You probably have most of the ingredients in your pantry right now! And the best part? It’s infinitely customizable. Feel like adding some chopped nuts? Go for it! Craving a hint of cinnamon? Sprinkle some in! Want to make it extra decadent? Throw in some chocolate chunks! The possibilities are endless.
Beyond the ease and customizability, it’s the sheer deliciousness that sets this Pizookie apart. The combination of the warm, soft cookie dough with the melty chocolate chips is simply irresistible. And when you top it with a scoop of vanilla ice cream? Pure bliss!
Speaking of serving suggestions, let’s get into some fun variations. For a classic experience, serve it warm with a generous scoop of vanilla ice cream and a drizzle of chocolate sauce. But don’t stop there! Try adding a dollop of whipped cream and some fresh berries for a more elegant presentation. Or, if you’re feeling adventurous, crumble some peanut butter cups on top for a salty-sweet explosion.
Here are a few more ideas to get your creative juices flowing:
Serving & Variation Ideas:
- The Nutty Professor: Add chopped walnuts, pecans, or macadamia nuts to the dough.
- The Mint Chocolate Chip Mania: Use mint chocolate chips instead of regular chocolate chips and top with a sprig of fresh mint.
- The Salted Caramel Dream: Drizzle with salted caramel sauce and sprinkle with sea salt.
- The S’mores Sensation: Top with toasted marshmallows and a sprinkle of graham cracker crumbs.
- The Birthday Bash: Add sprinkles to the dough and top with candles for a fun and festive treat.
But really, the best way to enjoy this Homemade Pizookie is however you like it! That’s the beauty of this recipe it’s a blank canvas for your culinary creativity.
So, what are you waiting for? Preheat your oven, gather your ingredients, and get ready to experience the magic of a Homemade Pizookie. I promise you won’t regret it.
And once you’ve made it (and devoured it, let’s be real), I want to hear all about it! Share your photos and your variations with me. Let me know what you loved about it, what you changed, and how you made it your own. Use #HomemadePizookie and tag me in your posts so I can see your creations. I can’t wait to see what you come up with! Happy baking!
Homemade Pizookie: The Ultimate Guide to Baking Perfection
Warm, gooey cookie pizza topped with vanilla ice cream and your favorite sauces and sprinkles! Perfect for sharing.
Ingredients
- 1 cup (2 sticks) unsalted butter, softened
- ¾ cup granulated sugar
- ¾ cup packed brown sugar
- 2 large eggs
- 1 teaspoon vanilla extract
- 2 ¼ cups all-purpose flour
- 1 teaspoon baking soda
- 1 teaspoon salt
- 1 cup chocolate chips (milk, semi-sweet, or dark your choice!)
- Vanilla ice cream
- Chocolate sauce (optional)
- Caramel sauce (optional)
- Sprinkles (optional)
Instructions
- Cream the Butter and Sugars: In a large bowl (or the bowl of your stand mixer), cream together the softened butter, granulated sugar, and brown sugar until light and fluffy. This usually takes about 3-5 minutes. Scrape down the sides of the bowl occasionally to ensure everything is evenly mixed. The mixture should be pale and airy.
- Add the Eggs and Vanilla: Beat in the eggs one at a time, mixing well after each addition. Then, stir in the vanilla extract. Ensure each egg is fully incorporated before adding the next.
- Combine Dry Ingredients: In a separate medium bowl, whisk together the all-purpose flour, baking soda, and salt.
- Gradually Add Dry Ingredients to Wet Ingredients: Gradually add the dry ingredients to the wet ingredients, mixing on low speed until just combined. Be careful not to overmix! Mix until you no longer see streaks of flour.
- Stir in Chocolate Chips: Gently fold in the chocolate chips until they are evenly distributed throughout the dough.
- Chill the Dough (Optional but Recommended): Cover the bowl with plastic wrap and chill the dough in the refrigerator for at least 30 minutes, or up to 2 hours.
- Preheat Oven and Prepare Baking Dish: Preheat your oven to 350°F (175°C). Grease a 9-inch cast iron skillet or a similar oven-safe dish.
- Press Dough into Baking Dish: Press the cookie dough evenly into the prepared baking dish.
- Bake the Pizookie: Bake for 20-25 minutes, or until the edges are golden brown and the center is still slightly soft. A toothpick inserted into the center should come out with moist crumbs attached.
- Let Cool Slightly: Remove the pizookie from the oven and let it cool in the skillet for a few minutes before serving.
- Add Ice Cream: While the pizookie is still warm, top it with a generous scoop (or two!) of vanilla ice cream.
- Drizzle with Sauce (Optional): Drizzle with chocolate sauce, caramel sauce, or both! You can also add other toppings like sprinkles, chopped nuts, or whipped cream.
- Serve Immediately: Serve immediately and enjoy! The pizookie is best enjoyed warm and gooey.
Notes
- Don’t Overbake: The key to a soft and chewy pizookie is to not overbake it. The center should still be slightly soft when you take it out of the oven. It will continue to cook as it cools.
- Use Room Temperature Ingredients: Using room temperature butter and eggs will help the ingredients to combine more easily and create a smoother batter.
- Chill the Dough: Chilling the dough is optional, but it helps to prevent the pizookie from spreading too thin and also enhances the flavor.
- Customize Your Toppings: Get creative with your toppings! You can use any kind of ice cream, sauce, or sprinkles that you like.
- Individual Pizookies: For individual servings, divide the dough into smaller portions and bake in ramekins. Reduce the baking time accordingly.
- Storage: Leftover pizookie can be stored in an airtight container at room temperature for up to 2 days. Reheat in the microwave for a few seconds before serving.
- Variations: Try adding different extracts to the dough, such as almond extract or peppermint extract. You can also add different types of chocolate chips, such as white chocolate chips or peanut butter chips.