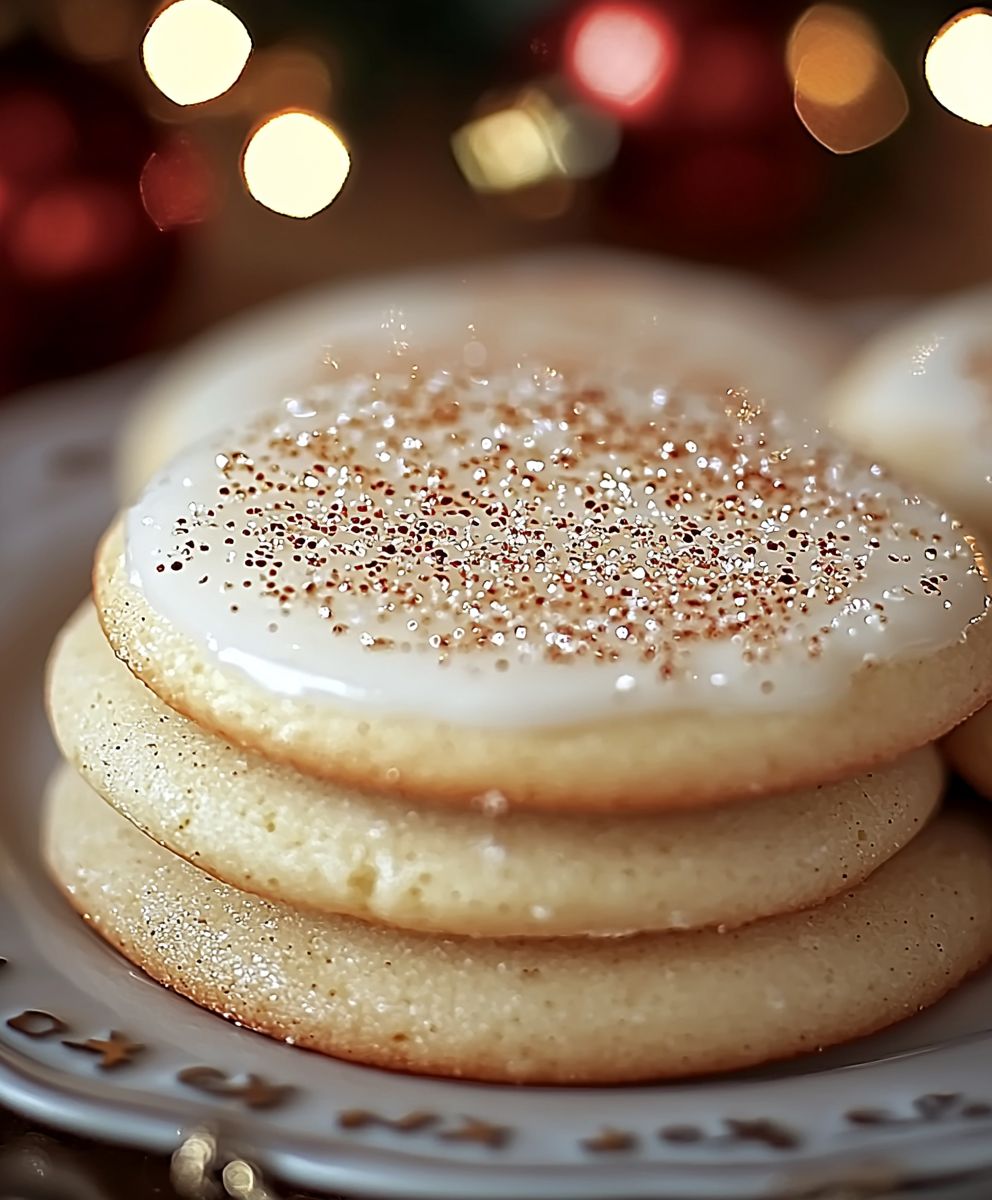
Eggnog Sugar Cookies: Prepare to be transported to a winter wonderland with every delectable bite! These aren’t just your average sugar cookies; they’re a festive explosion of holiday cheer, infused with the warm, comforting flavors of classic eggnog. Imagine the soft, melt-in-your-mouth texture of a perfectly baked sugar cookie, elevated by the subtle spice and creamy sweetness of everyone’s favorite yuletide beverage.
Eggnog itself boasts a rich history, dating back to medieval Britain where it was a drink enjoyed by the aristocracy. Over time, it evolved, incorporating spices from the colonies and eventually making its way to America, where it became a beloved Christmas tradition. Now, we’re taking that tradition one step further by baking it into a cookie!
What makes these Eggnog Sugar Cookies so irresistible? It’s the perfect balance of flavors and textures. The delicate sweetness of the sugar cookie is beautifully complemented by the nutmeg, cinnamon, and vanilla notes of the eggnog. They’re incredibly easy to make, making them perfect for holiday baking with family and friends. Plus, their festive flavor makes them a guaranteed crowd-pleaser at any Christmas gathering. Get ready to experience a new holiday favorite!

Ingredients:
- For the Cookies:
- 3 cups all-purpose flour, plus more for dusting
- 1 teaspoon baking powder
- 1/2 teaspoon baking soda
- 1/4 teaspoon salt
- 1 cup (2 sticks) unsalted butter, softened
- 1 1/2 cups granulated sugar
- 1 large egg
- 1 teaspoon vanilla extract
- 1/2 teaspoon ground nutmeg
- 1/4 cup eggnog (store-bought or homemade)
- For the Eggnog Glaze:
- 2 cups powdered sugar
- 1/4 cup eggnog (store-bought or homemade), plus more as needed
- 1/4 teaspoon ground nutmeg
- Optional: Pinch of salt
Preparing the Cookie Dough:
- Combine Dry Ingredients: In a medium bowl, whisk together the flour, baking powder, baking soda, and salt. This ensures that the leavening agents are evenly distributed throughout the dough, resulting in a consistent texture. Set aside for now.
- Cream Butter and Sugar: In a large bowl (or the bowl of a stand mixer), cream together the softened butter and granulated sugar until light and fluffy. This usually takes about 3-5 minutes on medium speed. The mixture should be noticeably lighter in color and have a smooth, almost whipped texture. This step is crucial for incorporating air into the dough, which contributes to the cookies’ tenderness.
- Add Egg and Extracts: Beat in the egg and vanilla extract until well combined. Make sure to scrape down the sides of the bowl to ensure everything is evenly mixed. The egg adds richness and structure to the cookies, while the vanilla extract enhances the overall flavor profile.
- Incorporate Eggnog and Nutmeg: Stir in the eggnog and ground nutmeg. The eggnog adds a distinctive holiday flavor and helps to keep the cookies moist. The nutmeg complements the eggnog perfectly, adding a warm and aromatic touch.
- Gradually Add Dry Ingredients: Gradually add the dry ingredients to the wet ingredients, mixing on low speed until just combined. Be careful not to overmix the dough, as this can develop the gluten in the flour and result in tough cookies. Mix until the flour is just incorporated, and then stop.
- Chill the Dough: Wrap the dough in plastic wrap and chill in the refrigerator for at least 1 hour, or preferably 2-3 hours. Chilling the dough allows the gluten to relax, which prevents the cookies from spreading too much during baking. It also makes the dough easier to handle and roll out. You can even chill it overnight for best results!
Rolling, Cutting, and Baking the Cookies:
- Preheat Oven and Prepare Baking Sheets: Preheat your oven to 375°F (190°C). Line baking sheets with parchment paper or silicone baking mats. This will prevent the cookies from sticking and make cleanup a breeze.
- Roll Out the Dough: On a lightly floured surface, roll out the chilled dough to about 1/4-inch thickness. Use a rolling pin and apply even pressure to ensure a uniform thickness. If the dough is sticking, add a little more flour to the surface.
- Cut Out Cookies: Use cookie cutters to cut out desired shapes. I love using holiday-themed cookie cutters like stars, trees, and gingerbread men, but you can use any shapes you like.
- Place on Baking Sheets: Place the cut-out cookies onto the prepared baking sheets, leaving about 1-2 inches of space between each cookie. This allows for proper air circulation and prevents the cookies from sticking together during baking.
- Bake: Bake for 8-10 minutes, or until the edges are lightly golden brown. Keep a close eye on the cookies, as baking times may vary depending on your oven. You want them to be baked through but still soft in the center.
- Cool: Remove the baking sheets from the oven and let the cookies cool on the baking sheets for a few minutes before transferring them to a wire rack to cool completely. This prevents the cookies from breaking while they are still warm and delicate.
Preparing the Eggnog Glaze:
- Combine Ingredients: In a medium bowl, whisk together the powdered sugar, eggnog, and ground nutmeg until smooth. Start with the 1/4 cup of eggnog and add more, 1 tablespoon at a time, until you reach your desired consistency. The glaze should be thick enough to coat the cookies but thin enough to spread easily.
- Adjust Consistency: If the glaze is too thick, add a little more eggnog, 1 teaspoon at a time, until it reaches the desired consistency. If the glaze is too thin, add a little more powdered sugar, 1 tablespoon at a time, until it thickens up.
- Optional: Add Salt: A pinch of salt can help balance the sweetness of the glaze and enhance the other flavors. Add a very small pinch and taste, adjusting as needed.
Glazing the Cookies:
- Glaze the Cookies: Once the cookies are completely cool, dip the tops of the cookies into the eggnog glaze, or spread the glaze evenly over the tops of the cookies using a knife or spatula.
- Decorate (Optional): If desired, decorate the glazed cookies with sprinkles, sanding sugar, or other festive decorations. Do this while the glaze is still wet so the decorations adhere properly.
- Let Glaze Set: Place the glazed cookies on a wire rack to allow the glaze to set completely. This usually takes about 30-60 minutes.
- Enjoy! Once the glaze is set, the eggnog sugar cookies are ready to enjoy! Store them in an airtight container at room temperature for up to 3-5 days.
Conclusion:
And there you have it! These Eggnog Sugar Cookies are more than just a holiday treat; they’re a little bite of Christmas magic. I truly believe this recipe is a must-try this season, and here’s why: the delicate balance of warm spices, the creamy richness of eggnog, and the satisfyingly soft texture all come together to create a cookie that’s simply irresistible. Forget those dry, crumbly sugar cookies you might have encountered before these are in a league of their own.
But the best part? They’re incredibly easy to make! Even if you’re not a seasoned baker, you’ll find this recipe straightforward and rewarding. The simple steps and readily available ingredients mean you can whip up a batch in no time, filling your kitchen with the comforting aroma of the holidays. And trust me, that aroma alone is worth the effort!
Beyond the sheer deliciousness and ease of preparation, these cookies are incredibly versatile. Looking for serving suggestions? They’re perfect with a steaming mug of coffee or hot chocolate on a chilly evening. Arrange them on a festive platter for your next holiday gathering, and watch them disappear in minutes. Or, package them up in decorative tins as thoughtful homemade gifts for friends and family. They’re guaranteed to bring a smile to anyone’s face.
Now, let’s talk variations! Feel free to get creative and personalize these cookies to your liking. For a little extra zing, try adding a pinch of nutmeg or cardamom to the dough. If you’re a fan of citrus, a teaspoon of orange or lemon zest will brighten the flavor beautifully. And for those who love a little crunch, consider adding chopped pecans or walnuts to the dough before baking.
Another fun variation is to experiment with different types of frosting. While the classic eggnog glaze is divine, you could also try a cream cheese frosting, a vanilla buttercream, or even a simple dusting of powdered sugar. Get the kids involved and let them decorate the cookies with sprinkles, candies, and edible glitter for a truly festive touch.
Don’t be afraid to experiment and make these cookies your own! That’s the beauty of baking it’s all about creating something delicious and unique that reflects your personal taste.
I’m so confident that you’ll love these Eggnog Sugar Cookies that I urge you to give them a try. This recipe has become a holiday staple in my own home, and I know it will become one in yours too. The combination of flavors and textures is simply perfect, and the joy of sharing these cookies with loved ones is priceless.
So, what are you waiting for? Preheat your oven, gather your ingredients, and get ready to bake up a batch of holiday cheer. And most importantly, don’t forget to share your experience! I’d love to hear how your cookies turned out, what variations you tried, and what your family and friends thought of them. Leave a comment below, tag me in your photos on social media, and let’s spread the holiday spirit together, one delicious cookie at a time. Happy baking! I can’t wait to see your creations and hear all about your Eggnog Sugar Cookie adventures!
Eggnog Sugar Cookies: The Ultimate Holiday Recipe
Festive and flavorful eggnog sugar cookies, perfect for the holidays! These soft, tender cookies are infused with eggnog and nutmeg, then topped with a creamy eggnog glaze.
Ingredients
- 3 cups all-purpose flour, plus more for dusting
- 1 teaspoon baking powder
- 1/2 teaspoon baking soda
- 1/4 teaspoon salt
- 1 cup (2 sticks) unsalted butter, softened
- 1 1/2 cups granulated sugar
- 1 large egg
- 1 teaspoon vanilla extract
- 1/2 teaspoon ground nutmeg
- 1/4 cup eggnog (store-bought or homemade)
- 2 cups powdered sugar
- 1/4 cup eggnog (store-bought or homemade), plus more as needed
- 1/4 teaspoon ground nutmeg
- Optional: Pinch of salt
Instructions
- In a medium bowl, whisk together the flour, baking powder, baking soda, and salt. Set aside.
- In a large bowl (or the bowl of a stand mixer), cream together the softened butter and granulated sugar until light and fluffy (3-5 minutes on medium speed).
- Beat in the egg and vanilla extract until well combined. Scrape down the sides of the bowl.
- Stir in the eggnog and ground nutmeg.
- Gradually add the dry ingredients to the wet ingredients, mixing on low speed until just combined. Be careful not to overmix.
- Wrap the dough in plastic wrap and chill in the refrigerator for at least 1 hour, or preferably 2-3 hours (or overnight).
- Preheat your oven to 375°F (190°C). Line baking sheets with parchment paper or silicone baking mats.
- On a lightly floured surface, roll out the chilled dough to about 1/4-inch thickness.
- Use cookie cutters to cut out desired shapes.
- Place the cut-out cookies onto the prepared baking sheets, leaving about 1-2 inches of space between each cookie.
- Bake for 8-10 minutes, or until the edges are lightly golden brown.
- Remove the baking sheets from the oven and let the cookies cool on the baking sheets for a few minutes before transferring them to a wire rack to cool completely.
- In a medium bowl, whisk together the powdered sugar, eggnog, and ground nutmeg until smooth. Start with the 1/4 cup of eggnog and add more, 1 tablespoon at a time, until you reach your desired consistency.
- If the glaze is too thick, add a little more eggnog, 1 teaspoon at a time. If the glaze is too thin, add a little more powdered sugar, 1 tablespoon at a time.
- A pinch of salt can help balance the sweetness of the glaze.
- Once the cookies are completely cool, dip the tops of the cookies into the eggnog glaze, or spread the glaze evenly over the tops of the cookies using a knife or spatula.
- If desired, decorate the glazed cookies with sprinkles, sanding sugar, or other festive decorations. Do this while the glaze is still wet.
- Place the glazed cookies on a wire rack to allow the glaze to set completely (30-60 minutes).
- Enjoy! Store them in an airtight container at room temperature for up to 3-5 days.
Notes
- Chilling the dough is crucial for preventing the cookies from spreading too much during baking.
- Be careful not to overmix the dough, as this can result in tough cookies.
- Adjust the amount of eggnog in the glaze to achieve your desired consistency.
- For best results, use high-quality eggnog and fresh nutmeg.