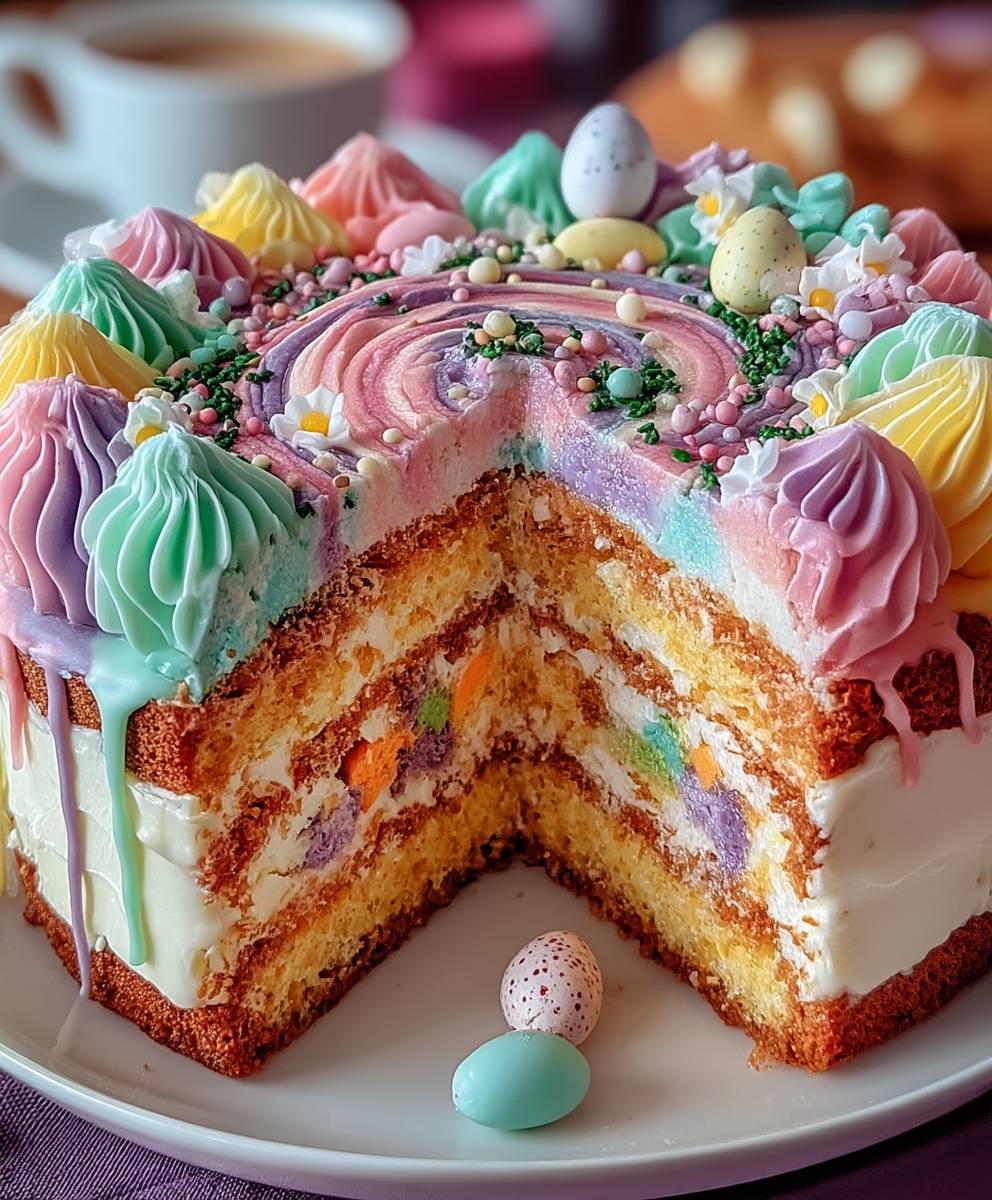
Easter Swirl Cake: Just imagine slicing into a vibrant, beautifully marbled cake that perfectly captures the joy and renewal of Easter. The stunning visual appeal alone is enough to make mouths water, but the delightful flavor combination is what truly elevates this dessert to a holiday centerpiece. I’m so excited to share this recipe with you!
Swirled cakes, in general, have a rich history, often associated with celebrations and special occasions. The mesmerizing patterns created by blending different batters symbolize harmony and unity, making them a fitting treat for gatherings. While the exact origins of the Easter Swirl Cake are difficult to pinpoint, the concept of incorporating pastel colors and festive flavors into a cake aligns perfectly with Easter traditions.
What makes this Easter Swirl Cake so irresistible? It’s the perfect balance of moist, tender crumb and a burst of bright, cheerful flavors. The vanilla and citrus notes dance on your palate, creating a symphony of taste that’s both comforting and invigorating. Plus, the visual appeal is undeniable! It’s a showstopper that’s surprisingly easy to make, even for novice bakers. This cake is guaranteed to impress your family and friends this Easter. Let’s get baking!

Ingredients:
- For the Cake:
- 3 cups all-purpose flour, plus more for dusting
- 1 teaspoon baking powder
- 1/2 teaspoon baking soda
- 1/4 teaspoon salt
- 1 cup (2 sticks) unsalted butter, softened
- 1 3/4 cups granulated sugar
- 3 large eggs
- 1 1/2 teaspoons vanilla extract
- 1 1/4 cups buttermilk
- For the Pink Swirl:
- 1/2 cup reserved cake batter
- 1-2 tablespoons milk (if needed to thin)
- 1/4 teaspoon red food coloring gel (or more, to desired shade)
- 1/4 teaspoon strawberry extract (optional, for enhanced flavor)
- For the Yellow Swirl:
- 1/2 cup reserved cake batter
- 1-2 tablespoons milk (if needed to thin)
- 1/4 teaspoon yellow food coloring gel (or more, to desired shade)
- 1/4 teaspoon lemon extract (optional, for enhanced flavor)
- For the Glaze:
- 2 cups powdered sugar
- 1/4 cup milk (or more, to desired consistency)
- 1/2 teaspoon vanilla extract
- Sprinkles, for decoration (optional)
Preparing the Cake Batter:
- Preheat and Prep: First things first, let’s get that oven ready! Preheat your oven to 350°F (175°C). Grease and flour a 9×13 inch baking pan. I like to use a baking spray that contains flour for extra insurance against sticking.
- Dry Ingredients: In a medium bowl, whisk together the flour, baking powder, baking soda, and salt. Whisking ensures everything is evenly distributed, which is key for a good rise.
- Cream Butter and Sugar: In a large bowl (or the bowl of your stand mixer), cream together the softened butter and granulated sugar until light and fluffy. This usually takes about 3-5 minutes. Don’t rush this step it’s important for incorporating air into the batter.
- Add Eggs and Vanilla: Beat in the eggs one at a time, making sure each egg is fully incorporated before adding the next. Then, stir in the vanilla extract.
- Alternate Wet and Dry: Gradually add the dry ingredients to the wet ingredients, alternating with the buttermilk. Begin and end with the dry ingredients. So, add about a third of the dry ingredients, then half of the buttermilk, then another third of the dry ingredients, then the remaining buttermilk, and finally the last of the dry ingredients. Mix until just combined. Be careful not to overmix! Overmixing can lead to a tough cake.
- Divide the Batter: Now, this is where the fun begins! Divide the batter into three bowls. You’ll want one bowl with the majority of the batter (this will be your base), and then two smaller bowls with about 1/2 cup of batter each.
Creating the Swirls:
- Pink Batter: In one of the smaller bowls, add the red food coloring gel and strawberry extract (if using) to the batter. Stir until the color is evenly distributed. If the batter seems too thick, add a tablespoon or two of milk to thin it out slightly.
- Yellow Batter: In the other small bowl, add the yellow food coloring gel and lemon extract (if using) to the batter. Stir until the color is evenly distributed. Again, if the batter is too thick, add a tablespoon or two of milk.
Assembling and Baking:
- Base Layer: Pour the plain (uncolored) batter into the prepared baking pan and spread it evenly.
- Adding the Swirls: Now, drop spoonfuls of the pink batter and the yellow batter randomly over the plain batter. Don’t be too precise the more random, the better the swirl!
- Creating the Swirl: Use a knife or skewer to gently swirl the colored batters into the plain batter. Be careful not to overmix, as you want to maintain distinct swirls of color. I like to drag the knife in a figure-eight pattern across the batter.
- Bake: Bake for 30-35 minutes, or until a wooden skewer inserted into the center comes out clean.
- Cool: Let the cake cool in the pan for 10-15 minutes before inverting it onto a wire rack to cool completely.
Preparing the Glaze:
- Whisk Ingredients: In a medium bowl, whisk together the powdered sugar, milk, and vanilla extract until smooth. Add more milk, a teaspoon at a time, until you reach your desired consistency. I prefer a glaze that’s thick enough to coat the cake nicely but thin enough to drizzle easily.
- Glaze the Cake: Once the cake is completely cool, drizzle the glaze over the top.
- Decorate: Immediately sprinkle with sprinkles, if desired. The glaze will set quickly, so you want to add the sprinkles while it’s still wet.
- Set and Serve: Let the glaze set for about 15-20 minutes before slicing and serving.
Tips for Success:
- Room Temperature Ingredients: Using room temperature butter and eggs is crucial for creating a smooth and even batter. It helps the ingredients emulsify properly, resulting in a tender cake.
- Don’t Overmix: Overmixing develops the gluten in the flour, which can lead to a tough cake. Mix until just combined.
- Even Swirls: To prevent the colored batters from sinking to the bottom, make sure the plain batter is thick enough. If it seems too thin, add a tablespoon or two of flour.
- Cool Completely: Make sure the cake is completely cool before glazing. Otherwise, the glaze will melt and run off.
- Variations: Feel free to experiment with different flavors and colors! You could use orange extract and orange food coloring, or almond extract and green food coloring. The possibilities are endless! You can also add chocolate chips, nuts, or dried fruit to the batter.
- Storage: Store the cake in an airtight container at room temperature for up to 3 days. You can also freeze the cake for up to 2 months. Wrap it tightly in plastic wrap and then in foil.
Troubleshooting:
- Cake is dry: This could be due to overbaking or using too much flour. Make sure to measure the flour accurately and don’t overbake the cake.
- Cake is sinking in the middle: This could be due to underbaking or opening the oven door too early. Make sure the cake is fully baked before removing it from the oven.
- Swirls are not distinct: This could be due to overmixing the colored batters into the plain batter. Be gentle when swirling.
- Glaze is too thin: Add more powdered sugar, a tablespoon at a time, until you reach your desired consistency.
- Glaze is too thick: Add more milk, a teaspoon at a time, until you reach your desired consistency.
Enjoy!
I hope you enjoy making and eating this delicious Easter Swirl Cake! It’s a fun and festive treat that’s perfect for any occasion. Happy baking!
Conclusion:
This Easter Swirl Cake isn’t just a dessert; it’s a celebration on a plate! From the vibrant colors that mimic the joy of springtime to the moist, tender crumb that melts in your mouth, every bite is a delightful experience. I truly believe this recipe is a must-try for anyone looking to add a touch of magic to their Easter gathering or simply brighten up a spring afternoon. It’s surprisingly easy to make, even for beginner bakers, and the visual impact is absolutely stunning. Forget store-bought cakes this year; impress your family and friends with this homemade masterpiece!
But the best part? This recipe is incredibly versatile! While I’ve shared my favorite combination of vanilla and lemon flavors, feel free to experiment with your own. Imagine a chocolate swirl with a hint of raspberry, or perhaps a coconut cake base with a lime swirl for a tropical twist. You could even add chopped nuts or dried fruit to the batter for extra texture and flavor. For a truly decadent treat, try frosting the cooled cake with a simple cream cheese frosting or a rich chocolate ganache.
Serving suggestions are endless! A slice of this Easter Swirl Cake pairs perfectly with a scoop of vanilla ice cream or a dollop of whipped cream. It’s also delicious served with a cup of coffee or tea. For a more festive presentation, garnish the cake with fresh berries, edible flowers, or a dusting of powdered sugar. If you’re feeling extra creative, you could even create a mini Easter egg hunt around the cake, hiding small chocolate eggs for your guests to discover.
Don’t be intimidated by the swirl effect; it’s much easier than it looks! Just remember to alternate the batters carefully and use a skewer or knife to create the swirling pattern. The key is not to overmix, as this can result in a tough cake. And don’t worry if your swirl isn’t perfect; the imperfections are what make it unique and charming!
I’m so excited for you to try this recipe and experience the joy of baking your own Easter Swirl Cake. I’m confident that it will become a new family favorite. I really put my heart into creating this recipe, and I know you’ll love it as much as I do.
So, what are you waiting for? Gather your ingredients, preheat your oven, and get ready to create a show-stopping dessert that will impress everyone. And most importantly, have fun! Baking should be a joyful experience, so relax, put on some music, and enjoy the process.
Once you’ve made your own version of this delicious cake, I would absolutely love to hear about your experience! Share your photos and stories in the comments below. Did you make any variations? What were your favorite flavor combinations? What did your family and friends think? I can’t wait to see your creations and hear all about your baking adventures. Happy baking, and Happy Easter! I hope this Easter Swirl Cake brings a little extra sweetness to your holiday celebration.
Easter Swirl Cake: A Delicious and Festive Recipe
Festive Easter Swirl Cake with pink and yellow swirls, vanilla glaze, and sprinkles. Perfect for celebrations!
Ingredients
- 3 cups all-purpose flour, plus more for dusting
- 1 teaspoon baking powder
- 1/2 teaspoon baking soda
- 1/4 teaspoon salt
- 1 cup (2 sticks) unsalted butter, softened
- 1 3/4 cups granulated sugar
- 3 large eggs
- 1 1/2 teaspoons vanilla extract
- 1 1/4 cups buttermilk
- 1/2 cup reserved cake batter
- 1-2 tablespoons milk (if needed to thin)
- 1/4 teaspoon red food coloring gel (or more, to desired shade)
- 1/4 teaspoon strawberry extract (optional, for enhanced flavor)
- 1/2 cup reserved cake batter
- 1-2 tablespoons milk (if needed to thin)
- 1/4 teaspoon yellow food coloring gel (or more, to desired shade)
- 1/4 teaspoon lemon extract (optional, for enhanced flavor)
- 2 cups powdered sugar
- 1/4 cup milk (or more, to desired consistency)
- 1/2 teaspoon vanilla extract
- Sprinkles, for decoration (optional)
Instructions
- Preheat your oven to 350°F (175°C). Grease and flour a 9×13 inch baking pan.
- In a medium bowl, whisk together the flour, baking powder, baking soda, and salt.
- In a large bowl (or the bowl of your stand mixer), cream together the softened butter and granulated sugar until light and fluffy (3-5 minutes).
- Beat in the eggs one at a time, then stir in the vanilla extract.
- Gradually add the dry ingredients to the wet ingredients, alternating with the buttermilk. Begin and end with the dry ingredients. Mix until just combined.
- Divide the batter into three bowls: one with the majority of the batter (base), and two smaller bowls with about 1/2 cup of batter each.
- In one of the smaller bowls, add the red food coloring gel and strawberry extract (if using) to the batter. Stir until the color is evenly distributed. If the batter seems too thick, add a tablespoon or two of milk to thin it out slightly.
- In the other small bowl, add the yellow food coloring gel and lemon extract (if using) to the batter. Stir until the color is evenly distributed. Again, if the batter is too thick, add a tablespoon or two of milk.
- Pour the plain (uncolored) batter into the prepared baking pan and spread it evenly.
- Drop spoonfuls of the pink batter and the yellow batter randomly over the plain batter.
- Use a knife or skewer to gently swirl the colored batters into the plain batter. Be careful not to overmix.
- Bake for 30-35 minutes, or until a wooden skewer inserted into the center comes out clean.
- Let the cake cool in the pan for 10-15 minutes before inverting it onto a wire rack to cool completely.
- In a medium bowl, whisk together the powdered sugar, milk, and vanilla extract until smooth. Add more milk, a teaspoon at a time, until you reach your desired consistency.
- Once the cake is completely cool, drizzle the glaze over the top.
- Immediately sprinkle with sprinkles, if desired.
- Let the glaze set for about 15-20 minutes before slicing and serving.
Notes
- Using room temperature butter and eggs is crucial for creating a smooth and even batter.
- Don’t overmix the batter.
- To prevent the colored batters from sinking to the bottom, make sure the plain batter is thick enough.
- Make sure the cake is completely cool before glazing.
- Feel free to experiment with different flavors and colors.
- Store the cake in an airtight container at room temperature for up to 3 days. You can also freeze the cake for up to 2 months.
- If the cake is dry, this could be due to overbaking or using too much flour.
- If the cake is sinking in the middle, this could be due to underbaking or opening the oven door too early.
- If the swirls are not distinct, this could be due to overmixing the colored batters into the plain batter.
- If the glaze is too thin, add more powdered sugar, a tablespoon at a time, until you reach your desired consistency.
- If the glaze is too thick, add more milk, a teaspoon at a time, until you reach your desired consistency.