Coconut Quinoa Breakfast Cups: the make-ahead breakfast that will revolutionize your mornings! Are you tired of skipping breakfast or grabbing something unhealthy on your way out the door? I know I was! That’s why I’m so excited to share this recipe with you. These aren’t just any breakfast cups; they’re a delicious, nutritious, and incredibly convenient way to start your day.
Quinoa, a grain revered by the ancient Incas as the “mother of all grains,” has become a modern-day superfood. Its nutty flavor and impressive protein content make it a perfect base for these breakfast cups. The addition of coconut not only adds a tropical sweetness but also provides healthy fats to keep you feeling full and energized for hours.
What makes these Coconut Quinoa Breakfast Cups so irresistible? It’s the delightful combination of textures the slight chewiness of the quinoa, the creamy coconut milk, and the burst of flavor from your favorite fruits and nuts. Plus, they’re incredibly versatile! You can customize them with whatever ingredients you have on hand, making them a perfect way to use up leftover fruit or pantry staples. But the best part? You can make a batch on Sunday and have a healthy, delicious breakfast ready to go all week long. Say goodbye to rushed mornings and hello to a stress-free, nutritious start to your day!
Ingredients:
- 1 cup quinoa, rinsed
- 2 cups unsweetened coconut milk (plus extra for soaking)
- 1/2 cup shredded unsweetened coconut
- 1/4 cup chia seeds
- 1/4 cup maple syrup (or honey, agave)
- 1 teaspoon vanilla extract
- 1/2 teaspoon ground cinnamon
- 1/4 teaspoon ground nutmeg
- Pinch of salt
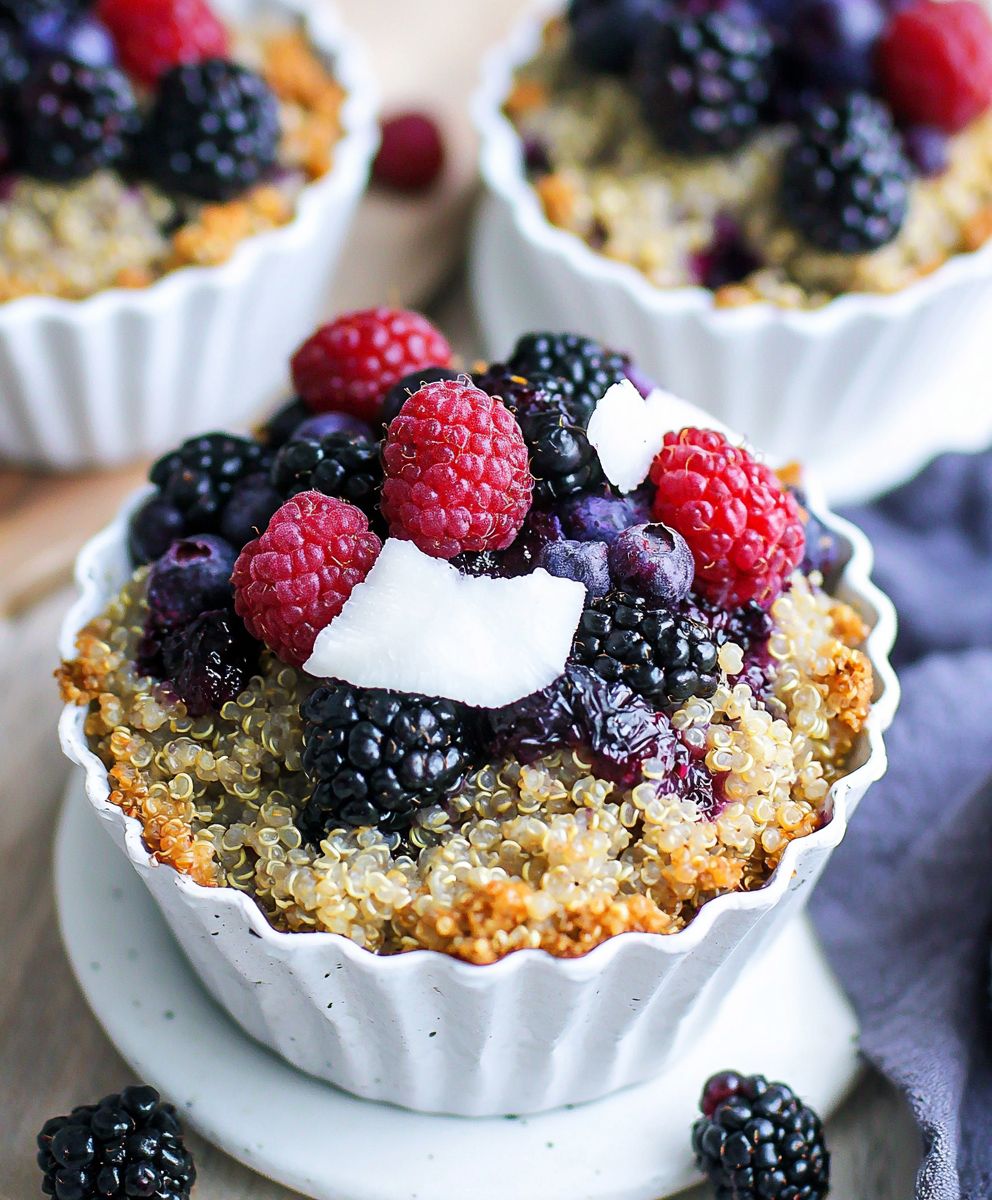
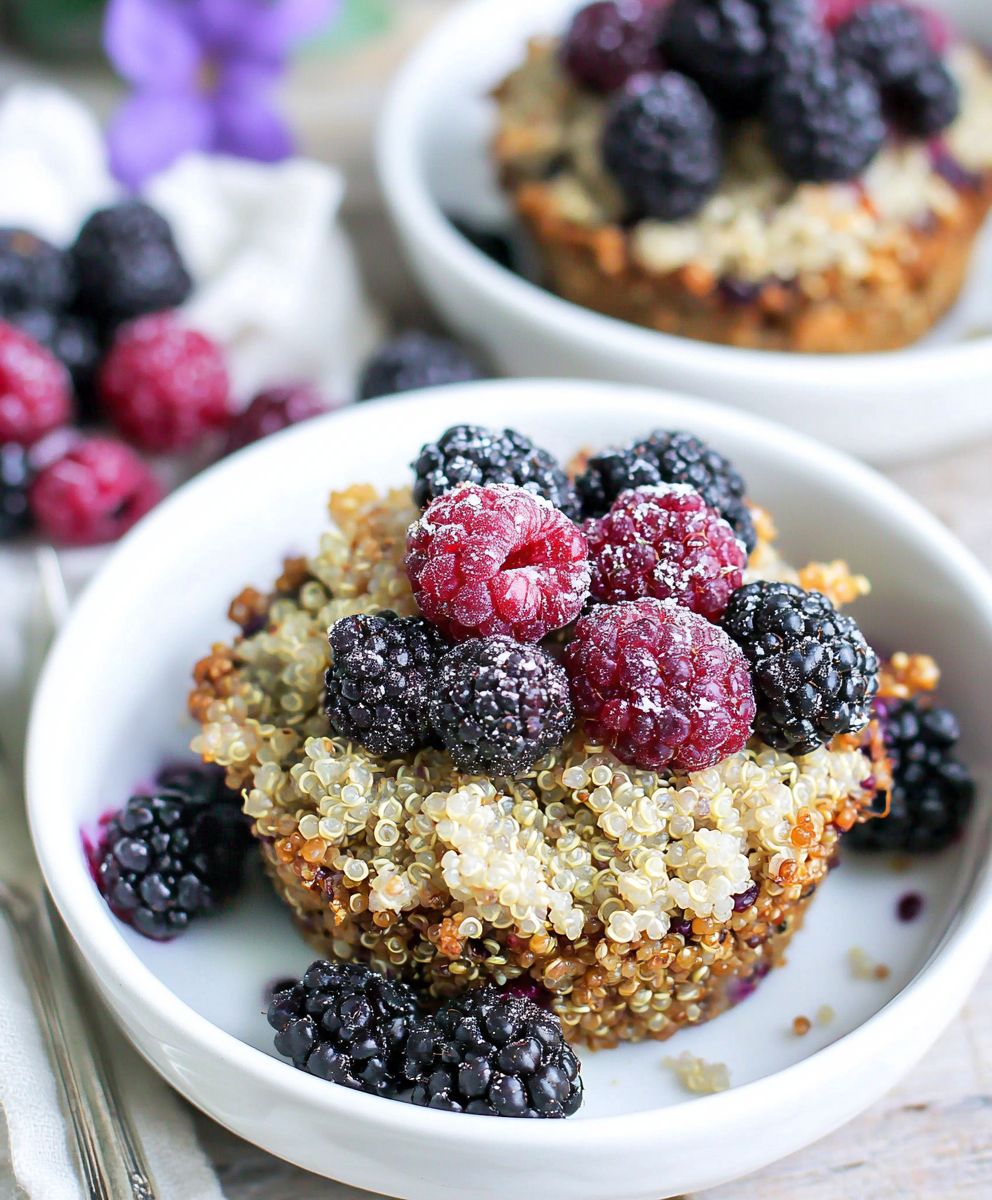
- Optional toppings: fresh berries (strawberries, blueberries, raspberries), sliced banana, toasted coconut flakes, chopped nuts (almonds, pecans, walnuts), a drizzle of maple syrup or coconut cream.
Preparing the Quinoa Base:
- Rinse the quinoa thoroughly. This is a crucial step! Rinsing removes the saponins, which are natural compounds that can give quinoa a bitter taste. Place the quinoa in a fine-mesh sieve and rinse under cold running water for about 2-3 minutes, until the water runs clear.
- Combine quinoa and coconut milk. In a medium saucepan, combine the rinsed quinoa and 2 cups of unsweetened coconut milk. Make sure the quinoa is fully submerged. If not, add a splash more coconut milk.
- Bring to a boil, then simmer. Place the saucepan over medium-high heat and bring the mixture to a boil. Once boiling, reduce the heat to low, cover the saucepan, and simmer for 15-20 minutes, or until the quinoa is cooked through and the liquid has been absorbed. Keep an eye on it to prevent burning. If the liquid is absorbed before the quinoa is cooked, add a little more coconut milk, about 1/4 cup at a time, and continue simmering.
- Fluff and cool slightly. Once the quinoa is cooked, remove the saucepan from the heat and fluff the quinoa with a fork. Let it cool slightly for about 5-10 minutes. This will prevent the chia seeds from clumping together too much when you add them.
Mixing in the Flavor and Texture:
- Add the remaining ingredients. To the slightly cooled quinoa, add the shredded coconut, chia seeds, maple syrup (or your chosen sweetener), vanilla extract, cinnamon, nutmeg, and salt.
- Stir well to combine. Stir all the ingredients together thoroughly until everything is evenly distributed. Make sure the chia seeds are well incorporated to prevent them from settling at the bottom.
- Let the mixture thicken. This is where the magic happens! Cover the bowl with plastic wrap or a lid and refrigerate for at least 2 hours, or preferably overnight. This allows the chia seeds to absorb the liquid and create a thick, pudding-like consistency. The longer it sits, the thicker it will become.
- Check the consistency and adjust if needed. After chilling, check the consistency of the quinoa mixture. If it’s too thick for your liking, add a little more coconut milk, one tablespoon at a time, until you reach your desired consistency. If it’s too thin, you can add a little more chia seeds (about 1 teaspoon at a time), stir well, and let it sit for another 30 minutes to thicken further.
Assembling the Breakfast Cups:
- Prepare your muffin tin. Lightly grease a 12-cup muffin tin with coconut oil or cooking spray. You can also use silicone muffin liners for easy removal.
- Fill the muffin cups. Spoon the quinoa mixture evenly into the prepared muffin cups, filling each cup almost to the top.
- Optional: Add toppings before baking. If you want to incorporate some toppings into the cups themselves, you can press some fresh berries, chopped nuts, or extra shredded coconut into the top of each cup before baking. This will add a nice visual appeal and extra flavor.
Baking the Breakfast Cups (Optional):
- Preheat your oven. Preheat your oven to 350°F (175°C).
- Bake the cups. Place the muffin tin in the preheated oven and bake for 15-20 minutes, or until the tops are lightly golden brown and the cups are set. Baking is optional; you can enjoy these chilled without baking. Baking will give them a slightly firmer texture and a warmer, more comforting feel.
- Cool slightly before removing. Once baked, remove the muffin tin from the oven and let the cups cool in the tin for about 5-10 minutes before attempting to remove them. This will help them firm up and prevent them from crumbling.
- Remove from the muffin tin. Carefully remove the breakfast cups from the muffin tin. If you used silicone liners, they should pop out easily. If you greased the tin, you may need to use a thin spatula to loosen the edges.
Serving and Storing:
- Serve warm or cold. These Coconut Quinoa Breakfast Cups can be enjoyed warm, straight from the oven (if baked), or cold, straight from the refrigerator. I personally love them both ways!
- Add your favorite toppings. Before serving, top the breakfast cups with your favorite toppings. Some of my go-to options include fresh berries (strawberries, blueberries, raspberries), sliced banana, toasted coconut flakes, chopped nuts (almonds, pecans, walnuts), and a drizzle of maple syrup or coconut cream. Get creative and customize them to your liking!
- Store leftovers properly. Store any leftover breakfast cups in an airtight container in the refrigerator for up to 5 days. They are perfect for meal prepping and grabbing a quick and healthy breakfast on the go.
- Freezing for longer storage. You can also freeze these breakfast cups for longer storage. Wrap each cup individually in plastic wrap or place them in a freezer-safe container. They can be stored in the freezer for up to 2-3 months. To thaw, simply transfer them to the refrigerator overnight or microwave them for a minute or two until heated through.
Tips and Variations:
- Sweetness Level: Adjust the amount of maple syrup (or your chosen sweetener) to your liking. If you prefer a less sweet breakfast, start with 1/4 cup and add more as needed.
- Nut Butter Boost: For an extra boost of protein and healthy fats, try adding a tablespoon or two of your favorite nut butter (almond butter, peanut butter, cashew butter) to the quinoa mixture.
- Chocolate Chip Delight: If you’re craving something a little more decadent, add a handful of mini chocolate chips to the quinoa mixture.
- Spice it Up: Experiment with different spices. Try adding a pinch of cardamom, ginger, or allspice for a warm and flavorful twist.
- Fruit Infusion: Incorporate other fruits into the quinoa mixture. Diced apples, pears, or peaches would be delicious additions.
- Vegan Option: This recipe is naturally vegan, but be sure to use maple syrup or agave nectar as your sweetener instead of honey.
- Gluten-Free: Quinoa is naturally gluten-free, making this recipe a great option for those with gluten sensitivities.
- Make it a Parfait: Instead of baking, layer the quinoa mixture with yogurt and fresh berries in a glass or jar for a beautiful and delicious breakfast parfait.
- Overnight Oats Variation: For a no-bake option, combine all the ingredients in a jar or container and let it sit in the refrigerator overnight. This will create a delicious and creamy overnight oats-style breakfast.
Enjoy your delicious and healthy Coconut Quinoa Breakfast Cups!
Conclusion:
These Coconut Quinoa Breakfast Cups are truly a game-changer for busy mornings, and I wholeheartedly believe you need to try them! They’re not just another breakfast option; they’re a delicious, nutritious, and incredibly convenient way to start your day. The creamy coconut milk perfectly complements the nutty quinoa, creating a flavor profile that’s both satisfying and subtly sweet. The added fruit provides a burst of freshness and essential vitamins, making these cups a powerhouse of goodness. But the real magic lies in their versatility. You can customize these breakfast cups to your heart’s content! Feeling adventurous? Try adding a pinch of cinnamon or nutmeg for a warm, comforting spice. Craving something a little richer? A drizzle of maple syrup or a dollop of Greek yogurt will do the trick. And don’t be afraid to experiment with different fruits! Berries, bananas, peaches, mangoes the possibilities are endless. You can even throw in some chopped nuts or seeds for added crunch and healthy fats. These Coconut Quinoa Breakfast Cups are also perfect for meal prepping. Make a batch on Sunday, and you’ll have a healthy and delicious breakfast ready to go all week long. They’re also incredibly portable, making them ideal for taking to work, school, or even on a road trip. Just grab a cup from the fridge, and you’re good to go! Beyond breakfast, these cups can also serve as a healthy snack or even a light dessert. Warm them up slightly for a cozy treat on a chilly evening, or enjoy them cold straight from the fridge on a hot summer day. They’re truly a versatile recipe that you’ll find yourself reaching for again and again. I know that trying a new recipe can sometimes feel daunting, but trust me, this one is worth it. The ingredients are simple, the instructions are easy to follow, and the results are absolutely delicious. Plus, you’ll feel good knowing that you’re starting your day with a healthy and wholesome meal. So, what are you waiting for? Grab your ingredients, put on your apron, and get ready to whip up a batch of these amazing Coconut Quinoa Breakfast Cups. I promise you won’t be disappointed. And once you’ve tried them, I’d love to hear what you think! Share your photos and comments on social media using #CoconutQuinoaCups. Let me know what variations you tried and what your favorite combinations are. I’m always looking for new ideas and inspiration, and I can’t wait to see what you create! Your feedback is invaluable, and it helps me to continue creating recipes that you’ll love. So, don’t be shy share your culinary adventures with me and the rest of the community! Happy cooking! Print
Coconut Quinoa Breakfast Cups: A Healthy & Delicious Recipe
- Total Time: 150 minutes
- Yield: 12 breakfast cups 1x
Description
Wholesome and delicious Coconut Quinoa Breakfast Cups, packed with flavor and nutrients. Enjoy them warm or cold, topped with your favorite fruits and nuts for a healthy and satisfying start to your day!
Ingredients
- 1 cup quinoa, rinsed
- 2 cups unsweetened coconut milk (plus extra for soaking)
- 1/2 cup shredded unsweetened coconut
- 1/4 cup chia seeds
- 1/4 cup maple syrup (or honey, agave)
- 1 teaspoon vanilla extract
- 1/2 teaspoon ground cinnamon
- 1/4 teaspoon ground nutmeg
- Pinch of salt
Instructions
- Rinse the quinoa thoroughly: Place the quinoa in a fine-mesh sieve and rinse under cold running water for about 2-3 minutes, until the water runs clear.
- Combine quinoa and coconut milk: In a medium saucepan, combine the rinsed quinoa and 2 cups of unsweetened coconut milk. Make sure the quinoa is fully submerged. If not, add a splash more coconut milk.
- Bring to a boil, then simmer: Place the saucepan over medium-high heat and bring the mixture to a boil. Once boiling, reduce the heat to low, cover the saucepan, and simmer for 15-20 minutes, or until the quinoa is cooked through and the liquid has been absorbed. Keep an eye on it to prevent burning. If the liquid is absorbed before the quinoa is cooked, add a little more coconut milk, about 1/4 cup at a time, and continue simmering.
- Fluff and cool slightly: Once the quinoa is cooked, remove the saucepan from the heat and fluff the quinoa with a fork. Let it cool slightly for about 5-10 minutes.
- Add the remaining ingredients: To the slightly cooled quinoa, add the shredded coconut, chia seeds, maple syrup (or your chosen sweetener), vanilla extract, cinnamon, nutmeg, and salt.
- Stir well to combine: Stir all the ingredients together thoroughly until everything is evenly distributed.
- Let the mixture thicken: Cover the bowl with plastic wrap or a lid and refrigerate for at least 2 hours, or preferably overnight.
- Check the consistency and adjust if needed: After chilling, check the consistency of the quinoa mixture. If it’s too thick for your liking, add a little more coconut milk, one tablespoon at a time, until you reach your desired consistency. If it’s too thin, you can add a little more chia seeds (about 1 teaspoon at a time), stir well, and let it sit for another 30 minutes to thicken further.
- Prepare your muffin tin: Lightly grease a 12-cup muffin tin with coconut oil or cooking spray. You can also use silicone muffin liners for easy removal.
- Fill the muffin cups: Spoon the quinoa mixture evenly into the prepared muffin cups, filling each cup almost to the top.
- Optional: Add toppings before baking. If you want to incorporate some toppings into the cups themselves, you can press some fresh berries, chopped nuts, or extra shredded coconut into the top of each cup before baking.
- Preheat your oven: Preheat your oven to 350°F (175°C). (Optional)
- Bake the cups: Place the muffin tin in the preheated oven and bake for 15-20 minutes, or until the tops are lightly golden brown and the cups are set. Baking is optional; you can enjoy these chilled without baking. (Optional)
- Cool slightly before removing: Once baked, remove the muffin tin from the oven and let the cups cool in the tin for about 5-10 minutes before attempting to remove them. (Optional)
- Remove from the muffin tin: Carefully remove the breakfast cups from the muffin tin. (Optional)
- Serve warm or cold: These Coconut Quinoa Breakfast Cups can be enjoyed warm, straight from the oven (if baked), or cold, straight from the refrigerator.
- Add your favorite toppings: Before serving, top the breakfast cups with your favorite toppings.
- Store leftovers properly: Store any leftover breakfast cups in an airtight container in the refrigerator for up to 5 days.
- Freezing for longer storage: You can also freeze these breakfast cups for longer storage. Wrap each cup individually in plastic wrap or place them in a freezer-safe container. They can be stored in the freezer for up to 2-3 months. To thaw, simply transfer them to the refrigerator overnight or microwave them for a minute or two until heated through.
Notes
- Sweetness Level: Adjust the amount of maple syrup (or your chosen sweetener) to your liking.
- Nut Butter Boost: Add a tablespoon or two of your favorite nut butter for extra protein and healthy fats.
- Chocolate Chip Delight: Add a handful of mini chocolate chips.
- Spice it Up: Experiment with different spices like cardamom, ginger, or allspice.
- Fruit Infusion: Incorporate other fruits like diced apples, pears, or peaches.
- Vegan Option: Use maple syrup or agave nectar as your sweetener instead of honey.
- Gluten-Free: This recipe is naturally gluten-free.
- Make it a Parfait: Layer the quinoa mixture with yogurt and fresh berries in a glass or jar.
- Overnight Oats Variation: Combine all the ingredients in a jar or container and let it sit in the refrigerator overnight.
- Prep Time: 10 minutes
- Cook Time: 20 minutes