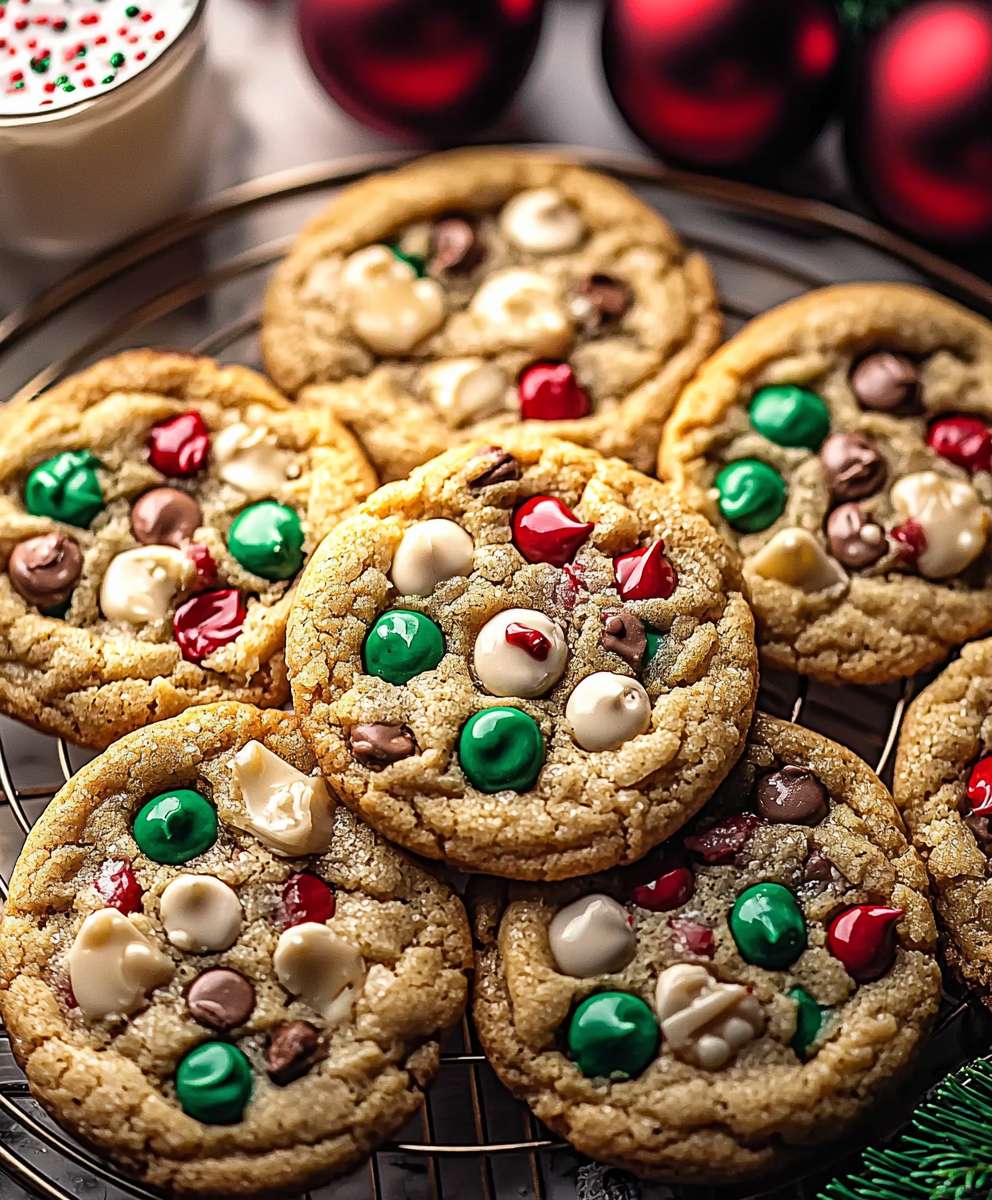
Christmas Kitchen Sink Cookies: Prepare to embark on a delightful baking adventure that will transform your holiday season! Imagine sinking your teeth into a cookie that’s a symphony of sweet, salty, and crunchy textures a true explosion of festive flavors. These aren’t just any cookies; they’re a celebration in every bite, a testament to the joy of the holidays.
The beauty of “kitchen sink” recipes lies in their adaptability and resourcefulness. While the exact origins are shrouded in culinary lore, the spirit of using what you have on hand to create something extraordinary resonates deeply with the traditions of home baking. It’s a way to minimize waste and maximize deliciousness, a practice that has been passed down through generations.
What makes Christmas Kitchen Sink Cookies so irresistible? It’s the unexpected combination of ingredients! The sweetness of chocolate chips dances with the saltiness of pretzels, while the chewiness of dried cranberries complements the crunch of nuts. This delightful contrast keeps your taste buds engaged and wanting more. Plus, they are incredibly easy to customize, making them a perfect activity for the whole family. These cookies are not only delicious but also a fantastic way to use up leftover holiday treats, ensuring nothing goes to waste. Get ready to create a batch of these unforgettable cookies and spread some holiday cheer!

Ingredients:
- 1 cup (2 sticks) unsalted butter, softened
- 1 cup granulated sugar
- 1 cup packed light brown sugar
- 2 large eggs
- 1 teaspoon vanilla extract
- 3 cups all-purpose flour
- 1 teaspoon baking soda
- 1 teaspoon salt
- 1 teaspoon ground cinnamon
- ½ teaspoon ground nutmeg
- 1 cup semi-sweet chocolate chips
- 1 cup milk chocolate chips
- 1 cup peanut butter chips
- 1 cup crushed pretzels
- 1 cup rolled oats
- 1 cup shredded coconut (sweetened or unsweetened, your preference!)
- 1 cup chopped pecans or walnuts (optional)
- 1 cup dried cranberries
- ½ cup toffee bits
- ½ cup mini marshmallows
Preparing the Dough: The Foundation of Deliciousness
- Cream the Butter and Sugars: In a large bowl, or the bowl of your stand mixer, cream together the softened butter, granulated sugar, and brown sugar until light and fluffy. This usually takes about 3-5 minutes. Don’t rush this step! Properly creaming the butter and sugar incorporates air, which is crucial for a tender cookie. Scrape down the sides of the bowl occasionally to ensure everything is evenly mixed.
- Incorporate the Eggs and Vanilla: Beat in the eggs one at a time, making sure each egg is fully incorporated before adding the next. Then, stir in the vanilla extract. The vanilla enhances all the other flavors, so don’t skip it!
- Combine Dry Ingredients: In a separate medium bowl, whisk together the flour, baking soda, salt, cinnamon, and nutmeg. Whisking ensures that the baking soda and spices are evenly distributed throughout the flour, which is important for proper leavening and flavor.
- Gradually Add Dry Ingredients to Wet Ingredients: Gradually add the dry ingredients to the wet ingredients, mixing on low speed until just combined. Be careful not to overmix! Overmixing develops the gluten in the flour, which can result in tough cookies. Mix until you see the flour just disappear.
- The Fun Part: Adding the Mix-Ins! This is where the “kitchen sink” magic happens! Gently fold in the chocolate chips (semi-sweet, milk chocolate, and peanut butter), crushed pretzels, rolled oats, shredded coconut, chopped nuts (if using), dried cranberries, toffee bits, and mini marshmallows. Make sure everything is evenly distributed throughout the dough. I like to use a large spatula for this to avoid overmixing.
- Chill the Dough (Important!): Cover the bowl with plastic wrap and chill the dough in the refrigerator for at least 30 minutes, or even better, for 1-2 hours. Chilling the dough allows the flavors to meld together and prevents the cookies from spreading too thin during baking. This step is crucial for achieving that perfect chewy texture. You can even chill it overnight for an even more developed flavor.
Baking Process: Achieving Cookie Perfection
- Preheat the Oven: Preheat your oven to 375°F (190°C). Make sure your oven rack is in the center position.
- Prepare Baking Sheets: Line baking sheets with parchment paper or silicone baking mats. This prevents the cookies from sticking and makes cleanup a breeze.
- Scoop the Dough: Use a cookie scoop or spoon to drop rounded tablespoons of dough onto the prepared baking sheets, leaving about 2 inches between each cookie. The cookies will spread a bit during baking, so don’t overcrowd the baking sheet.
- Bake the Cookies: Bake for 9-11 minutes, or until the edges are golden brown and the centers are set. Keep a close eye on them, as baking times can vary depending on your oven.
- Cool on Baking Sheets: Remove the baking sheets from the oven and let the cookies cool on the baking sheets for a few minutes before transferring them to a wire rack to cool completely. This allows the cookies to firm up a bit and prevents them from breaking when you move them.
Tips and Variations: Making These Cookies Your Own
- Adjust the Sweetness: If you prefer a less sweet cookie, you can reduce the amount of sugar slightly.
- Nut-Free Option: Omit the nuts or substitute with sunflower seeds for a nut-free version.
- Spice It Up: Add a pinch of ground cloves or ginger for a warmer, spicier flavor.
- Add Different Candies: Feel free to experiment with different types of candies, such as M&Ms, chopped candy bars, or sprinkles.
- Make Them Gluten-Free: Substitute the all-purpose flour with a gluten-free all-purpose flour blend. Be sure to choose a blend that contains xanthan gum for best results.
- Storage: Store the cooled cookies in an airtight container at room temperature for up to 5 days.
- Freezing: You can freeze the cookie dough for up to 2 months. Scoop the dough into balls and place them on a baking sheet lined with parchment paper. Freeze until solid, then transfer the frozen dough balls to a freezer bag. When ready to bake, bake from frozen, adding a few extra minutes to the baking time. You can also freeze the baked cookies for up to 2 months.
- Pretzel Size Matters: I prefer using pretzel sticks and crushing them myself, but you can also use pretzel snaps. Just make sure they are crushed into small pieces, but not too fine. You want some texture!
- Marshmallow Tip: If you find the mini marshmallows are melting too much during baking, try tossing them in a little bit of flour before adding them to the dough. This helps to coat them and prevent them from melting as quickly.
- Don’t Overbake: Overbaked cookies will be dry and crumbly. You want them to be slightly soft in the center when you take them out of the oven. They will continue to bake as they cool on the baking sheet.
- Use Quality Ingredients: The quality of your ingredients will affect the taste of your cookies. Use good quality butter, chocolate chips, and vanilla extract for the best results.
Troubleshooting: Common Cookie Problems and Solutions
Why are my cookies spreading too thin?
There are several reasons why your cookies might be spreading too thin. One common reason is that the butter was too soft. Make sure your butter is softened but not melted. Another reason is that the dough wasn’t chilled long enough. Chilling the dough helps to firm up the butter and prevent the cookies from spreading too much. Finally, overmixing the dough can also cause the cookies to spread. Be careful not to overmix the dough, especially after adding the flour.
Why are my cookies dry and crumbly?
Dry and crumbly cookies are usually the result of overbaking. Make sure you are not baking the cookies for too long. You want them to be slightly soft in the center when you take them out of the oven. Another reason could be that you used too much flour. Be sure to measure your flour accurately. Spoon the flour into the measuring cup and level it off with a knife. Don’t pack the flour into the measuring cup.
Why are my cookies not spreading enough?
If your cookies are not spreading enough, it could be that you used too much flour or that the butter was too cold. Make sure you are measuring your flour accurately and that your butter is softened but not melted. Another reason could be that you didn’t use enough sugar. Sugar helps the cookies to spread. Finally, make sure your baking soda is fresh. Old baking soda will not work as well and can prevent the cookies from spreading.
Why are my cookies burning on the bottom?
If your cookies are burning on the bottom, it could be that your oven is too hot or that your baking sheets are too thin. Try lowering the oven temperature by 25 degrees and using thicker baking sheets. You can also try placing a second baking sheet underneath the first one to insulate the cookies from the heat.
Why are my cookies sticking to the baking sheet?
To prevent your cookies from sticking to the baking sheet, line the baking sheet with parchment paper or a silicone baking mat. This will create a barrier between the cookies and the baking sheet and prevent them from sticking.
Conclusion:
And there you have it! These Christmas Kitchen Sink Cookies are more than just a recipe; they’re a festive explosion of flavor and texture, guaranteed to become a holiday tradition. I truly believe this is a must-try recipe because it perfectly captures the spirit of Christmas a little bit of everything wonderful, all mixed together in joyful harmony. Forget those perfectly uniform, meticulously decorated cookies; these are all about embracing the delightful chaos and unexpected combinations that make the holidays so special. What makes these cookies so irresistible? It’s the symphony of sweet, salty, crunchy, and chewy all playing together on your taste buds. The rich chocolate chunks melt in your mouth, the pretzels offer a satisfying salty crunch, the colorful sprinkles add a touch of whimsy, and the chewy oats provide a comforting base. It’s a textural and flavor adventure in every single bite! Plus, they are incredibly easy to make, even if you’re not a seasoned baker. The recipe is forgiving and adaptable, allowing you to customize it to your own preferences and pantry staples. But the real magic of these cookies lies in their versatility. They’re perfect for so many occasions! Imagine serving them warm from the oven with a scoop of vanilla ice cream for a decadent dessert. Or, package them up in festive tins as thoughtful homemade gifts for friends and family. They’re also ideal for cookie exchanges, holiday parties, or simply enjoying with a cup of hot cocoa by the fireplace. Looking for serving suggestions or variations? The possibilities are endless! For a richer, more intense chocolate flavor, try using dark chocolate chunks instead of semi-sweet. If you’re a fan of nuts, add a handful of chopped pecans or walnuts to the dough. Craving a little extra sweetness? Toss in some mini marshmallows or butterscotch chips. And for a truly festive touch, drizzle the cooled cookies with melted white chocolate and sprinkle with crushed candy canes. You can even adapt the recipe for other holidays by changing the sprinkles and candies to match the occasion. Think pastel sprinkles for Easter or orange and black sprinkles for Halloween! Don’t be afraid to experiment and get creative with your own Christmas Kitchen Sink Cookies. That’s the beauty of this recipe it’s all about using what you have on hand and creating something truly unique and delicious. I encourage you to gather your ingredients, preheat your oven, and embark on this baking adventure. I promise you won’t be disappointed. I’m so excited for you to try this recipe and experience the joy of these incredible cookies for yourself. Once you’ve baked a batch (or two!), I would absolutely love to hear about your experience. Did you make any substitutions or variations? What were your favorite ingredients to include? What did your friends and family think? Please share your photos and stories in the comments below! Let’s spread the holiday cheer and inspire others to create their own delicious versions of these unforgettable Christmas Kitchen Sink Cookies. Happy baking, and happy holidays! Print
Christmas Kitchen Sink Cookies: The Ultimate Holiday Recipe
- Total Time: 60 minutes
- Yield: 36 cookies 1x
Description
Loaded with chocolate chips, pretzels, oats, coconut, and more, these Kitchen Sink Cookies are a delicious explosion of flavors and textures in every bite!
Ingredients
- 1 cup (2 sticks) unsalted butter, softened
- 1 cup granulated sugar
- 1 cup packed light brown sugar
- 2 large eggs
- 1 teaspoon vanilla extract
- 3 cups all-purpose flour
- 1 teaspoon baking soda
- 1 teaspoon salt
- 1 teaspoon ground cinnamon
- ½ teaspoon ground nutmeg
- 1 cup semi-sweet chocolate chips
- 1 cup milk chocolate chips
- 1 cup peanut butter chips
- 1 cup crushed pretzels
- 1 cup rolled oats
- 1 cup shredded coconut (sweetened or unsweetened, your preference!)
- 1 cup chopped pecans or walnuts (optional)
- 1 cup dried cranberries
- ½ cup toffee bits
- ½ cup mini marshmallows
Instructions
- Cream the Butter and Sugars: In a large bowl, or the bowl of your stand mixer, cream together the softened butter, granulated sugar, and brown sugar until light and fluffy (3-5 minutes). Scrape down the sides of the bowl occasionally.
- Incorporate the Eggs and Vanilla: Beat in the eggs one at a time, making sure each egg is fully incorporated before adding the next. Then, stir in the vanilla extract.
- Combine Dry Ingredients: In a separate medium bowl, whisk together the flour, baking soda, salt, cinnamon, and nutmeg.
- Gradually Add Dry Ingredients to Wet Ingredients: Gradually add the dry ingredients to the wet ingredients, mixing on low speed until just combined. Be careful not to overmix.
- Add the Mix-Ins: Gently fold in the chocolate chips (semi-sweet, milk chocolate, and peanut butter), crushed pretzels, rolled oats, shredded coconut, chopped nuts (if using), dried cranberries, toffee bits, and mini marshmallows.
- Chill the Dough: Cover the bowl with plastic wrap and chill the dough in the refrigerator for at least 30 minutes, or up to 2 hours (or overnight).
- Preheat the Oven: Preheat your oven to 375°F (190°C). Place oven rack in the center position.
- Prepare Baking Sheets: Line baking sheets with parchment paper or silicone baking mats.
- Scoop the Dough: Use a cookie scoop or spoon to drop rounded tablespoons of dough onto the prepared baking sheets, leaving about 2 inches between each cookie.
- Bake the Cookies: Bake for 9-11 minutes, or until the edges are golden brown and the centers are set.
- Cool on Baking Sheets: Remove the baking sheets from the oven and let the cookies cool on the baking sheets for a few minutes before transferring them to a wire rack to cool completely.
Notes
- Adjust the sweetness by reducing the amount of sugar slightly.
- For a nut-free option, omit the nuts or substitute with sunflower seeds.
- Add a pinch of ground cloves or ginger for a warmer, spicier flavor.
- Experiment with different types of candies, such as M&Ms, chopped candy bars, or sprinkles.
- To make them gluten-free, substitute the all-purpose flour with a gluten-free all-purpose flour blend that contains xanthan gum.
- Store the cooled cookies in an airtight container at room temperature for up to 5 days.
- Freeze the cookie dough for up to 2 months. Scoop the dough into balls and place them on a baking sheet lined with parchment paper. Freeze until solid, then transfer the frozen dough balls to a freezer bag. When ready to bake, bake from frozen, adding a few extra minutes to the baking time. You can also freeze the baked cookies for up to 2 months.
- I prefer using pretzel sticks and crushing them myself, but you can also use pretzel snaps. Just make sure they are crushed into small pieces, but not too fine. You want some texture!
- If you find the mini marshmallows are melting too much during baking, try tossing them in a little bit of flour before adding them to the dough. This helps to coat them and prevent them from melting as quickly.
- Overbaked cookies will be dry and crumbly. You want them to be slightly soft in the center when you take them out of the oven. They will continue to bake as they cool on the baking sheet.
- The quality of your ingredients will affect the taste of your cookies. Use good quality butter, chocolate chips, and vanilla extract for the best results.
- Prep Time: 20 minutes
- Cook Time: 9-11 minutes