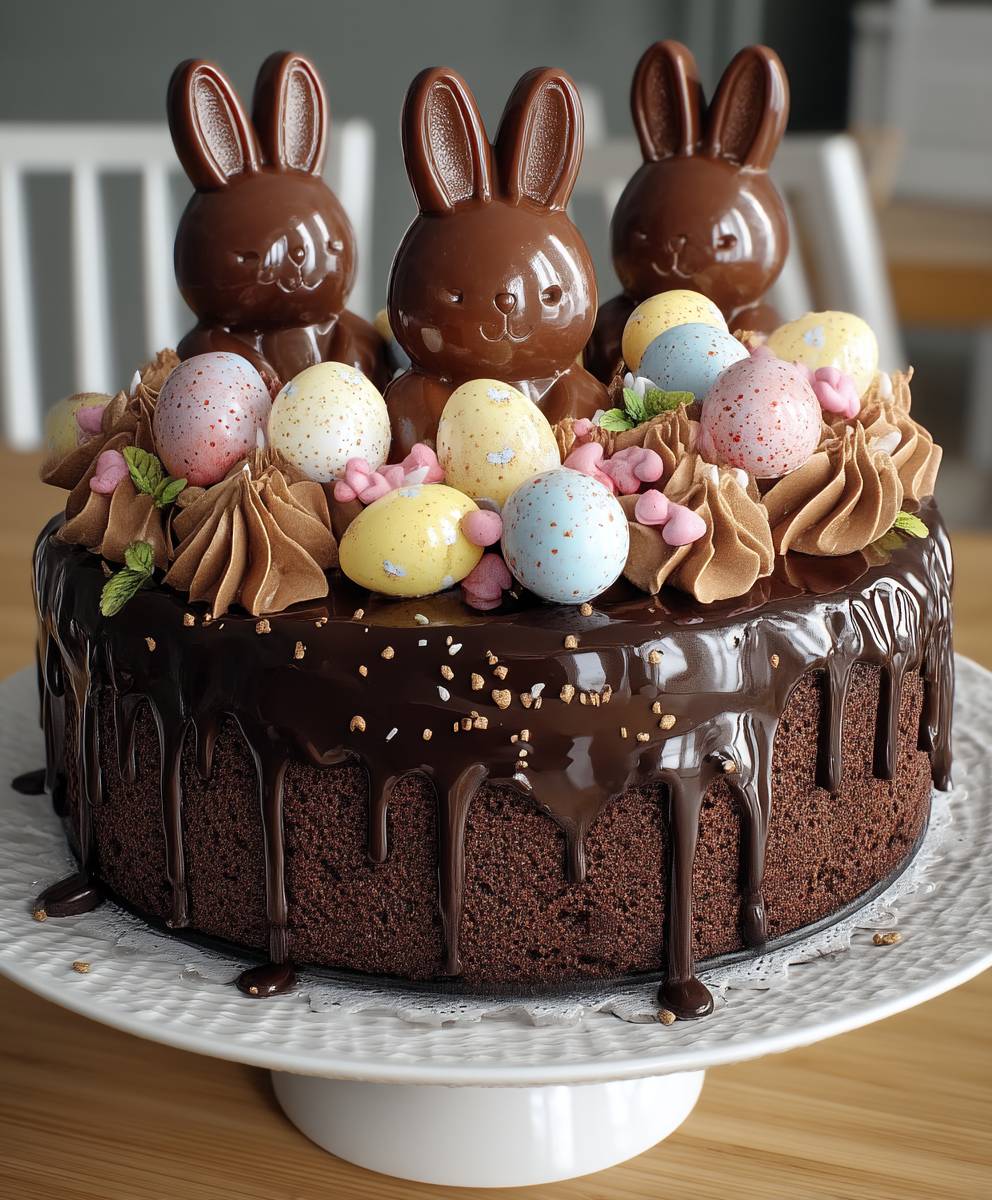
Chocolate bunny Easter cake: just the words conjure up images of spring, celebration, and, of course, deliciousness! Forget those store-bought Easter treats this year, because I’m going to show you how to create a show-stopping dessert that will have everyone hopping with joy. Imagine a moist, decadent chocolate cake, adorned with a charming chocolate bunny, surrounded by a landscape of colorful candies and sweet frosting. Sounds tempting, right?
Easter cakes, particularly those featuring bunnies and eggs, have a long and rich history, symbolizing new life and the arrival of spring. While the exact origins are debated, the tradition of baking special cakes for Easter has been around for centuries, evolving with different cultures and culinary influences. Today, the chocolate bunny Easter cake is a beloved tradition in many households, a centerpiece for Easter celebrations that brings families together.
But what makes this cake so irresistible? It’s the perfect combination of rich chocolate flavor, a soft and tender crumb, and the whimsical charm of the Easter bunny. Plus, it’s surprisingly easy to make! Whether you’re a seasoned baker or a beginner, this recipe is designed to be straightforward and fun. Get ready to impress your family and friends with a homemade Easter cake that tastes as good as it looks!

Ingredients:
- For the Chocolate Cake:
- 2 cups all-purpose flour
- 2 cups granulated sugar
- ¾ cup unsweetened cocoa powder
- 1 ½ teaspoons baking powder
- 1 ½ teaspoons baking soda
- 1 teaspoon salt
- 1 cup buttermilk
- ½ cup vegetable oil
- 2 large eggs
- 2 teaspoons vanilla extract
- 1 cup boiling water
- For the Chocolate Buttercream Frosting:
- 1 cup (2 sticks) unsalted butter, softened
- 3 cups powdered sugar
- ¾ cup unsweetened cocoa powder
- ½ cup heavy cream
- 1 teaspoon vanilla extract
- Pinch of salt
- For the Chocolate Ganache Drip:
- 4 ounces semi-sweet chocolate, finely chopped
- ½ cup heavy cream
- For Decoration:
- 1 large chocolate bunny
- Assorted Easter candies (chocolate eggs, jelly beans, etc.)
- Green tinted coconut flakes (optional, for a “grass” effect)
Preparing the Chocolate Cake:
- Preheat and Prepare: Preheat your oven to 350°F (175°C). Grease and flour two 9-inch round cake pans. I like to use baking spray with flour already in it for extra insurance against sticking. You can also line the bottoms with parchment paper circles for easy removal.
- Combine Dry Ingredients: In a large bowl, whisk together the flour, sugar, cocoa powder, baking powder, baking soda, and salt. Make sure everything is well combined to avoid any pockets of baking powder or soda.
- Add Wet Ingredients: In a separate bowl, whisk together the buttermilk, oil, eggs, and vanilla extract.
- Combine Wet and Dry: Gradually add the wet ingredients to the dry ingredients, mixing on low speed until just combined. Be careful not to overmix at this stage. Overmixing can lead to a tough cake.
- Add Boiling Water: Carefully pour in the boiling water and mix until the batter is smooth and thin. Don’t be alarmed by the thin consistency; this is what gives the cake its moistness.
- Divide and Bake: Divide the batter evenly between the prepared cake pans. Bake for 30-35 minutes, or until a wooden skewer inserted into the center comes out clean.
- Cool Completely: Let the cakes cool in the pans for 10 minutes before inverting them onto a wire rack to cool completely. This is crucial for preventing the cakes from breaking apart.
Making the Chocolate Buttercream Frosting:
- Cream the Butter: In a large bowl (or the bowl of a stand mixer), beat the softened butter on medium speed until light and fluffy. This usually takes about 3-5 minutes.
- Add Powdered Sugar and Cocoa: Gradually add the powdered sugar and cocoa powder, alternating with the heavy cream, beating on low speed until combined. Start with a low speed to prevent a powdered sugar cloud!
- Whip to Perfection: Increase the speed to medium-high and beat for 2-3 minutes, or until the frosting is light and fluffy.
- Add Vanilla and Salt: Stir in the vanilla extract and salt. Taste and adjust sweetness or cocoa flavor as needed.
Creating the Chocolate Ganache Drip:
- Heat the Cream: Place the heavy cream in a microwave-safe bowl and heat until just simmering. You can also do this in a saucepan over medium heat.
- Pour Over Chocolate: Pour the hot cream over the finely chopped chocolate.
- Let it Sit: Let the mixture sit for 1 minute to allow the heat to melt the chocolate.
- Stir Until Smooth: Gently stir the mixture until the chocolate is completely melted and the ganache is smooth and glossy. If there are still some unmelted chocolate pieces, you can microwave the mixture in 15-second intervals, stirring in between, until smooth.
- Cool Slightly: Let the ganache cool slightly until it thickens to a pourable consistency. This usually takes about 10-15 minutes. If it gets too thick, you can gently warm it up again.
Assembling the Easter Bunny Cake:
- Level the Cakes: Once the cakes are completely cool, use a serrated knife to level the tops of the cakes. This will ensure that your cake is stable and doesn’t wobble.
- Frost the First Layer: Place one cake layer on a serving plate or cake stand. Spread a generous layer of chocolate buttercream frosting evenly over the top.
- Add the Second Layer: Carefully place the second cake layer on top of the frosting.
- Crumb Coat: Apply a thin layer of frosting over the entire cake to seal in any crumbs. This is called a crumb coat. Chill the cake in the refrigerator for 30 minutes to allow the crumb coat to set.
- Final Frosting: Apply a final, thicker layer of chocolate buttercream frosting over the entire cake, smoothing it out as much as possible. You can use an offset spatula or a cake scraper for a smooth finish.
- Drip the Ganache: Carefully pour the cooled chocolate ganache around the edge of the cake, allowing it to drip down the sides. You can use a spoon or a squeeze bottle for more control.
- Decorate: Place the chocolate bunny in the center of the cake. Arrange the assorted Easter candies around the bunny and on top of the cake. If using, sprinkle the green tinted coconut flakes around the base of the bunny to create a “grass” effect.
- Chill and Serve: Chill the cake in the refrigerator for at least 30 minutes before serving to allow the ganache to set. This will also help the frosting to firm up.
Tips for Success:
- Room Temperature Ingredients: Using room temperature ingredients, especially the butter and eggs, helps to create a smoother batter and a more evenly baked cake.
- Don’t Overmix: Overmixing the cake batter can develop the gluten in the flour, resulting in a tough cake. Mix until just combined.
- Cooling is Key: Make sure the cakes are completely cool before frosting them. Warm cakes will melt the frosting and make it difficult to work with.
- Ganache Consistency: The consistency of the ganache is important for creating a beautiful drip. If it’s too thin, it will run right off the cake. If it’s too thick, it won’t drip properly. Let it cool until it reaches a pourable consistency.
- Get Creative with Decorations: Feel free to get creative with your decorations! Use different types of Easter candies, sprinkles, or even edible flowers to personalize your cake.
Variations:
- Different Cake Flavors: You can use a different cake flavor, such as vanilla, carrot, or lemon, instead of chocolate.
- Different Frosting Flavors: Experiment with different frosting flavors, such as vanilla, cream cheese, or peanut butter.
- Add Filling: Add a layer of filling between the cake layers, such as raspberry jam, chocolate mousse, or whipped cream.
- Mini Cakes: Make mini Easter bunny cakes by using cupcake pans instead of cake pans.
Conclusion:
This Chocolate Bunny Easter Cake isn’t just a dessert; it’s a centerpiece, a conversation starter, and a memory maker all rolled into one delicious package. From the moist, decadent chocolate cake to the whimsical bunny decoration, every element is designed to bring joy to your Easter celebration. It’s a recipe that’s surprisingly simple to execute, even for novice bakers, yet delivers a show-stopping result that will impress your family and friends.
Why is this a must-try? Because it perfectly captures the spirit of Easter fun, festive, and filled with sweet treats. Forget store-bought cakes that lack personality; this homemade creation is bursting with love and attention to detail. The rich chocolate flavor is irresistible, and the bunny design adds a touch of playful charm that kids (and adults!) will adore. Plus, the satisfaction of creating something so beautiful and delicious from scratch is truly rewarding.
But the fun doesn’t stop there! Feel free to get creative with your serving suggestions and variations. For a truly decadent experience, serve each slice with a scoop of vanilla bean ice cream and a drizzle of hot fudge sauce. Or, if you’re looking for a lighter option, pair it with fresh berries and a dollop of whipped cream.
Looking to customize the recipe? Consider adding a layer of raspberry jam between the cake layers for a burst of fruity flavor. You could also experiment with different frosting flavors, such as cream cheese frosting or peanut butter frosting. For the bunny decoration, get the kids involved! Let them help decorate with sprinkles, edible glitter, or even small chocolate eggs. You can also use different types of candies to create a unique and personalized bunny design. Think jelly beans for the eyes, licorice for the whiskers, and mini marshmallows for the tail.
Another fun variation is to make individual bunny cupcakes instead of a full cake. Simply bake the cake batter in cupcake liners and decorate each one with a bunny face. This is a great option for parties or for portion control. You could even create a “bunny patch” by arranging the cupcakes on a platter and decorating the surrounding area with green frosting and edible grass.
Don’t be intimidated by the thought of making a decorated cake. This recipe is designed to be approachable and fun. With a little patience and creativity, you can create a stunning Chocolate Bunny Easter Cake that will be the highlight of your Easter celebration.
So, what are you waiting for? Gather your ingredients, preheat your oven, and get ready to bake some Easter magic! I’m confident that this recipe will become a family favorite for years to come.
I can’t wait to hear about your baking adventures! Please, try this recipe and share your photos and experiences in the comments below. Let me know what variations you tried and how your cake turned out. Happy baking, and Happy Easter! I hope you enjoy making and eating this delicious and festive treat as much as I do. Remember, baking is all about having fun and creating memories, so don’t be afraid to experiment and make this recipe your own.
Chocolate Bunny Easter Cake: A Delicious & Festive Recipe
Decadent chocolate cake layered with rich chocolate buttercream frosting, topped with a luscious chocolate ganache drip, and decorated with a chocolate bunny and Easter candies. The perfect centerpiece for your Easter celebration!
Ingredients
- 2 cups all-purpose flour
- 2 cups granulated sugar
- ¾ cup unsweetened cocoa powder
- 1 ½ teaspoons baking powder
- 1 ½ teaspoons baking soda
- 1 teaspoon salt
- 1 cup buttermilk
- ½ cup vegetable oil
- 2 large eggs
- 2 teaspoons vanilla extract
- 1 cup boiling water
- 1 cup (2 sticks) unsalted butter, softened
- 3 cups powdered sugar
- ¾ cup unsweetened cocoa powder
- ½ cup heavy cream
- 1 teaspoon vanilla extract
- Pinch of salt
- 4 ounces semi-sweet chocolate, finely chopped
- ½ cup heavy cream
- 1 large chocolate bunny
- Assorted Easter candies (chocolate eggs, jelly beans, etc.)
- Green tinted coconut flakes (optional, for a “grass” effect)
Instructions
- Preheat your oven to 350°F (175°C). Grease and flour two 9-inch round cake pans. Line the bottoms with parchment paper circles for easy removal.
- In a large bowl, whisk together the flour, sugar, cocoa powder, baking powder, baking soda, and salt.
- In a separate bowl, whisk together the buttermilk, oil, eggs, and vanilla extract.
- Gradually add the wet ingredients to the dry ingredients, mixing on low speed until just combined. Be careful not to overmix.
- Carefully pour in the boiling water and mix until the batter is smooth and thin.
- Divide the batter evenly between the prepared cake pans. Bake for 30-35 minutes, or until a wooden skewer inserted into the center comes out clean.
- Let the cakes cool in the pans for 10 minutes before inverting them onto a wire rack to cool completely.
- In a large bowl (or the bowl of a stand mixer), beat the softened butter on medium speed until light and fluffy (3-5 minutes).
- Gradually add the powdered sugar and cocoa powder, alternating with the heavy cream, beating on low speed until combined.
- Increase the speed to medium-high and beat for 2-3 minutes, or until the frosting is light and fluffy.
- Stir in the vanilla extract and salt. Taste and adjust sweetness or cocoa flavor as needed.
- Place the heavy cream in a microwave-safe bowl and heat until just simmering. You can also do this in a saucepan over medium heat.
- Pour the hot cream over the finely chopped chocolate.
- Let the mixture sit for 1 minute to allow the heat to melt the chocolate.
- Gently stir the mixture until the chocolate is completely melted and the ganache is smooth and glossy. Microwave in 15-second intervals if needed.
- Let the ganache cool slightly until it thickens to a pourable consistency (10-15 minutes).
- Once the cakes are completely cool, use a serrated knife to level the tops of the cakes.
- Place one cake layer on a serving plate or cake stand. Spread a generous layer of chocolate buttercream frosting evenly over the top.
- Carefully place the second cake layer on top of the frosting.
- Apply a thin layer of frosting over the entire cake to seal in any crumbs (crumb coat). Chill the cake in the refrigerator for 30 minutes to allow the crumb coat to set.
- Apply a final, thicker layer of chocolate buttercream frosting over the entire cake, smoothing it out as much as possible.
- Carefully pour the cooled chocolate ganache around the edge of the cake, allowing it to drip down the sides.
- Place the chocolate bunny in the center of the cake. Arrange the assorted Easter candies around the bunny and on top of the cake. If using, sprinkle the green tinted coconut flakes around the base of the bunny to create a “grass” effect.
- Chill the cake in the refrigerator for at least 30 minutes before serving to allow the ganache to set.
Notes
- Using room temperature ingredients, especially the butter and eggs, helps to create a smoother batter and a more evenly baked cake.
- Overmixing the cake batter can develop the gluten in the flour, resulting in a tough cake. Mix until just combined.
- Make sure the cakes are completely cool before frosting them. Warm cakes will melt the frosting and make it difficult to work with.
- The consistency of the ganache is important for creating a beautiful drip. If it’s too thin, it will run right off the cake. If it’s too thick, it won’t drip properly. Let it cool until it reaches a pourable consistency.
- Feel free to get creative with your decorations! Use different types of Easter candies, sprinkles, or even edible flowers to personalize your cake.