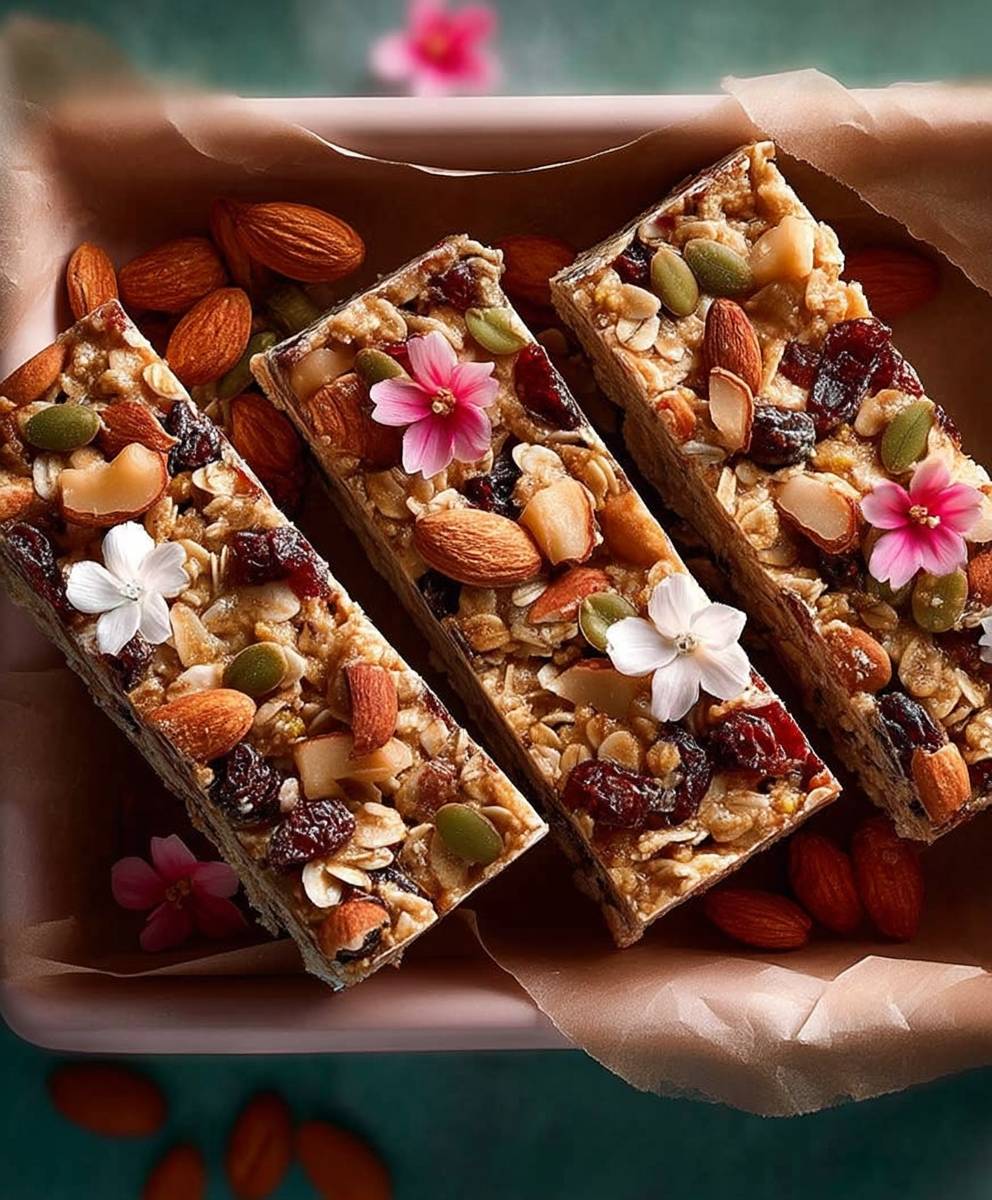
Chewy muesli bars, the ultimate grab-and-go snack, are about to become your new best friend! Forget those store-bought bars packed with hidden sugars and questionable ingredients. I’m going to show you how to create the most delicious, satisfying, and utterly addictive chewy muesli bars right in your own kitchen. Imagine sinking your teeth into a perfectly balanced blend of oats, nuts, seeds, and dried fruit, all held together with a touch of honey and baked to golden perfection.
While the exact origins of the muesli bar are debated, its roots lie in the Swiss “Birchermüesli,” a breakfast dish created by Dr. Maximilian Bircher-Benner in the early 1900s. He believed in the power of raw, whole foods, and his muesli was a revolutionary concept at the time. Over the years, this healthy concoction evolved into the convenient and portable snack we know and love today.
But what is it about chewy muesli bars that makes them so irresistible? It’s the perfect combination of textures the satisfying chewiness of the oats, the delightful crunch of the nuts, and the burst of sweetness from the dried fruit. Plus, they’re incredibly versatile! You can customize them with your favorite ingredients, making them a truly personalized treat. Whether you need a quick breakfast on the run, a mid-afternoon energy boost, or a healthy snack for your kids, these homemade muesli bars are the answer. Get ready to ditch the processed snacks and embrace the wholesome goodness of homemade!

Ingredients:
- 1 cup rolled oats (old-fashioned)
- 1/2 cup shredded coconut (unsweetened)
- 1/2 cup chopped nuts (almonds, walnuts, or pecans work well)
- 1/4 cup seeds (sunflower, pumpkin, or chia seeds)
- 1/2 cup dried fruit (raisins, cranberries, chopped apricots)
- 1/4 cup all-purpose flour
- 1/4 teaspoon salt
- 1/4 teaspoon ground cinnamon
- 1/4 cup unsalted butter, melted
- 1/4 cup honey
- 1/4 cup brown sugar, packed
- 1 teaspoon vanilla extract
- 2 tablespoons milk (any kind)
Preparing the Dry Ingredients:
Okay, let’s get started! First, we need to combine all the dry ingredients. This ensures that everything is evenly distributed throughout the bars, giving you that perfect bite every time.
- In a large bowl, combine the rolled oats, shredded coconut, chopped nuts, and seeds. Make sure everything is nicely mixed together. I like to use my hands for this part to really get everything incorporated.
- Add the dried fruit to the bowl. If you’re using larger pieces of dried fruit, like apricots, make sure they’re chopped into smaller, bite-sized pieces. This will prevent the bars from being too chunky and difficult to cut later.
- In a separate small bowl, whisk together the all-purpose flour, salt, and ground cinnamon. This step is important because it helps to evenly distribute the salt and cinnamon throughout the dry ingredients. No one wants a bite of pure salt!
- Pour the flour mixture into the large bowl with the oat mixture. Stir well to combine. Make sure there are no clumps of flour remaining.
Preparing the Wet Ingredients:
Now for the wet ingredients! These are what will bind everything together and give the bars their chewy texture. The combination of melted butter, honey, and brown sugar creates a delicious caramel-like flavor that’s just irresistible.
- In a medium-sized bowl, combine the melted butter, honey, and brown sugar. Make sure the butter is completely melted before adding the other ingredients.
- Whisk the mixture together until it’s smooth and well combined. The brown sugar should be fully dissolved into the melted butter and honey.
- Add the vanilla extract and milk to the wet ingredients. Whisk again to incorporate. The vanilla extract adds a lovely aroma and flavor, while the milk helps to thin out the mixture slightly.
Combining Wet and Dry Ingredients:
This is where the magic happens! We’re going to bring the wet and dry ingredients together to create the muesli bar mixture. Be sure to mix everything thoroughly so that all the dry ingredients are coated with the wet ingredients.
- Pour the wet ingredients into the large bowl with the dry ingredients.
- Stir well to combine. Make sure that all of the dry ingredients are evenly coated with the wet ingredients. This may take a few minutes of stirring, but it’s important to ensure that the bars hold together properly.
- The mixture should be slightly sticky and clumpy. If it seems too dry, you can add a tablespoon of milk at a time until it reaches the desired consistency.
Baking the Muesli Bars:
Time to bake! This step is crucial for achieving that perfect chewy texture. We want the bars to be golden brown and slightly firm to the touch.
- Preheat your oven to 325°F (160°C).
- Line an 8×8 inch baking pan with parchment paper. Make sure the parchment paper overhangs the sides of the pan. This will make it easier to remove the bars later.
- Pour the muesli bar mixture into the prepared baking pan.
- Use a spatula or your hands to press the mixture firmly and evenly into the pan. This is important for creating a compact and cohesive bar. I like to use the bottom of a measuring cup to really press it down firmly.
- Bake for 25-30 minutes, or until the bars are golden brown and slightly firm to the touch. Keep a close eye on them, as baking times may vary depending on your oven.
- Remove the baking pan from the oven and let the bars cool completely in the pan. This is important for allowing them to set properly.
Cutting and Storing the Muesli Bars:
Almost there! Once the bars are completely cool, it’s time to cut them into individual servings and store them for later enjoyment.
- Once the bars are completely cool, lift them out of the baking pan using the parchment paper overhang.
- Place the bars on a cutting board.
- Use a sharp knife to cut the bars into desired sizes. I usually cut them into 12 equal-sized bars.
- Store the muesli bars in an airtight container at room temperature for up to a week, or in the refrigerator for up to two weeks. You can also freeze them for longer storage.
Tips and Variations:
Want to customize your muesli bars? Here are a few ideas:
- Add chocolate chips: Mix in 1/2 cup of chocolate chips (milk, dark, or semi-sweet) for a chocolatey treat.
- Use different nuts and seeds: Experiment with different combinations of nuts and seeds, such as pecans, macadamia nuts, flax seeds, or sesame seeds.
- Try different dried fruits: Use dried cherries, blueberries, or mangoes instead of raisins or cranberries.
- Add spices: Add a pinch of nutmeg, ginger, or cardamom for a warm and spicy flavor.
- Make them gluten-free: Use gluten-free rolled oats and a gluten-free flour blend.
- Add protein powder: Mix in a scoop of your favorite protein powder for an extra boost of protein.
- Drizzle with chocolate: Once the bars are cooled and cut, drizzle them with melted chocolate for a decadent touch.
Troubleshooting:
Having trouble with your muesli bars? Here are a few common issues and how to fix them:
- Bars are too crumbly: This could be due to not pressing the mixture firmly enough into the pan, or not using enough wet ingredients. Try adding a tablespoon of honey or milk to the mixture next time.
- Bars are too hard: This could be due to overbaking. Reduce the baking time by a few minutes next time.
- Bars are too sticky: This could be due to using too much honey or not baking them long enough. Increase the baking time by a few minutes next time.
- Bars are not holding together: Make sure you are using enough of the wet ingredients to bind everything together. Also, ensure that you are pressing the mixture firmly into the pan.
Enjoy!
That’s it! You’ve successfully made your own batch of chewy muesli bars. These bars are perfect for a quick breakfast, a healthy snack, or a post-workout treat. I hope you enjoy them as much as I do!
Conclusion:
This isn’t just another recipe; it’s your ticket to homemade goodness and a healthier snacking option! These chewy muesli bars are a must-try because they’re incredibly versatile, satisfyingly delicious, and surprisingly easy to make. Forget those store-bought bars packed with artificial ingredients and excessive sugar. With this recipe, you control exactly what goes into your snack, ensuring a wholesome treat for yourself and your loved ones.
What makes these bars so special? It’s the perfect balance of textures and flavors. The oats provide a hearty base, the nuts add a delightful crunch, and the dried fruit offers a burst of sweetness. The binding agent, a combination of honey and a touch of coconut oil, creates that irresistible chewiness that will keep you coming back for more. Plus, the aroma that fills your kitchen while they’re baking is simply divine!
But the best part is how adaptable this recipe is. Feel free to experiment with different ingredients to create your own signature muesli bar. Not a fan of almonds? Swap them out for walnuts or pecans. Craving a chocolatey twist? Add some dark chocolate chips or cocoa powder to the mix. You can also customize the dried fruit to your liking cranberries, raisins, apricots, or even chopped dates would all work beautifully.
For serving suggestions, these bars are perfect as an on-the-go breakfast, a post-workout snack, or a midday pick-me-up. Pack them in your lunchbox, take them on hikes, or simply enjoy them with a cup of tea or coffee. You can even crumble them over yogurt or ice cream for a delicious and healthy topping.
Want to elevate your muesli bar game even further? Consider adding a drizzle of melted chocolate or a sprinkle of sea salt after they’ve cooled. You could also experiment with different spices, such as cinnamon, nutmeg, or ginger, to add a warm and comforting flavor. For a vegan option, simply substitute the honey with maple syrup or agave nectar.
I truly believe that once you try this recipe, you’ll never go back to store-bought muesli bars again. The satisfaction of creating something delicious and healthy from scratch is simply unmatched. And the best part is that you can tailor the recipe to your own preferences and dietary needs.
So, what are you waiting for? Gather your ingredients, preheat your oven, and get ready to embark on a muesli bar adventure! I’m confident that you’ll love the results.
I’m so excited for you to try this recipe and experience the joy of homemade chewy muesli bars. Once you’ve made them, I’d love to hear about your experience. Did you make any modifications? What were your favorite ingredients? Share your photos and comments in the section below. Let’s inspire each other to create delicious and healthy snacks! Happy baking!
Chewy Muesli Bars: The Ultimate Guide to Homemade Goodness
Chewy homemade muesli bars packed with oats, nuts, seeds, and dried fruit. A perfect healthy snack or breakfast on the go!
Ingredients
- 1 cup rolled oats (old-fashioned)
- 1/2 cup shredded coconut (unsweetened)
- 1/2 cup chopped nuts (almonds, walnuts, or pecans work well)
- 1/4 cup seeds (sunflower, pumpkin, or chia seeds)
- 1/2 cup dried fruit (raisins, cranberries, chopped apricots)
- 1/4 cup all-purpose flour
- 1/4 teaspoon salt
- 1/4 teaspoon ground cinnamon
- 1/4 cup unsalted butter, melted
- 1/4 cup honey
- 1/4 cup brown sugar, packed
- 1 teaspoon vanilla extract
- 2 tablespoons milk (any kind)
Instructions
- Prepare Dry Ingredients: In a large bowl, combine rolled oats, shredded coconut, chopped nuts, and seeds. Mix well. Add dried fruit and stir to combine. In a separate small bowl, whisk together flour, salt, and cinnamon. Pour the flour mixture into the large bowl with the oat mixture and stir well.
- Prepare Wet Ingredients: In a medium bowl, combine melted butter, honey, and brown sugar. Whisk until smooth. Add vanilla extract and milk. Whisk again to incorporate.
- Combine Wet and Dry Ingredients: Pour the wet ingredients into the large bowl with the dry ingredients. Stir well until all dry ingredients are evenly coated. The mixture should be slightly sticky and clumpy. If it seems too dry, add milk one tablespoon at a time until the desired consistency is reached.
- Bake the Muesli Bars: Preheat oven to 325°F (160°C). Line an 8×8 inch baking pan with parchment paper, ensuring the paper overhangs the sides. Pour the muesli bar mixture into the prepared pan. Use a spatula or your hands to press the mixture firmly and evenly into the pan. Bake for 25-30 minutes, or until golden brown and slightly firm to the touch.
- Cool, Cut, and Store: Remove the baking pan from the oven and let the bars cool completely in the pan. Once cool, lift the bars out of the pan using the parchment paper overhang. Place the bars on a cutting board and use a sharp knife to cut them into desired sizes (e.g., 12 equal-sized bars). Store in an airtight container at room temperature for up to a week, or in the refrigerator for up to two weeks. Can also be frozen for longer storage.
Notes
- Variations:
- Add 1/2 cup chocolate chips (milk, dark, or semi-sweet).
- Use different nuts and seeds (pecans, macadamia nuts, flax seeds, sesame seeds).
- Try different dried fruits (dried cherries, blueberries, or mangoes).
- Add a pinch of nutmeg, ginger, or cardamom.
- Use gluten-free rolled oats and a gluten-free flour blend for gluten-free bars.
- Mix in a scoop of protein powder.
- Drizzle with melted chocolate after cooling.
- Troubleshooting:
- Crumbly bars: Press mixture more firmly into the pan or add a tablespoon of honey or milk.
- Hard bars: Reduce baking time.
- Sticky bars: Increase baking time.
- Bars not holding together: Ensure enough wet ingredients are used and press the mixture firmly into the pan.