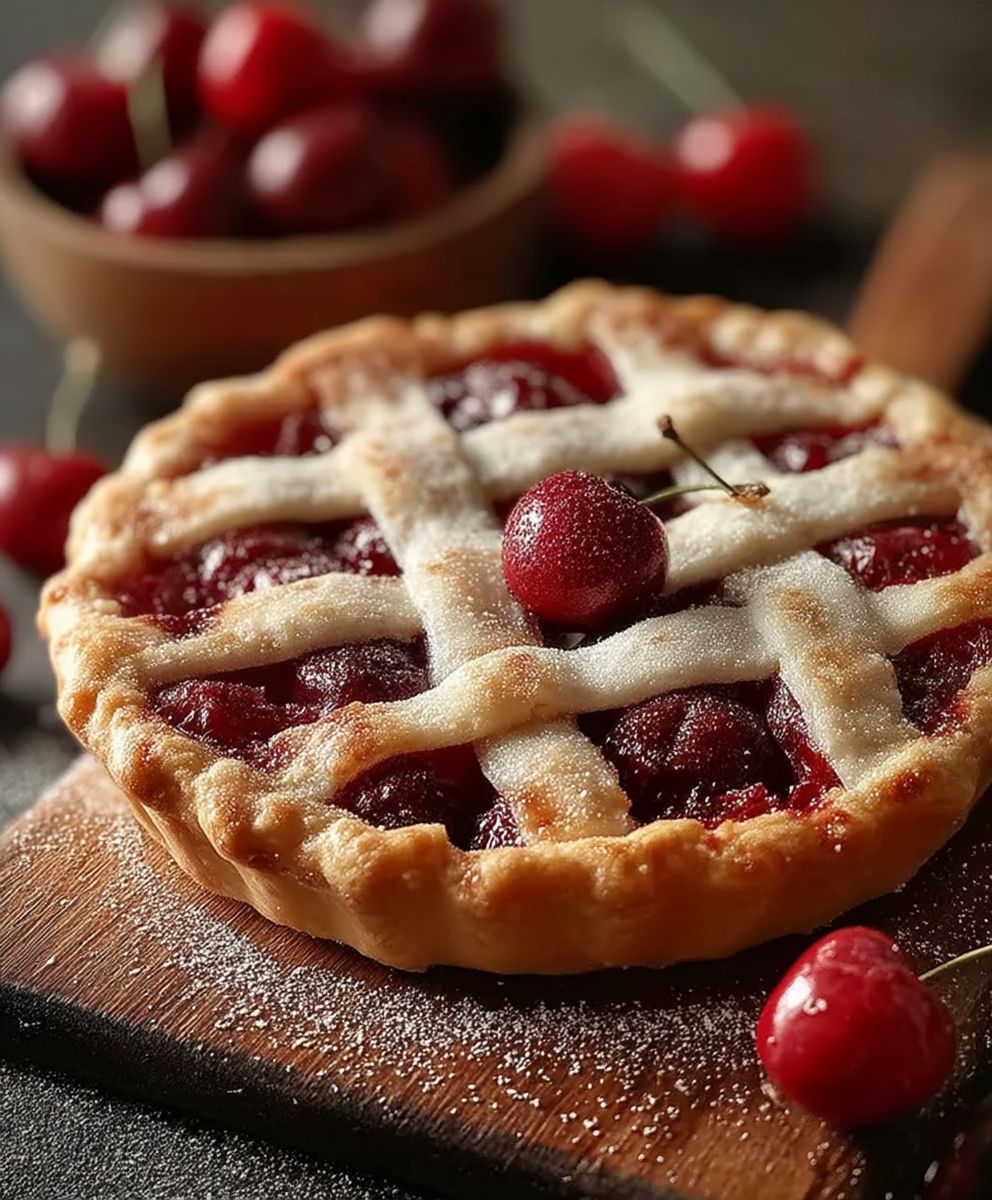
Cherry Pie, oh, the very words conjure up images of Americana, summer picnics, and the sweet, tart taste of pure happiness! Have you ever bitten into a slice of perfectly baked cherry pie and felt instantly transported back to simpler times? I know I have! This isn’t just a dessert; it’s a nostalgic journey in every bite.
The history of cherry pie is as rich and layered as the pie itself. While the exact origins are debated, pies filled with fruit have been enjoyed for centuries. The modern version we know and love gained popularity in America, becoming a symbol of home-baked goodness and celebratory occasions. Think Fourth of July barbecues, Thanksgiving feasts, or simply a comforting treat on a chilly evening. It’s a dessert that transcends generations.
So, why do people adore Cherry Pie so much? It’s the delightful contrast of flavors, of course! The sweet, juicy cherries, bursting with their unique tartness, are perfectly balanced by the buttery, flaky crust. The texture is divine the soft, yielding filling against the crisp, golden-brown pastry. Plus, while it might seem intimidating, making a cherry pie from scratch is incredibly rewarding, and I’m here to guide you through every step of the process. Get ready to create a masterpiece that will impress your family and friends, and fill your home with the irresistible aroma of baking cherries!

Ingredients:
- For the Crust:
- 2 ½ cups all-purpose flour, plus more for dusting
- 1 teaspoon salt
- 1 cup (2 sticks) unsalted butter, very cold and cut into ½-inch cubes
- ½ cup vegetable shortening, very cold
- 6-8 tablespoons ice water
- For the Cherry Filling:
- 6 cups fresh sweet cherries, pitted (or frozen, thawed and drained)
- ¾ cup granulated sugar (adjust to taste depending on cherry sweetness)
- ¼ cup cornstarch
- 2 tablespoons lemon juice
- 1 teaspoon almond extract
- ¼ teaspoon salt
- 2 tablespoons unsalted butter, cut into small pieces
- For the Egg Wash (optional):
- 1 large egg
- 1 tablespoon milk or water
- For Sprinkling (optional):
- Turbinado sugar or granulated sugar
Preparing the Pie Crust:
- Combine Dry Ingredients: In a large bowl, whisk together the flour and salt. This ensures the salt is evenly distributed throughout the crust, which is crucial for flavor.
- Cut in the Fat: Add the cold butter and shortening to the flour mixture. Using a pastry blender or your fingertips (work quickly to keep the fat cold!), cut the fat into the flour until the mixture resembles coarse crumbs with some pea-sized pieces of butter remaining. These little pockets of butter are what create flaky layers in the crust. Don’t overmix!
- Add Ice Water: Gradually add the ice water, one tablespoon at a time, mixing lightly after each addition. Use just enough water to bring the dough together. Be careful not to add too much water, as this will make the crust tough. The dough should be shaggy and slightly sticky.
- Divide and Chill: Divide the dough in half, flatten each half into a disc, wrap tightly in plastic wrap, and refrigerate for at least 2 hours, or preferably overnight. This chilling time is essential for relaxing the gluten in the flour, which will make the crust easier to roll out and prevent it from shrinking during baking.
Making the Cherry Filling:
- Combine Filling Ingredients: In a large bowl, combine the pitted cherries, granulated sugar, cornstarch, lemon juice, almond extract, and salt. Gently toss to coat the cherries evenly. The cornstarch will help thicken the filling as it bakes, and the lemon juice and almond extract enhance the cherry flavor.
- Let it Sit: Let the cherry mixture sit for about 15-20 minutes, allowing the juices to release. This will help the cornstarch dissolve properly and prevent a grainy filling.
Assembling and Baking the Pie:
- Preheat Oven: Preheat your oven to 400°F (200°C). Place a baking sheet on the lower rack of the oven to catch any drips from the pie. This will save you from having to clean a messy oven later!
- Roll Out the Bottom Crust: On a lightly floured surface, roll out one of the chilled dough discs into a 12-inch circle. It should be large enough to fit your pie plate with some overhang. Gently transfer the dough to a 9-inch pie plate. Trim and crimp the edges as desired. You can use a fork to crimp, or get fancy with your fingers!
- Add the Filling: Pour the cherry filling into the prepared pie crust. Dot the top of the filling with the small pieces of butter. This adds richness and flavor to the filling.
- Roll Out the Top Crust: Roll out the second chilled dough disc into a 12-inch circle. You can either place the entire crust over the filling, or cut it into strips for a lattice top.
- Create a Lattice Top (Optional): If making a lattice top, cut the dough into even strips. Lay half of the strips across the pie filling, spacing them evenly. Fold back every other strip and lay a strip perpendicular to the first set. Repeat with the remaining strips, weaving them together to create a lattice pattern. Trim the edges of the strips and crimp them to the bottom crust.
- Seal and Crimp the Edges: Whether you’re using a full top crust or a lattice top, trim any excess dough from the edges of the pie plate. Crimp the edges of the top and bottom crusts together to seal the pie. This will prevent the filling from leaking out during baking.
- Cut Vents: If using a full top crust, cut several slits in the top to allow steam to escape. This will prevent the crust from puffing up and cracking.
- Egg Wash (Optional): In a small bowl, whisk together the egg and milk (or water). Brush the top crust with the egg wash. This will give the crust a beautiful golden-brown color and a slight sheen.
- Sprinkle with Sugar (Optional): Sprinkle the top crust with turbinado sugar or granulated sugar for added sweetness and sparkle.
- Bake: Bake the pie for 50-60 minutes, or until the crust is golden brown and the filling is bubbling. If the crust starts to brown too quickly, you can tent it with aluminum foil.
- Cool Completely: Let the pie cool completely on a wire rack before slicing and serving. This is crucial for allowing the filling to set properly. If you cut into it while it’s still warm, the filling will be runny. I know it’s tempting, but patience is key!
Tips for Success:
- Keep Everything Cold: The key to a flaky pie crust is to keep the butter and shortening as cold as possible. This prevents the fat from melting into the flour, which would result in a tough crust.
- Don’t Overmix the Dough: Overmixing the dough will develop the gluten in the flour, which will also result in a tough crust. Mix just until the dough comes together.
- Chill the Dough: Chilling the dough is essential for relaxing the gluten and allowing the fat to solidify. This will make the crust easier to roll out and prevent it from shrinking during baking.
- Use a Pie Shield: If your crust tends to brown too quickly, use a pie shield to protect the edges. You can also tent the pie with aluminum foil.
- Adjust Sugar to Taste: The amount of sugar in the filling can be adjusted to taste, depending on the sweetness of the cherries.
- Don’t Be Afraid to Experiment: Feel free to experiment with different flavor combinations. You can add other fruits to the filling, such as blueberries or raspberries. You can also add spices, such as cinnamon or nutmeg.
Troubleshooting:
- Runny Filling: If your filling is too runny, it could be because you didn’t use enough cornstarch, or because you didn’t let the pie cool completely before slicing. Next time, try using a little more cornstarch, and be sure to let the pie cool completely.
- Tough Crust: If your crust is tough, it could be because you overmixed the dough, or because you didn’t use enough fat. Next time, be careful not to overmix the dough, and make sure to use plenty of cold butter and shortening.
- Burnt Crust: If your crust is burnt, it could be because your oven is too hot, or because you didn’t use a pie shield. Next time, try lowering the oven temperature, and use a pie shield to protect the edges of the crust.
Variations:
- Cherry Crumble Pie: Instead of a top crust, top the cherry filling with a crumble topping made from flour, butter, sugar, and oats.
- Chocolate Cherry Pie: Add chocolate chips or cocoa powder to the cherry filling for a chocolatey twist.
- Cherry Almond Pie: Add more almond extract or slivered almonds to the filling for an extra almond flavor.
Conclusion:
This isn’t just another pie recipe; it’s an invitation to experience the pure, unadulterated joy of summer in every single bite. From the flaky, golden crust to the burst of sweet and tart cherries, this cherry pie is a symphony of flavors and textures that will have you reaching for seconds (and maybe even thirds!). I truly believe this recipe is a must-try, not just because it’s delicious, but because it’s a celebration of simple, wholesome ingredients transformed into something truly special.
Think of it: the aroma filling your kitchen as it bakes, the anticipation building with each passing minute, and finally, the moment you slice into that perfect pie and see the glistening, ruby-red filling. It’s a moment worth savoring, a moment worth sharing, and a moment that will undoubtedly create lasting memories.
But the beauty of this recipe lies not only in its simplicity but also in its versatility. While I’ve shared my go-to method, feel free to experiment and make it your own! For a richer, more decadent experience, try adding a tablespoon of almond extract to the cherry filling. The subtle nutty flavor complements the cherries beautifully. Or, if you’re feeling adventurous, a pinch of cinnamon or nutmeg can add a warm, comforting touch.
Serving suggestions? Oh, the possibilities are endless! A scoop of vanilla bean ice cream is a classic pairing that never fails to delight. But don’t underestimate the power of a dollop of freshly whipped cream, lightly sweetened with a touch of powdered sugar. For a more sophisticated twist, try serving it with a drizzle of balsamic glaze the tangy sweetness creates a delightful contrast with the cherries. And for those who prefer a lighter option, a simple dusting of powdered sugar is all you need to let the pie’s natural flavors shine.
Beyond the classic pairings, consider these variations to truly make this cherry pie your own signature dessert. If you’re short on time, a store-bought pie crust works perfectly well just be sure to choose a high-quality one. You can also use frozen cherries if fresh ones aren’t available, just remember to thaw them completely and drain off any excess liquid before using. For a fun twist, try adding a crumble topping instead of a traditional top crust. A mixture of flour, butter, sugar, and oats creates a delightful textural contrast that’s sure to impress.
I’ve poured my heart and soul into perfecting this recipe, and I’m confident that you’ll love it as much as I do. But the real magic happens when you bring it to life in your own kitchen. So, gather your ingredients, preheat your oven, and get ready to embark on a baking adventure.
I’m so excited for you to try this recipe and experience the joy of homemade cherry pie. Once you’ve baked it, please, please, please come back and share your experience! Let me know what you thought, what variations you tried, and any tips or tricks you discovered along the way. Your feedback is invaluable, and it helps me continue to improve and refine my recipes. Share your photos, your stories, and your baking triumphs I can’t wait to hear all about it! Happy baking!
Cherry Pie: The Ultimate Guide to Baking the Perfect Pie
Loading…