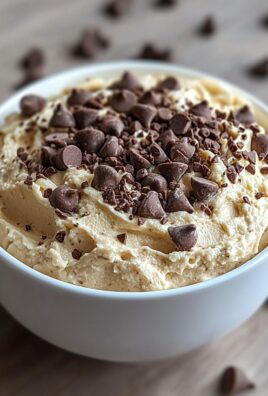
Carnivore Fudge Ice Cream: Prepare to have your dessert preconceptions shattered! Imagine a world where rich, decadent fudge meets the creamy coolness of ice cream, all while adhering to a carnivore diet. Sounds impossible? I thought so too, until I stumbled upon this game-changing recipe. This isn’t your grandma’s ice cream, but trust me, she’d be impressed.
While the carnivore diet might seem like a modern trend, its roots lie in ancestral eating habits, focusing on nutrient-dense animal products. Historically, indigenous cultures thrived on diets primarily composed of meat and animal fats. This Carnivore Fudge Ice Cream recipe cleverly adapts those principles to create a surprisingly satisfying and guilt-free treat.
So, why do people love this unconventional dessert? It’s simple: the taste and texture are phenomenal. The deep, chocolatey flavor of the fudge, derived from high-quality animal fats and cocoa (if included, depending on your strictness), perfectly complements the smooth, melt-in-your-mouth ice cream. Plus, it’s incredibly convenient to make with just a few ingredients. Whether you’re a dedicated carnivore or simply curious about exploring new culinary horizons, this ice cream is a must-try. Get ready to indulge in a dessert that defies expectations and satisfies your sweet cravings without compromising your dietary goals!

Ingredients:
- 1 pound (450g) high-quality beef tallow, rendered and cooled but still liquid
- 1/2 cup (120ml) heavy cream, preferably grass-fed
- 1/4 cup (60ml) unsweetened cocoa powder (ensure it’s 100% cocoa)
- 1/4 cup (60ml) MCT oil (medium-chain triglyceride oil) – optional, for smoother texture
- 1/4 teaspoon sea salt
- 1 teaspoon vanilla extract (ensure it’s pure vanilla, no added sugar)
- 1/4 cup (60ml) bone broth protein powder (unflavored) – optional, for added protein and texture
- 1/4 cup (60ml) gelatin powder (unflavored) – optional, for a firmer texture
- Optional toppings: crumbled bacon, shredded beef jerky, unsweetened chocolate shavings (100% cacao)
Preparing the Base:
- Rendering the Tallow (if needed): If you don’t have pre-rendered tallow, you’ll need to render it yourself. Cut the beef fat into small cubes, about 1-inch in size. Place the cubes in a heavy-bottomed pot or Dutch oven. Cook over low heat, stirring occasionally, until the fat has melted completely and the solid pieces have turned brown and crispy (these are called cracklings). This process can take several hours, so be patient. Strain the melted tallow through a fine-mesh sieve lined with cheesecloth to remove any impurities. Let the tallow cool slightly before using it in the recipe.
- Combining the Wet Ingredients: In a large bowl, whisk together the cooled (but still liquid) beef tallow, heavy cream, MCT oil (if using), and vanilla extract. Make sure the tallow isn’t too hot, or it will cook the cream. You want a smooth, emulsified mixture.
- Incorporating the Dry Ingredients: In a separate bowl, whisk together the cocoa powder, sea salt, bone broth protein powder (if using), and gelatin powder (if using). This ensures that the cocoa powder is evenly distributed and prevents clumps from forming when added to the wet ingredients.
- Combining Wet and Dry: Gradually add the dry ingredients to the wet ingredients, whisking constantly to prevent lumps. It’s important to add the dry ingredients slowly to ensure a smooth and consistent mixture. Continue whisking until all the ingredients are fully incorporated and the mixture is smooth and glossy.
Freezing the Ice Cream:
- Preparing the Ice Cream Maker (if using): If you’re using an ice cream maker, make sure the bowl is properly frozen according to the manufacturer’s instructions. This usually involves freezing the bowl for at least 24 hours.
- Churning the Ice Cream (if using an ice cream maker): Pour the ice cream base into the frozen ice cream maker bowl. Churn according to the manufacturer’s instructions, usually for about 20-30 minutes, or until the ice cream reaches a soft-serve consistency.
- Freezing Without an Ice Cream Maker: If you don’t have an ice cream maker, pour the ice cream base into a freezer-safe container. Cover the container tightly with plastic wrap, pressing the plastic wrap directly onto the surface of the ice cream to prevent ice crystals from forming. Freeze for at least 4-6 hours, or until the ice cream is firm. Every hour, take the container out of the freezer and stir the ice cream vigorously with a fork or whisk to break up any ice crystals that may have formed. This will help to create a smoother texture.
- Hardening the Ice Cream: Once the ice cream has reached a soft-serve consistency (if using an ice cream maker) or has been partially frozen (if freezing without an ice cream maker), transfer it to a freezer-safe container. Cover the container tightly and freeze for at least 2-3 hours, or until the ice cream is firm enough to scoop.
Serving and Storage:
- Scooping the Ice Cream: Before serving, let the ice cream sit at room temperature for a few minutes to soften slightly, making it easier to scoop. Use an ice cream scoop to scoop the ice cream into bowls or cones.
- Adding Toppings (Optional): Sprinkle the ice cream with your favorite carnivore-friendly toppings, such as crumbled bacon, shredded beef jerky, or unsweetened chocolate shavings.
- Storage: Store the leftover ice cream in a freezer-safe container in the freezer for up to 2 weeks. To prevent freezer burn, make sure the container is tightly sealed.
- Tips for a Creamier Texture: The key to a creamy carnivore ice cream is to use high-quality ingredients and to prevent ice crystals from forming. Using an ice cream maker will help to create a smoother texture, but it’s not essential. If you’re freezing the ice cream without an ice cream maker, be sure to stir it frequently during the initial freezing process. Adding MCT oil can also help to improve the texture.
- Adjusting Sweetness (Optional): While this recipe is designed to be sugar-free, some people may prefer a slightly sweeter ice cream. If you want to add a touch of sweetness, you can use a small amount of a carnivore-friendly sweetener, such as erythritol or stevia. Start with a small amount and add more to taste. Be careful not to add too much, as some sweeteners can affect the texture of the ice cream.
- Variations: Feel free to experiment with different flavors and toppings to create your own unique carnivore ice cream. You could try adding different spices, such as cinnamon or nutmeg, or using different types of animal fats, such as duck fat or lamb fat. You could also try adding different types of meat, such as cooked and crumbled sausage or ground beef. Just be sure to adjust the recipe accordingly to maintain the desired consistency and flavor.
Troubleshooting:
- Ice Cream is Too Hard: If your ice cream is too hard to scoop, it’s likely that it was frozen for too long or at too low of a temperature. To soften it, let it sit at room temperature for a few minutes before scooping. You can also try running the ice cream scoop under warm water before scooping.
- Ice Cream is Too Soft: If your ice cream is too soft, it’s likely that it wasn’t frozen for long enough or that the freezer isn’t cold enough. To firm it up, place it back in the freezer for a few more hours.
- Ice Crystals Forming: Ice crystals can form if the ice cream is not stored properly or if it’s not stirred frequently enough during the initial freezing process. To prevent ice crystals from forming, make sure the container is tightly sealed and that you stir the ice cream every hour during the first few hours of freezing.
- Tallow Flavor Too Strong: If the tallow flavor is too strong, try using a higher-quality tallow or rendering the tallow yourself to remove any impurities. You can also try adding more cocoa powder or vanilla extract to mask the tallow flavor.
Nutritional Information (Approximate):
Please note: Nutritional information is an estimate and can vary based on specific ingredients and portion sizes.
- Calories: Approximately 400-500 per serving
- Fat: 40-50g
- Protein: 10-15g (depending on protein powder)
- Carbohydrates: 5-10g (primarily from cocoa powder)
Disclaimer:
This recipe is intended for individuals following a carnivore diet. Consult with a healthcare professional or registered dietitian before making significant dietary changes.
Conclusion:
This Carnivore Fudge Ice Cream isn’t just a dessert; it’s a revelation! It’s a testament to the fact that you can indulge in something incredibly rich, decadent, and satisfying while staying true to your dietary goals. The creamy texture, the intense chocolate flavor, and the surprising lack of guilt make this recipe a must-try for anyone following a carnivore, keto, or low-carb lifestyle. It’s a game-changer, proving that you don’t have to sacrifice pleasure for health.
Why You Absolutely Need to Make This:
Seriously, if you’ve been missing ice cream, this is your answer. It’s so easy to whip up, requiring minimal ingredients and effort. The result is a frozen treat that rivals anything you’d find in the store, but without all the added sugars and artificial ingredients. It’s pure, unadulterated deliciousness. Plus, it’s a fantastic way to get in some extra healthy fats, which are essential on a carnivore diet.
Serving Suggestions and Variations:
The beauty of this recipe is its versatility. While it’s fantastic on its own, there are so many ways to customize it to your liking. For a truly decadent experience, try topping it with some crispy bacon crumbles. The salty, savory bacon perfectly complements the rich, sweet chocolate. You could also add a swirl of unsweetened cocoa powder for an even deeper chocolate flavor.
Another option is to experiment with different extracts. A few drops of peppermint extract would transform this into a refreshing mint chocolate ice cream. Or, a touch of vanilla extract can enhance the overall sweetness and aroma. If you’re feeling adventurous, try adding a pinch of sea salt to bring out the flavors even more.
For a slightly different texture, you can adjust the amount of gelatin. Less gelatin will result in a softer, creamier ice cream, while more gelatin will give it a firmer, more scoopable consistency. Play around with it until you find your perfect balance.
You can also get creative with how you serve it. Enjoy it straight from the container, scoop it into a bowl, or even use it to make a carnivore-friendly ice cream sandwich using almond flour cookies (if you tolerate nuts). The possibilities are endless!
Your Turn to Indulge:
I truly believe that this Carnivore Fudge Ice Cream will become a staple in your household. It’s the perfect treat for a hot summer day, a satisfying dessert after a hearty meal, or simply a little something to brighten your day.
So, what are you waiting for? Gather your ingredients, fire up your ice cream maker (or use the no-churn method!), and prepare to be amazed. I’m confident that you’ll love this recipe as much as I do.
Once you’ve tried it, I’d love to hear about your experience! Share your photos, variations, and feedback in the comments below. Let me know what you think and how you made it your own. Happy ice cream making! I can’t wait to see what delicious creations you come up with.
Carnivore Fudge Ice Cream: The Ultimate Keto Dessert Recipe
Rich and decadent carnivore ice cream made with beef tallow, heavy cream, and cocoa powder. A surprisingly delicious and satisfying treat for those following a carnivore diet.
Ingredients
- 1 pound (450g) high-quality beef tallow, rendered and cooled but still liquid
- 1/2 cup (120ml) heavy cream, preferably grass-fed
- 1/4 cup (60ml) unsweetened cocoa powder (ensure it’s 100% cocoa)
- 1/4 cup (60ml) MCT oil (medium-chain triglyceride oil) – optional, for smoother texture
- 1/4 teaspoon sea salt
- 1 teaspoon vanilla extract (ensure it’s pure vanilla, no added sugar)
- 1/4 cup (60ml) bone broth protein powder (unflavored) – optional, for added protein and texture
- 1/4 cup (60ml) gelatin powder (unflavored) – optional, for a firmer texture
- Optional toppings: crumbled bacon, shredded beef jerky, unsweetened chocolate shavings (100% cacao)
Instructions
- Rendering the Tallow (if needed): If you don’t have pre-rendered tallow, you’ll need to render it yourself. Cut the beef fat into small cubes, about 1-inch in size. Place the cubes in a heavy-bottomed pot or Dutch oven. Cook over low heat, stirring occasionally, until the fat has melted completely and the solid pieces have turned brown and crispy (these are called cracklings). This process can take several hours, so be patient. Strain the melted tallow through a fine-mesh sieve lined with cheesecloth to remove any impurities. Let the tallow cool slightly before using it in the recipe.
- Combining the Wet Ingredients: In a large bowl, whisk together the cooled (but still liquid) beef tallow, heavy cream, MCT oil (if using), and vanilla extract. Make sure the tallow isn’t too hot, or it will cook the cream. You want a smooth, emulsified mixture.
- Incorporating the Dry Ingredients: In a separate bowl, whisk together the cocoa powder, sea salt, bone broth protein powder (if using), and gelatin powder (if using). This ensures that the cocoa powder is evenly distributed and prevents clumps from forming when added to the wet ingredients.
- Combining Wet and Dry: Gradually add the dry ingredients to the wet ingredients, whisking constantly to prevent lumps. It’s important to add the dry ingredients slowly to ensure a smooth and consistent mixture. Continue whisking until all the ingredients are fully incorporated and the mixture is smooth and glossy.
- Preparing the Ice Cream Maker (if using): If you’re using an ice cream maker, make sure the bowl is properly frozen according to the manufacturer’s instructions. This usually involves freezing the bowl for at least 24 hours.
- Churning the Ice Cream (if using an ice cream maker): Pour the ice cream base into the frozen ice cream maker bowl. Churn according to the manufacturer’s instructions, usually for about 20-30 minutes, or until the ice cream reaches a soft-serve consistency.
- Freezing Without an Ice Cream Maker: If you don’t have an ice cream maker, pour the ice cream base into a freezer-safe container. Cover the container tightly with plastic wrap, pressing the plastic wrap directly onto the surface of the ice cream to prevent ice crystals from forming. Freeze for at least 4-6 hours, or until the ice cream is firm. Every hour, take the container out of the freezer and stir the ice cream vigorously with a fork or whisk to break up any ice crystals that may have formed. This will help to create a smoother texture.
- Hardening the Ice Cream: Once the ice cream has reached a soft-serve consistency (if using an ice cream maker) or has been partially frozen (if freezing without an ice cream maker), transfer it to a freezer-safe container. Cover the container tightly and freeze for at least 2-3 hours, or until the ice cream is firm enough to scoop.
- Scooping the Ice Cream: Before serving, let the ice cream sit at room temperature for a few minutes to soften slightly, making it easier to scoop. Use an ice cream scoop to scoop the ice cream into bowls or cones.
- Adding Toppings (Optional): Sprinkle the ice cream with your favorite carnivore-friendly toppings, such as crumbled bacon, shredded beef jerky, or unsweetened chocolate shavings.
- Storage: Store the leftover ice cream in a freezer-safe container in the freezer for up to 2 weeks. To prevent freezer burn, make sure the container is tightly sealed.
Notes
- Tips for a Creamier Texture: The key to a creamy carnivore ice cream is to use high-quality ingredients and to prevent ice crystals from forming. Using an ice cream maker will help to create a smoother texture, but it’s not essential. If you’re freezing the ice cream without an ice cream maker, be sure to stir it frequently during the initial freezing process. Adding MCT oil can also help to improve the texture.
- Adjusting Sweetness (Optional): While this recipe is designed to be sugar-free, some people may prefer a slightly sweeter ice cream. If you want to add a touch of sweetness, you can use a small amount of a carnivore-friendly sweetener, such as erythritol or stevia. Start with a small amount and add more to taste. Be careful not to add too much, as some sweeteners can affect the texture of the ice cream.
- Variations: Feel free to experiment with different flavors and toppings to create your own unique carnivore ice cream. You could try adding different spices, such as cinnamon or nutmeg, or using different types of animal fats, such as duck fat or lamb fat. You could also try adding different types of meat, such as cooked and crumbled sausage or ground beef. Just be sure to adjust the recipe accordingly to maintain the desired consistency and flavor.
- Ice Cream is Too Hard: If your ice cream is too hard to scoop, it’s likely that it was frozen for too long or at too low of a temperature. To soften it, let it sit at room temperature for a few minutes before scooping. You can also try running the ice cream scoop under warm water before scooping.
- Ice Cream is Too Soft: If your ice cream is too soft, it’s likely that it wasn’t frozen for long enough or that the freezer isn’t cold enough. To firm it up, place it back in the freezer for a few more hours.
- Ice Crystals Forming: Ice crystals can form if the ice cream is not stored properly or if it’s not stirred frequently enough during the initial freezing process. To prevent ice crystals from forming, make sure the container is tightly sealed and that you stir the ice cream every hour during the first few hours of freezing.
- Tallow Flavor Too Strong: If the tallow flavor is too strong, try using a higher-quality tallow or rendering the tallow yourself to remove any impurities. You can also try adding more cocoa powder or vanilla extract to mask the tallow flavor.