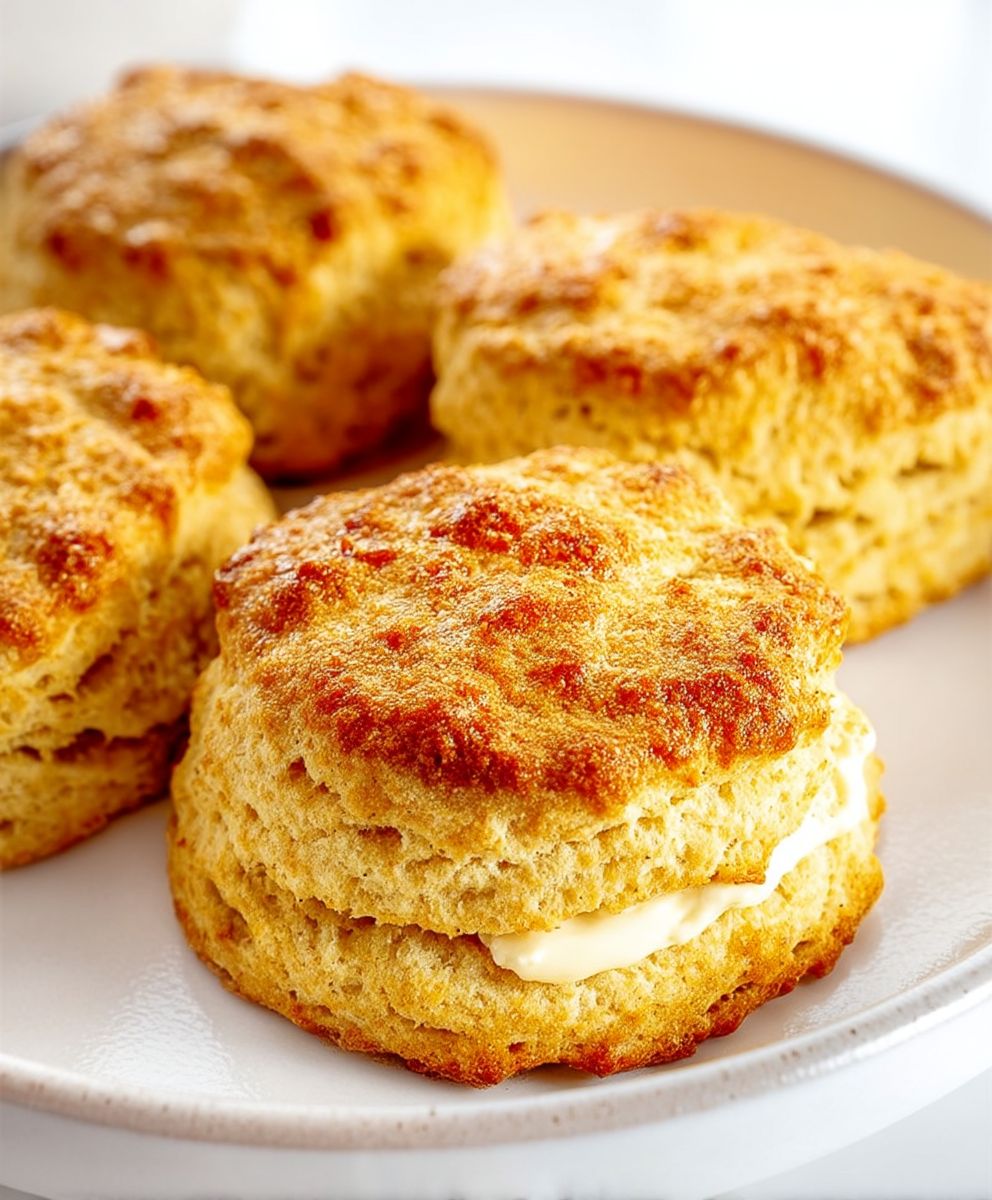
Buttermilk Biscuits: Is there anything more comforting than the aroma of freshly baked biscuits wafting through your kitchen? I think not! These golden-brown beauties, with their flaky layers and slightly tangy flavor, are a true testament to the magic of simple ingredients. Forget store-bought imitations; we’re diving headfirst into the world of homemade goodness.
Biscuits, in their various forms, have been a staple in Southern cuisine for generations. Their origins can be traced back to Europe, but it was in the American South that they truly flourished, becoming a symbol of hospitality and home-cooked comfort. Passed down through families, each cook has their own secret to the perfect biscuit, and I’m excited to share mine with you.
What makes buttermilk biscuits so irresistible? It’s the perfect combination of textures a crisp, golden exterior giving way to a soft, fluffy interior. The buttermilk adds a subtle tang that complements the richness of the butter, creating a flavor profile that’s both comforting and satisfying. Whether you slather them with butter and jam, use them to sop up gravy, or enjoy them alongside a hearty breakfast, these biscuits are guaranteed to be a crowd-pleaser. Plus, they’re surprisingly easy to make, even for beginner bakers. So, let’s get baking and create some biscuit magic!

Ingredients:
- All-Purpose Flour: 3 cups, plus more for dusting
- Baking Powder: 1 tablespoon
- Baking Soda: 1 teaspoon
- Salt: 1 teaspoon
- Granulated Sugar: 2 tablespoons
- Cold Unsalted Butter: 12 tablespoons (1 ½ sticks), cut into small cubes
- Cold Vegetable Shortening: 2 tablespoons, cut into small pieces
- Cold Buttermilk: 1 ¼ cups, plus more for brushing
Preparing the Dough: The Key to Flaky Biscuits
Okay, let’s get started! The secret to amazing buttermilk biscuits is keeping everything COLD. Seriously, cold, cold, cold. This prevents the butter from melting into the flour, which is what gives us those beautiful, flaky layers. I even sometimes chill my flour and bowl beforehand, especially on a warm day.
- Combine Dry Ingredients: In a large bowl, whisk together the 3 cups of all-purpose flour, 1 tablespoon of baking powder, 1 teaspoon of baking soda, 1 teaspoon of salt, and 2 tablespoons of granulated sugar. Make sure everything is well combined. This ensures even distribution of the leavening agents, which is crucial for a good rise.
- Cut in the Butter and Shortening: This is where the magic happens! Add the 12 tablespoons of cold, cubed butter and 2 tablespoons of cold vegetable shortening to the flour mixture. Now, you have a few options here. You can use a pastry blender, which is designed specifically for this task. Or, you can use two knives, cutting the butter and shortening into the flour until the mixture resembles coarse crumbs. Alternatively, and this is my preferred method, you can use your fingertips. Gently rub the butter and shortening into the flour, being careful not to overwork it. You want to see small pieces of butter and shortening, about the size of peas. These little pockets of fat will melt in the oven and create steam, which is what makes the biscuits flaky. Don’t overmix! Overmixing will develop the gluten in the flour, resulting in tough biscuits.
- Add the Buttermilk: Gradually add the 1 ¼ cups of cold buttermilk to the flour mixture, stirring gently with a fork until just combined. The dough will be shaggy and a little sticky, and that’s perfectly fine. Again, resist the urge to overmix. You just want to bring the dough together. If the dough seems too dry, add a tablespoon of buttermilk at a time until it comes together. If it seems too wet, add a tablespoon of flour at a time.
- Turn Out and Knead (Gently!): Lightly flour a clean work surface. Turn the dough out onto the floured surface. Gently pat the dough into a rectangle, about ½ inch thick. Now, here’s the “kneading” part, but it’s not like kneading bread. We’re going to do a technique called “laminating” or “folding.” Fold the dough in half, then gently pat it back into a ½-inch thick rectangle. Repeat this folding and patting process 3-4 times. This creates layers in the dough, which will result in even more flaky biscuits. Be gentle and don’t overwork the dough. The less you handle it, the better.
- Shape the Biscuits: Pat the dough into a ¾-inch to 1-inch thick circle or rectangle (depending on your preference). Use a 2 ½-inch biscuit cutter (or a sharp knife) to cut out the biscuits. Press straight down with the cutter; don’t twist it, as this will seal the edges and prevent them from rising properly. If you’re using a knife, cut straight down into squares or rectangles.
- Re-roll Scraps (Sparingly!): Gather the scraps of dough, gently press them together, and pat them out to cut out more biscuits. Keep in mind that these biscuits won’t be as tender as the first ones, as the dough has been worked more. I usually try to minimize the amount of re-rolling I do.
Baking the Biscuits: Achieving Golden Perfection
Now that our biscuits are shaped, it’s time to bake them to golden perfection! Proper oven temperature and placement are key here.
- Preheat the Oven: Preheat your oven to 450°F (232°C). Make sure your oven is fully preheated before you put the biscuits in. A hot oven is essential for a good rise.
- Prepare the Baking Sheet: Line a baking sheet with parchment paper. This will prevent the biscuits from sticking and make cleanup easier.
- Arrange the Biscuits: Place the biscuits on the prepared baking sheet, leaving about ½ inch of space between each biscuit. This allows for even heat circulation.
- Brush with Buttermilk: Brush the tops of the biscuits with a little extra buttermilk. This will help them brown beautifully. You can also use melted butter if you prefer, but I find buttermilk gives them a slightly tangy flavor that I love.
- Bake: Bake for 12-15 minutes, or until the biscuits are golden brown and have risen nicely. Keep an eye on them, as baking times can vary depending on your oven.
- Serve Immediately: Once the biscuits are done, remove them from the oven and let them cool for a few minutes on the baking sheet. Serve them warm with butter, jam, honey, or your favorite toppings. They’re also delicious with savory fillings like sausage gravy or fried chicken.
Tips for Biscuit Success:
- Use Cold Ingredients: I can’t stress this enough! Cold butter, cold shortening, and cold buttermilk are essential for flaky biscuits.
- Don’t Overmix: Overmixing develops the gluten in the flour, resulting in tough biscuits. Mix the dough just until it comes together.
- Handle the Dough Gently: Be gentle when patting and folding the dough. The less you handle it, the better.
- Use a Sharp Biscuit Cutter: A sharp biscuit cutter will cut cleanly through the dough, preventing the edges from sealing and inhibiting rising.
- Bake in a Hot Oven: A hot oven is essential for a good rise. Make sure your oven is fully preheated before you put the biscuits in.
- Don’t Overbake: Overbaking will result in dry biscuits. Bake them until they are golden brown and have risen nicely.
- Experiment with Flavors: Once you’ve mastered the basic recipe, feel free to experiment with different flavors. You can add cheese, herbs, spices, or even chocolate chips to the dough.
Variations:
- Cheese Biscuits: Add ½ cup of shredded cheddar cheese to the dry ingredients.
- Herb Biscuits: Add 2 tablespoons of chopped fresh herbs, such as rosemary, thyme, or chives, to the dry ingredients.
- Sweet Biscuits: Add ¼ cup of sugar to the dry ingredients and brush the tops of the biscuits with melted butter and sprinkle with sugar before baking.
Storage:
Leftover biscuits can be stored in an airtight container at room temperature for up to 2 days. For longer storage, wrap them individually in plastic wrap and freeze them for up to 2 months. To reheat frozen biscuits, thaw them overnight in the refrigerator and then bake them in a preheated oven at 350°F (175°C) for 5-10 minutes, or until warmed through.
Troubleshooting:
- Biscuits are flat: This could be due to several factors, including using warm ingredients, overmixing the dough, or using old baking powder.
- Biscuits are tough: This is usually caused by overmixing the dough.
- Biscuits are dry: This could be due to overbaking or using too much flour.
- Biscuits are not rising: This could be due to using old baking powder or not preheating the oven properly.
Enjoy!
I hope you enjoy these buttermilk biscuits as much as I do! They’re perfect for breakfast, brunch, or even as a side dish with dinner. Happy baking!
Conclusion:
Well, there you have it! These Buttermilk Biscuits are more than just a recipe; they’re a warm hug on a plate, a taste of home, and a guaranteed crowd-pleaser. I truly believe that once you try this recipe, it will become a staple in your kitchen, a go-to for everything from weekend brunches to holiday dinners.
Why are they a must-try? Because they are incredibly easy to make, requiring minimal ingredients and effort. Forget those complicated, multi-step biscuit recipes you’ve seen before. This one is straightforward, yielding consistently light, fluffy, and utterly delicious biscuits every single time. The buttermilk adds a subtle tang and tenderness that you just can’t achieve with regular milk, creating a biscuit that practically melts in your mouth. Plus, the satisfaction of pulling apart a warm, freshly baked biscuit is simply unmatched.
But the best part is the versatility! These biscuits are fantastic on their own, slathered with butter and your favorite jam. But don’t stop there! Imagine them split open and filled with crispy fried chicken and a drizzle of honey for a truly decadent treat. Or, use them as the base for a savory breakfast sandwich with eggs, bacon, and cheese. They are also the perfect accompaniment to a hearty bowl of chili or stew, soaking up all those delicious flavors.
Looking for variations? Get creative! Add a sprinkle of shredded cheddar cheese to the dough for cheesy biscuits. Stir in some chopped fresh herbs like rosemary or thyme for an aromatic twist. For a sweeter biscuit, brush the tops with melted butter and sprinkle with cinnamon sugar before baking. You could even add a handful of blueberries or cranberries for a fruity surprise. The possibilities are endless!
These Buttermilk Biscuits are also freezer-friendly. Bake them ahead of time and freeze them for a quick and easy breakfast or side dish whenever you need them. Simply reheat them in the oven or microwave until warm.
I’ve poured my heart into perfecting this recipe, and I’m confident that you’ll love it as much as I do. It’s a recipe that’s been passed down through generations in my family, and I’m so excited to share it with you.
So, what are you waiting for? Preheat your oven, gather your ingredients, and get ready to experience the joy of baking these incredible Buttermilk Biscuits. I promise you won’t be disappointed.
And most importantly, I want to hear about your experience! Did you try the recipe? What variations did you make? How did your family and friends react? Share your photos and stories in the comments below. I can’t wait to see your creations and hear your feedback. Happy baking! Let me know if you have any questions, and I’ll do my best to help. I’m sure you’ll agree that these are the best Buttermilk Biscuits you’ve ever tasted!
Buttermilk Biscuits: The Ultimate Guide to Fluffy, Homemade Perfection
Flaky, tender buttermilk biscuits made from scratch. The key is cold ingredients and gentle handling!
Ingredients
- 3 cups All-Purpose Flour, plus more for dusting
- 1 tablespoon Baking Powder
- 1 teaspoon Baking Soda
- 1 teaspoon Salt
- 2 tablespoons Granulated Sugar
- 12 tablespoons (1 ½ sticks) Cold Unsalted Butter, cut into small cubes
- 2 tablespoons Cold Vegetable Shortening, cut into small pieces
- 1 ¼ cups Cold Buttermilk, plus more for brushing
Instructions
- Combine Dry Ingredients: In a large bowl, whisk together the flour, baking powder, baking soda, salt, and sugar.
- Cut in the Butter and Shortening: Add the cold butter and shortening to the flour mixture. Use a pastry blender, two knives, or your fingertips to cut the butter and shortening into the flour until the mixture resembles coarse crumbs with pea-sized pieces of fat. Do not overmix.
- Add the Buttermilk: Gradually add the cold buttermilk to the flour mixture, stirring gently with a fork until just combined. The dough will be shaggy and a little sticky. If the dough seems too dry, add a tablespoon of buttermilk at a time until it comes together. If it seems too wet, add a tablespoon of flour at a time.
- Turn Out and Knead (Gently!): Lightly flour a clean work surface. Turn the dough out onto the floured surface. Gently pat the dough into a rectangle, about ½ inch thick. Fold the dough in half, then gently pat it back into a ½-inch thick rectangle. Repeat this folding and patting process 3-4 times.
- Shape the Biscuits: Pat the dough into a ¾-inch to 1-inch thick circle or rectangle. Use a 2 ½-inch biscuit cutter (or a sharp knife) to cut out the biscuits. Press straight down with the cutter; don’t twist it.
- Re-roll Scraps (Sparingly!): Gather the scraps of dough, gently press them together, and pat them out to cut out more biscuits.
- Preheat the Oven: Preheat your oven to 450°F (232°C).
- Prepare the Baking Sheet: Line a baking sheet with parchment paper.
- Arrange the Biscuits: Place the biscuits on the prepared baking sheet, leaving about ½ inch of space between each biscuit.
- Brush with Buttermilk: Brush the tops of the biscuits with a little extra buttermilk.
- Bake: Bake for 12-15 minutes, or until the biscuits are golden brown and have risen nicely.
- Serve Immediately: Remove them from the oven and let them cool for a few minutes on the baking sheet. Serve warm with butter, jam, honey, or your favorite toppings.
Notes
- Keep all ingredients as cold as possible for the flakiest biscuits.
- Don’t overmix the dough. Overmixing develops the gluten in the flour, resulting in tough biscuits.
- Handle the dough gently.
- Use a sharp biscuit cutter to prevent sealing the edges.
- A hot oven is essential for a good rise.