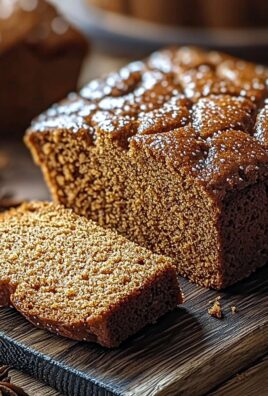
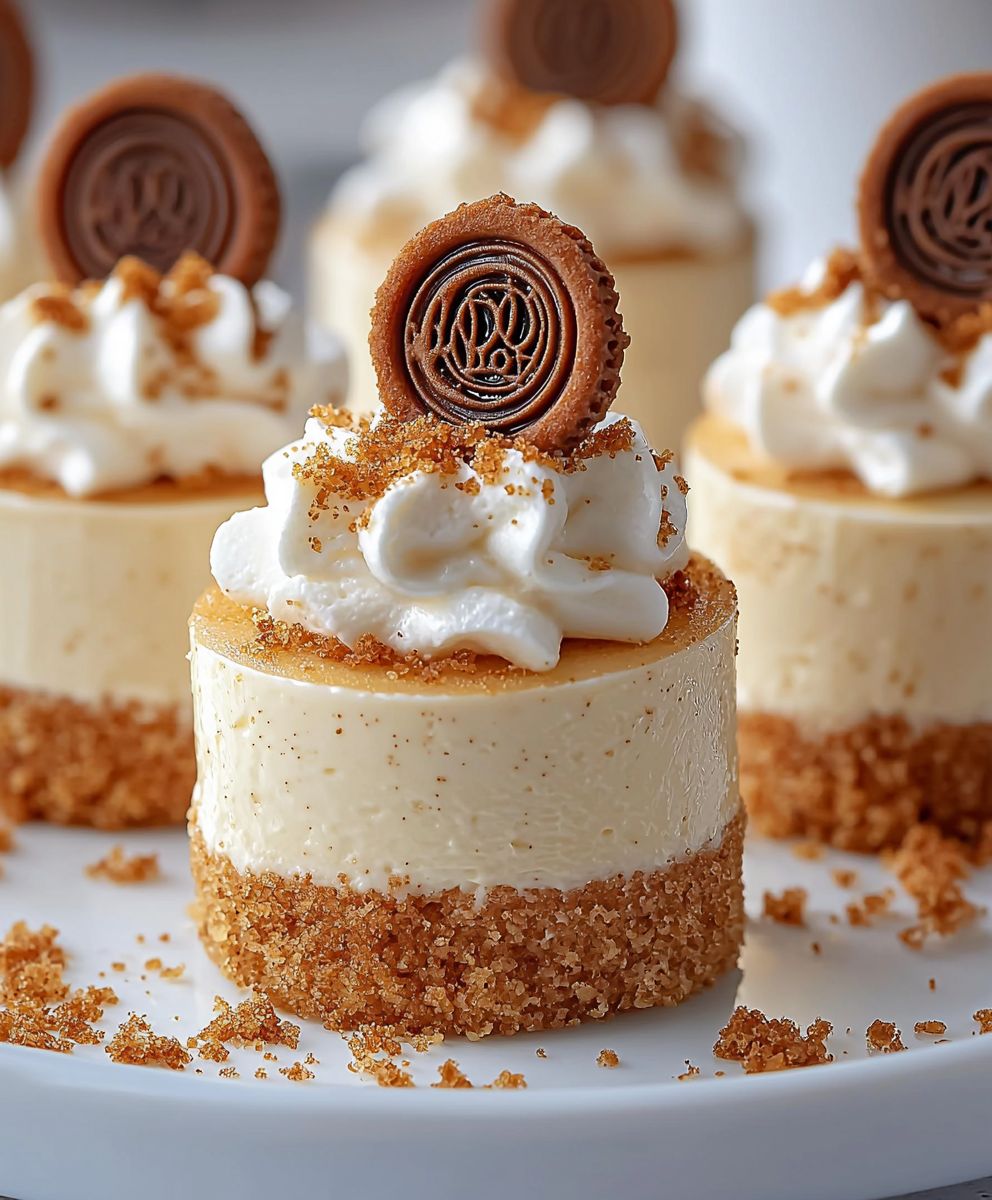
Biscoff Cheesecakes: Prepare to be utterly captivated by these miniature marvels! Imagine a creamy, dreamy cheesecake, infused with the irresistible caramelised biscuit flavour that has taken the world by storm. These aren’t just desserts; they’re individual portions of pure indulgence, perfect for impressing guests or simply treating yourself to a moment of blissful escape.
The allure of Biscoff, with its unique blend of spices and deep caramel notes, is undeniable. While the biscuit itself has a rich history rooted in Belgium, where it was traditionally served with coffee, its transformation into a cheesecake filling is a relatively modern phenomenon. However, it’s a match made in dessert heaven! The warm, comforting spice of the Biscoff beautifully complements the tangy richness of the cheesecake, creating a symphony of flavours that dance on your palate.
People adore Biscoff Cheesecakes for several reasons. Firstly, the taste is simply divine a perfect balance of sweet, creamy, and subtly spiced. Secondly, the texture is heavenly a smooth, velvety cheesecake base atop a crunchy Biscoff crust. And finally, the convenience factor is a major draw. These individual cheesecakes are easy to make, require no baking (a bonus for those hot summer days!), and are perfectly portioned for a satisfying treat. So, get ready to embark on a culinary adventure and discover the magic of these delightful desserts!

Ingredients:
- For the Biscoff Biscuit Base:
- 250g Biscoff biscuits
- 100g unsalted butter, melted
- For the Cheesecake Filling:
- 500g full-fat cream cheese, softened
- 150g icing sugar, sifted
- 300ml double cream
- 1 tsp vanilla extract
- 200g Biscoff spread, melted and cooled slightly
- For the Biscoff Topping:
- 100g Biscoff spread, melted
- Biscoff biscuits, crushed (for decoration)
Preparing the Biscoff Biscuit Base
- Crush the Biscoff Biscuits: The first thing we need to do is create our biscuit base. Place the Biscoff biscuits into a food processor and pulse until they form fine crumbs. If you don’t have a food processor, you can put the biscuits in a ziplock bag and crush them with a rolling pin. Make sure you get them nice and fine for a smooth base.
- Combine with Melted Butter: Pour the melted butter over the crushed Biscoff biscuits. Mix well until all the crumbs are evenly coated with butter. The mixture should resemble wet sand. This is what will hold our base together.
- Press into the Base of Tins: Divide the mixture evenly between 12 individual serving tins or a large springform tin (approximately 20cm/8 inches). Press the mixture firmly into the base of each tin to create a compact and even layer. I like to use the back of a spoon to really press it down.
- Chill the Base: Place the tins in the refrigerator and chill for at least 30 minutes. This will allow the biscuit base to firm up and set properly before we add the cheesecake filling. This step is crucial to prevent a soggy base!
Making the Cheesecake Filling
- Beat the Cream Cheese: In a large mixing bowl, beat the softened cream cheese with an electric mixer until smooth and creamy. Make sure your cream cheese is properly softened; otherwise, you’ll end up with lumps in your filling.
- Add Icing Sugar: Gradually add the sifted icing sugar to the cream cheese, beating until well combined. Sifting the icing sugar is important to avoid any lumps and ensure a smooth filling.
- Whip the Double Cream: In a separate bowl, whip the double cream until it forms soft peaks. Be careful not to overwhip the cream, as it can turn into butter. We want it thick enough to hold its shape but still light and airy.
- Combine Cream Cheese Mixture and Whipped Cream: Gently fold the whipped cream into the cream cheese mixture until just combined. Be careful not to overmix, as this can deflate the cream and result in a dense cheesecake.
- Add Vanilla Extract and Biscoff Spread: Stir in the vanilla extract and the melted and cooled Biscoff spread. Mix until everything is evenly combined and the filling is smooth and creamy. The Biscoff spread will give the cheesecake its signature flavor and color.
Assembling the Cheesecakes
- Pour Filling over Biscuit Base: Remove the chilled biscuit bases from the refrigerator. Spoon the cheesecake filling evenly over the biscuit bases, filling each tin to the top.
- Smooth the Surface: Use the back of a spoon or a spatula to smooth the surface of the cheesecake filling. This will ensure a neat and professional finish.
- Chill the Cheesecakes: Cover the tins with plastic wrap and refrigerate for at least 4 hours, or preferably overnight. This allows the cheesecake to set properly and develop its flavor. Patience is key here!
Decorating with Biscoff Topping
- Melt the Biscoff Spread: Gently melt the remaining Biscoff spread in the microwave or in a heatproof bowl set over a pan of simmering water. Be careful not to overheat it, as it can burn.
- Drizzle over Cheesecakes: Remove the cheesecakes from the refrigerator. Drizzle the melted Biscoff spread over the top of each cheesecake. You can create a simple drizzle pattern or get creative with your designs.
- Decorate with Crushed Biscoff Biscuits: Sprinkle crushed Biscoff biscuits over the melted Biscoff spread. This adds a lovely texture and visual appeal to the cheesecakes.
- Chill Briefly (Optional): If desired, chill the decorated cheesecakes for another 15-20 minutes to allow the Biscoff topping to set slightly.
Serving and Storage
- Serving: Carefully remove the cheesecakes from the tins before serving. You can run a thin knife around the edge of each cheesecake to help loosen it from the tin.
- Storage: Store the Biscoff cheesecakes in an airtight container in the refrigerator for up to 3 days. They are best enjoyed within the first 24 hours for optimal freshness.
Tips and Variations
- For a Vegan Version: Substitute the cream cheese with a vegan cream cheese alternative, the double cream with a vegan whipping cream, and ensure the Biscoff spread you use is vegan-friendly (most are!).
- Individual vs. Large Cheesecake: This recipe works equally well for individual cheesecakes or a large cheesecake. If using a large springform tin, you may need to adjust the chilling time to ensure it sets properly.
- Adding a Swirl: Before chilling, you can swirl some extra melted Biscoff spread into the cheesecake filling for a marbled effect.
- Biscoff Crumble Topping: For an extra crunchy topping, create a Biscoff crumble by mixing crushed Biscoff biscuits with melted butter and a little flour. Sprinkle this over the cheesecakes before chilling.
- Freezing: These cheesecakes can be frozen for up to 1 month. Wrap them individually in plastic wrap and then place them in a freezer-safe container. Thaw them in the refrigerator overnight before serving.
Troubleshooting
- Soggy Base: To prevent a soggy base, make sure you press the biscuit mixture firmly into the tins and chill it for at least 30 minutes before adding the filling.
- Lumpy Filling: Ensure your cream cheese is properly softened before beating it. Sifting the icing sugar will also help prevent lumps.
- Cracked Cheesecake: Overbaking can cause the cheesecake to crack. Since this is a no-bake cheesecake, this isn’t applicable, but if you were to bake a cheesecake, avoid overbaking.
- Cheesecake Not Setting: Make sure you chill the cheesecakes for at least 4 hours, or preferably overnight. If they are still not setting, you may need to add a little gelatin to the filling (although this recipe shouldn’t require it).
Nutritional Information (per serving, approximate)
- Calories: 450-500
- Fat: 30-35g
- Saturated Fat: 20-25g
- Carbohydrates: 40-45g
- Sugar: 30-35g
- Protein: 5-7g
Conclusion:
And there you have it! These individual Biscoff Cheesecakes are truly something special, and I genuinely believe they’re a must-try for any dessert lover. The creamy, dreamy cheesecake filling, perfectly balanced with the irresistible spiced caramel flavor of Biscoff, is a match made in heaven. It’s a dessert that’s both comforting and sophisticated, simple to make yet impressive enough to serve at a dinner party. Honestly, what’s not to love? Why are these Biscoff Cheesecakes a must-try? Because they offer a delightful textural contrast the smooth, velvety cheesecake against the crunchy Biscoff crust and topping. Because the flavor profile is universally appealing that warm, comforting spice is just *chef’s kiss*. And because they’re individually portioned, making them perfect for portion control (if you can resist eating more than one!) or for easy serving at gatherings. Plus, let’s be honest, anything with Biscoff is instantly elevated! But the best part? These cheesecakes are incredibly versatile. While I’ve shared my go-to recipe, feel free to experiment and make them your own.Serving Suggestions and Variations:
* For a truly decadent experience: Drizzle with extra melted Biscoff spread just before serving. The warm, gooey spread adds another layer of Biscoff bliss. * Add a touch of freshness: Top with fresh raspberries or strawberries to cut through the richness of the cheesecake. The tartness of the berries complements the sweetness beautifully. * Go nuts! Sprinkle chopped pecans or walnuts over the Biscoff topping for added crunch and nutty flavor. * Espresso Infusion: Add a teaspoon of instant espresso powder to the cheesecake batter for a subtle coffee kick that enhances the Biscoff flavor. * Chocolate Lover’s Dream: Swirl melted dark chocolate into the cheesecake batter before baking for a rich and decadent twist. * Seasonal Spice: During the fall and winter months, add a pinch of cinnamon, nutmeg, or cloves to the Biscoff crust for a warm and festive flavor. * Vegan Biscoff Cheesecakes: For a plant-based version, substitute the cream cheese with a vegan cream cheese alternative and use a vegan-friendly Biscoff spread. There are some great options available these days that deliver a similar creamy texture and delicious flavor. * Biscoff Cheesecake Parfaits: Layer crumbled Biscoff cookies, cheesecake filling, and whipped cream in a glass for a quick and easy dessert parfait. I truly hope you give this recipe a try. I’m confident that you’ll fall in love with these little Biscoff Cheesecakes just as much as I have. They’re the perfect treat for any occasion, or even just for a little self-indulgence. So, grab your ingredients, preheat your oven, and get ready to bake some magic! And when you do, please, please, please share your experience with me! I’d love to hear how they turned out, what variations you tried, and what your family and friends thought. You can tag me in your photos on social media or leave a comment below. I’m always eager to see your creations and hear your feedback. Happy baking, and enjoy every delicious bite of your homemade Biscoff Cheesecakes! Print
Biscoff Cheesecakes: The Ultimate Guide to Baking Delicious Treats
- Total Time: 270 minutes
- Yield: 12 individual cheesecakes or 1 large (8-inch) cheesecake 1x
Description
Decadent no-bake Biscoff cheesecakes with a crunchy Biscoff biscuit base, creamy Biscoff-infused filling, and a luscious Biscoff drizzle topping.
Ingredients
- 250g Biscoff biscuits
- 100g unsalted butter, melted
- 500g full-fat cream cheese, softened
- 150g icing sugar, sifted
- 300ml double cream
- 1 tsp vanilla extract
- 200g Biscoff spread, melted and cooled slightly
- 100g Biscoff spread, melted
- Biscoff biscuits, crushed (for decoration)
Instructions
- Crush the Biscoff Biscuits: Place the Biscoff biscuits into a food processor and pulse until they form fine crumbs. Alternatively, put the biscuits in a ziplock bag and crush them with a rolling pin.
- Combine with Melted Butter: Pour the melted butter over the crushed Biscoff biscuits. Mix well until all the crumbs are evenly coated with butter.
- Press into the Base of Tins: Divide the mixture evenly between 12 individual serving tins or a large springform tin (approximately 20cm/8 inches). Press the mixture firmly into the base of each tin to create a compact and even layer.
- Chill the Base: Place the tins in the refrigerator and chill for at least 30 minutes.
- Beat the Cream Cheese: In a large mixing bowl, beat the softened cream cheese with an electric mixer until smooth and creamy.
- Add Icing Sugar: Gradually add the sifted icing sugar to the cream cheese, beating until well combined.
- Whip the Double Cream: In a separate bowl, whip the double cream until it forms soft peaks.
- Combine Cream Cheese Mixture and Whipped Cream: Gently fold the whipped cream into the cream cheese mixture until just combined.
- Add Vanilla Extract and Biscoff Spread: Stir in the vanilla extract and the melted and cooled Biscoff spread. Mix until everything is evenly combined and the filling is smooth and creamy.
- Pour Filling over Biscuit Base: Remove the chilled biscuit bases from the refrigerator. Spoon the cheesecake filling evenly over the biscuit bases, filling each tin to the top.
- Smooth the Surface: Use the back of a spoon or a spatula to smooth the surface of the cheesecake filling.
- Chill the Cheesecakes: Cover the tins with plastic wrap and refrigerate for at least 4 hours, or preferably overnight.
- Melt the Biscoff Spread: Gently melt the remaining Biscoff spread in the microwave or in a heatproof bowl set over a pan of simmering water.
- Drizzle over Cheesecakes: Remove the cheesecakes from the refrigerator. Drizzle the melted Biscoff spread over the top of each cheesecake.
- Decorate with Crushed Biscoff Biscuits: Sprinkle crushed Biscoff biscuits over the melted Biscoff spread.
- Chill Briefly (Optional): If desired, chill the decorated cheesecakes for another 15-20 minutes to allow the Biscoff topping to set slightly.
- Serving: Carefully remove the cheesecakes from the tins before serving. You can run a thin knife around the edge of each cheesecake to help loosen it from the tin.
- Storage: Store the Biscoff cheesecakes in an airtight container in the refrigerator for up to 3 days.
Notes
- Vegan Version: Substitute the cream cheese with a vegan cream cheese alternative, the double cream with a vegan whipping cream, and ensure the Biscoff spread you use is vegan-friendly (most are!).
- Individual vs. Large Cheesecake: This recipe works equally well for individual cheesecakes or a large cheesecake. If using a large springform tin, you may need to adjust the chilling time to ensure it sets properly.
- Adding a Swirl: Before chilling, you can swirl some extra melted Biscoff spread into the cheesecake filling for a marbled effect.
- Biscoff Crumble Topping: For an extra crunchy topping, create a Biscoff crumble by mixing crushed Biscoff biscuits with melted butter and a little flour. Sprinkle this over the cheesecakes before chilling.
- Freezing: These cheesecakes can be frozen for up to 1 month. Wrap them individually in plastic wrap and then place them in a freezer-safe container. Thaw them in the refrigerator overnight before serving.
- Soggy Base: To prevent a soggy base, make sure you press the biscuit mixture firmly into the tins and chill it for at least 30 minutes before adding the filling.
- Lumpy Filling: Ensure your cream cheese is properly softened before beating it. Sifting the icing sugar will also help prevent lumps.
- Cheesecake Not Setting: Make sure you chill the cheesecakes for at least 4 hours, or preferably overnight. If they are still not setting, you may need to add a little gelatin to the filling (although this recipe shouldn’t require it).
- Prep Time: 30 minutes
- Cook Time: 0 minutes