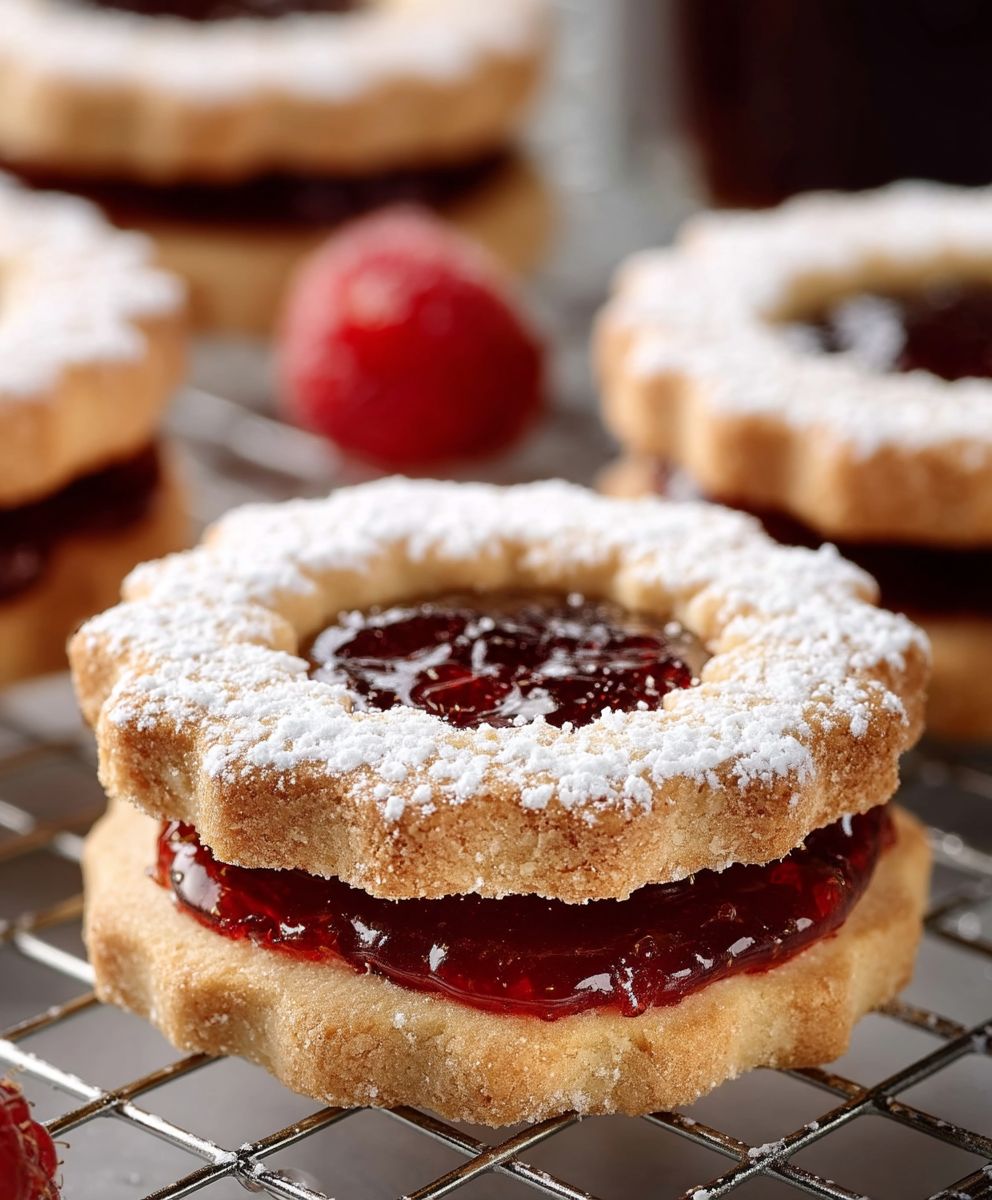
Linzer Cookies, those delicate, almond-kissed delights, are more than just a treat; they’re a miniature masterpiece of Austrian baking tradition. Have you ever bitten into a cookie that felt like a warm hug from a snowy Alpine village? That’s the magic of a perfectly made Linzer cookie! These beautiful sandwich cookies, with their signature peek-a-boo window showcasing a vibrant jam filling, are guaranteed to impress.
The history of Linzer Cookies stretches back centuries, originating in Linz, Austria, making them one of the oldest known cookie recipes in the world. While the exact origins are shrouded in a bit of delicious mystery, the Linzer torte, the cookie’s larger, more elaborate cousin, is documented as far back as the 17th century. This rich heritage adds a layer of sophistication to every bite.
But what makes these cookies so universally adored? It’s the delightful combination of textures and flavors. The buttery, crumbly almond-infused dough melts in your mouth, perfectly complementing the sweet and tangy jam filling. Whether you prefer raspberry, apricot, or even black currant, the jam adds a burst of fruity goodness that elevates the entire experience. Plus, their elegant appearance makes them perfect for gifting or serving at special occasions. So, let’s embark on a journey to create these exquisite cookies and bring a touch of Austrian charm to your kitchen!

Ingredients:
- For the Dough:
- 2 1/4 cups (281g) all-purpose flour, plus more for dusting
- 1/2 teaspoon baking powder
- 1/4 teaspoon salt
- 1 cup (2 sticks, 226g) unsalted butter, softened
- 3/4 cup (150g) granulated sugar
- 1 large egg
- 1 teaspoon vanilla extract
- 1/4 teaspoon almond extract (optional, but recommended)
- Zest of 1/2 lemon (optional)
- For the Filling:
- 1 cup (approximately 280g) raspberry jam, seedless preferred
- 1/4 cup (approximately 70g) apricot jam (optional, for blending with raspberry)
- For Dusting:
- Powdered sugar, for dusting
Preparing the Dough:
- Combine Dry Ingredients: In a medium bowl, whisk together the flour, baking powder, and salt. This ensures the baking powder is evenly distributed throughout the flour, leading to a more consistent rise. Set aside.
- Cream Butter and Sugar: In a large bowl (or the bowl of a stand mixer), cream together the softened butter and granulated sugar until light and fluffy. This usually takes about 3-5 minutes on medium speed. The mixture should be noticeably paler and have a whipped texture. Scraping down the sides of the bowl occasionally ensures everything is evenly incorporated.
- Add Egg and Extracts: Beat in the egg until fully incorporated. Then, stir in the vanilla extract, almond extract (if using), and lemon zest (if using). The almond extract adds a lovely subtle flavor that complements the raspberry jam beautifully. The lemon zest brightens the dough and adds a touch of freshness.
- Gradually Add Dry Ingredients: Gradually add the dry ingredients to the wet ingredients, mixing on low speed until just combined. Be careful not to overmix, as this can develop the gluten in the flour and result in tough cookies. Mix until the flour is almost fully incorporated, then stop and scrape down the sides of the bowl. Finish mixing until just combined. A few streaks of flour are okay at this stage.
- Divide and Chill the Dough: Divide the dough in half, flatten each half into a disc, and wrap each disc tightly in plastic wrap. Refrigerate for at least 2 hours, or preferably overnight. This chilling time is crucial! It allows the gluten to relax, making the dough easier to roll out, and it also prevents the cookies from spreading too much during baking.
Rolling and Cutting the Cookies:
- Preheat Oven and Prepare Baking Sheets: Preheat your oven to 350°F (175°C). Line two baking sheets with parchment paper or silicone baking mats. This prevents the cookies from sticking and makes cleanup a breeze.
- Roll Out the Dough: On a lightly floured surface, roll out one disc of dough to about 1/8-inch thickness. Keep the other disc of dough refrigerated while you work. Work quickly to prevent the dough from becoming too soft. If the dough becomes too sticky, return it to the refrigerator for a few minutes to firm up.
- Cut Out the Cookies: Use a Linzer cookie cutter (or any desired shape) to cut out the cookies. For the top cookies, use a smaller cutter to cut out a shape in the center (such as a heart, star, or circle). This will create the “window” for the jam to peek through.
- Transfer to Baking Sheets: Carefully transfer the cookies to the prepared baking sheets, leaving about 1 inch between each cookie. A thin metal spatula can be helpful for this.
- Repeat with Remaining Dough: Repeat the rolling and cutting process with the remaining dough, including the scraps. You can re-roll the scraps once or twice, but be aware that the dough will become tougher with each re-rolling.
- Chill Cut-Out Cookies (Optional but Recommended): For even better results and to further prevent spreading, chill the cut-out cookies on the baking sheets for another 15-20 minutes before baking.
Baking the Cookies:
- Bake the Cookies: Bake for 8-12 minutes, or until the edges are lightly golden brown. The baking time will vary depending on your oven, so keep a close eye on them.
- Cool on Baking Sheets: Let the cookies cool on the baking sheets for a few minutes before transferring them to a wire rack to cool completely.
Preparing the Filling:
- Prepare the Jam: In a small saucepan, gently heat the raspberry jam (and apricot jam, if using) over low heat until it is slightly loosened. This makes it easier to spread. You can also microwave the jam in a microwave-safe bowl for a few seconds.
- Strain the Jam (Optional): If you prefer a smoother filling, you can strain the jam through a fine-mesh sieve to remove any seeds or lumps. This is especially helpful if you are not using seedless raspberry jam.
Assembling the Linzer Cookies:
- Dust the Top Cookies: Dust the top cookies (the ones with the cut-out centers) generously with powdered sugar. This adds a touch of sweetness and creates a beautiful contrast with the jam filling.
- Spread the Jam: Spread a thin layer of jam on the flat side of the bottom cookies (the ones without the cut-out centers). Be careful not to overfill, as the jam will squeeze out when you press the top cookie on.
- Assemble the Cookies: Carefully place the powdered sugar-dusted top cookies on top of the jam-covered bottom cookies, gently pressing them together.
- Let the Cookies Set: Allow the assembled cookies to set for at least 30 minutes before serving. This allows the jam to firm up slightly and helps the cookies hold their shape.
Tips for Success:
- Use High-Quality Ingredients: The flavor of these cookies really shines through, so using good-quality butter, extracts, and jam will make a big difference.
- Don’t Overmix the Dough: Overmixing develops the gluten in the flour, resulting in tough cookies. Mix until just combined.
- Chill the Dough: Chilling the dough is essential for preventing spreading and making it easier to roll out.
- Roll the Dough Evenly: Rolling the dough to an even thickness ensures that the cookies bake evenly.
- Don’t Overbake: Overbaked cookies will be dry and crumbly. Bake until the edges are lightly golden brown.
- Let the Cookies Cool Completely: Let the cookies cool completely before assembling them, as the jam will melt if the cookies are still warm.
- Store Properly: Store the assembled cookies in an airtight container at room temperature for up to 3 days. They can also be frozen for longer storage.
- Experiment with Flavors: Feel free to experiment with different extracts, zests, and jams to create your own unique Linzer cookie variations. Almond extract and apricot jam are classic pairings, but you can also try lemon extract with blueberry jam, or orange zest with cranberry sauce.
- Use Different Cutters: Get creative with your cookie cutters! Use different shapes and sizes to make your Linzer cookies even more festive.
Conclusion:
And there you have it! These Linzer Cookies are more than just a treat; they’re a little piece of edible art, a burst of festive flavor, and a guaranteed crowd-pleaser. I truly believe this recipe is a must-try, and here’s why: the delicate, buttery shortbread, the sweet-tart raspberry filling peeking through the charming cutout, and the dusting of powdered sugar create a symphony of textures and tastes that’s simply irresistible. It’s a cookie that speaks of tradition, of warmth, and of sharing special moments with loved ones.
But the best part? These cookies are surprisingly easy to make! Don’t let the intricate look intimidate you. With a little patience and this straightforward recipe, you’ll be whipping up batches of these beauties in no time. The dough comes together quickly, chills beautifully, and rolls out like a dream. And the filling? Well, that’s just a matter of spreading your favorite jam!
Beyond the classic raspberry, feel free to get creative with your fillings. Apricot jam adds a bright, sunny note, while black currant offers a deeper, more complex flavor. For a truly decadent experience, try a chocolate hazelnut spread. You could even experiment with homemade fruit preserves for a truly unique touch.
Serving suggestions are endless! These Linzer Cookies are perfect for holiday gatherings, afternoon tea, or simply as a sweet treat to brighten your day. Arrange them on a pretty platter for a stunning presentation, or package them in cellophane bags tied with ribbon for a thoughtful homemade gift. They also pair wonderfully with a cup of hot coffee, a glass of milk, or even a dessert wine.
For a fun variation, consider using different cookie cutters to create unique shapes. Stars, hearts, snowflakes the possibilities are endless! You can also add a touch of citrus zest to the dough for a subtle hint of flavor. Or, for a nuttier cookie, incorporate finely ground almonds or hazelnuts into the dough.
I’m so excited for you to try this recipe and experience the joy of baking these delightful cookies. I’ve poured my heart into perfecting this recipe, and I’m confident that you’ll love the results. Remember to chill the dough thoroughly for the best texture, and don’t be afraid to experiment with different fillings and decorations to make them your own.
So, what are you waiting for? Gather your ingredients, preheat your oven, and get ready to create some magic in the kitchen. I can’t wait to hear about your baking adventures! Please, share your photos and stories with me in the comments below. Let me know what fillings you tried, what shapes you created, and how much your friends and family loved them. Your feedback is invaluable, and it inspires me to continue sharing my favorite recipes with you. Happy baking, and enjoy every delicious bite of these wonderful Linzer Cookies! I hope you find this recipe as rewarding and enjoyable as I do.
Linzer Cookies: The Ultimate Guide to Baking Perfect Treats
Buttery, almond-kissed Linzer cookies with sweet raspberry jam, dusted with powdered sugar.
Ingredients
- 2 1/4 cups (281g) all-purpose flour, plus more for dusting
- 1/2 teaspoon baking powder
- 1/4 teaspoon salt
- 1 cup (2 sticks, 226g) unsalted butter, softened
- 3/4 cup (150g) granulated sugar
- 1 large egg
- 1 teaspoon vanilla extract
- 1/4 teaspoon almond extract (optional, but recommended)
- Zest of 1/2 lemon (optional)
- 1 cup (approximately 280g) raspberry jam, seedless preferred
- 1/4 cup (approximately 70g) apricot jam (optional, for blending with raspberry)
- Powdered sugar, for dusting
Instructions
- Combine Dry Ingredients: In a medium bowl, whisk together the flour, baking powder, and salt. Set aside.
- Cream Butter and Sugar: In a large bowl (or the bowl of a stand mixer), cream together the softened butter and granulated sugar until light and fluffy (3-5 minutes on medium speed). Scrape down the sides of the bowl occasionally.
- Add Egg and Extracts: Beat in the egg until fully incorporated. Then, stir in the vanilla extract, almond extract (if using), and lemon zest (if using).
- Gradually Add Dry Ingredients: Gradually add the dry ingredients to the wet ingredients, mixing on low speed until just combined. Be careful not to overmix.
- Divide and Chill the Dough: Divide the dough in half, flatten each half into a disc, and wrap each disc tightly in plastic wrap. Refrigerate for at least 2 hours, or preferably overnight.
- Preheat Oven and Prepare Baking Sheets: Preheat your oven to 350°F (175°C). Line two baking sheets with parchment paper or silicone baking mats.
- Roll Out the Dough: On a lightly floured surface, roll out one disc of dough to about 1/8-inch thickness. Keep the other disc of dough refrigerated while you work.
- Cut Out the Cookies: Use a Linzer cookie cutter (or any desired shape) to cut out the cookies. For the top cookies, use a smaller cutter to cut out a shape in the center.
- Transfer to Baking Sheets: Carefully transfer the cookies to the prepared baking sheets, leaving about 1 inch between each cookie.
- Repeat with Remaining Dough: Repeat the rolling and cutting process with the remaining dough, including the scraps.
- Chill Cut-Out Cookies (Optional but Recommended): For even better results and to further prevent spreading, chill the cut-out cookies on the baking sheets for another 15-20 minutes before baking.
- Bake the Cookies: Bake for 8-12 minutes, or until the edges are lightly golden brown.
- Cool on Baking Sheets: Let the cookies cool on the baking sheets for a few minutes before transferring them to a wire rack to cool completely.
- Prepare the Jam: In a small saucepan, gently heat the raspberry jam (and apricot jam, if using) over low heat until it is slightly loosened. You can also microwave the jam in a microwave-safe bowl for a few seconds.
- Strain the Jam (Optional): If you prefer a smoother filling, you can strain the jam through a fine-mesh sieve to remove any seeds or lumps.
- Dust the Top Cookies: Dust the top cookies (the ones with the cut-out centers) generously with powdered sugar.
- Spread the Jam: Spread a thin layer of jam on the flat side of the bottom cookies (the ones without the cut-out centers).
- Assemble the Cookies: Carefully place the powdered sugar-dusted top cookies on top of the jam-covered bottom cookies, gently pressing them together.
- Let the Cookies Set: Allow the assembled cookies to set for at least 30 minutes before serving.
Notes
- Use high-quality ingredients for the best flavor.
- Don’t overmix the dough.
- Chilling the dough is essential.
- Roll the dough evenly.
- Don’t overbake the cookies.
- Let the cookies cool completely before assembling.
- Store assembled cookies in an airtight container at room temperature for up to 3 days, or freeze for longer storage.
- Experiment with different extracts, zests, and jams.
- Use different cookie cutters for a festive touch.