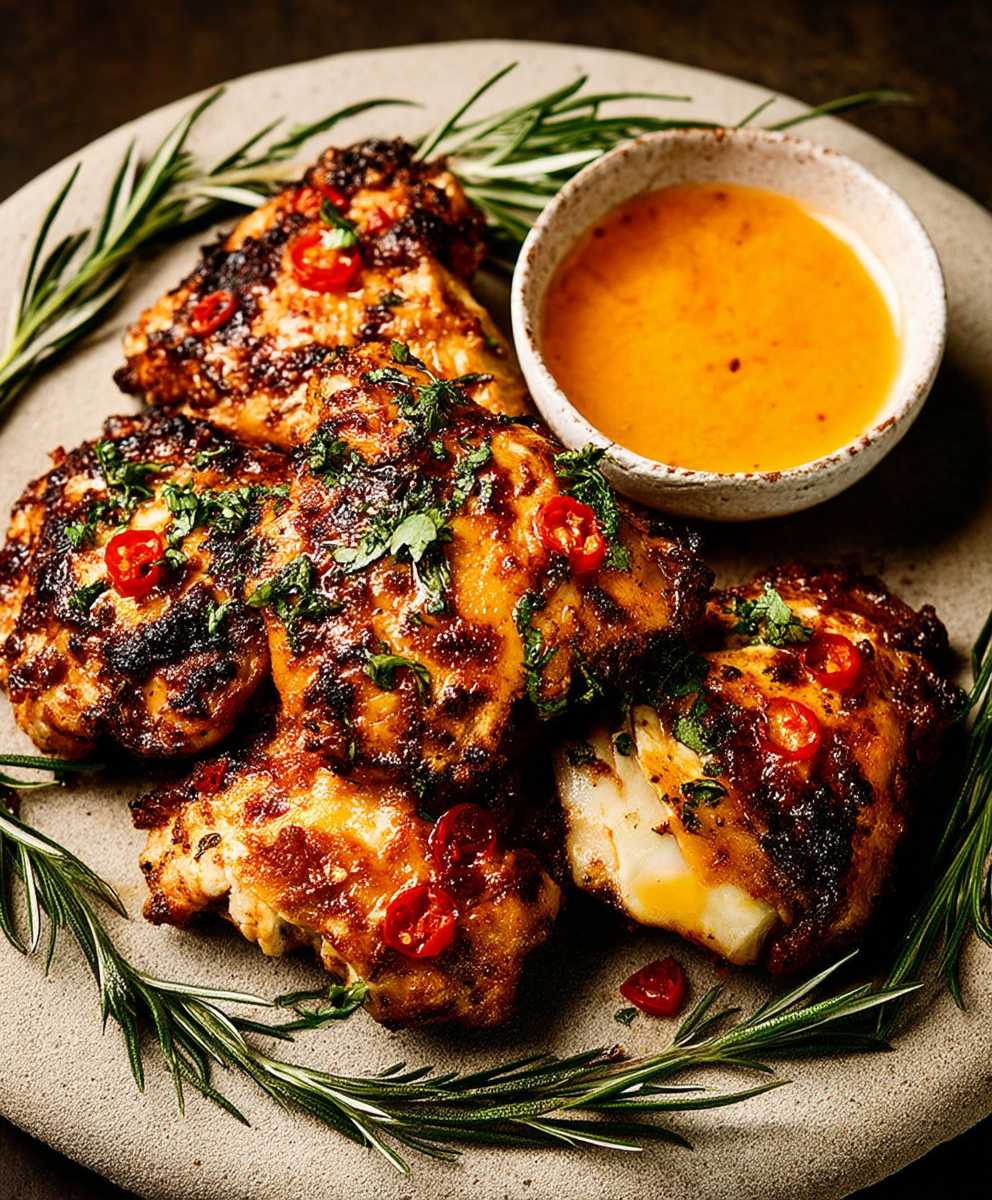
Piri Piri Chicken: Prepare to ignite your taste buds with a fiery, flavorful journey straight to the heart of Portugal! Imagine succulent chicken, marinated in a vibrant blend of chilies, garlic, and citrus, then grilled to smoky perfection. This isn’t just chicken; it’s an experience.
The story of Piri Piri Chicken is as captivating as its taste. While the name “piri piri” originates from the Swahili word for chili, the dish itself blossomed in Portugal and its former colonies, particularly Angola and Mozambique. Portuguese explorers introduced the fiery African bird’s eye chili to their cuisine, and the rest, as they say, is delicious history. The fusion of Portuguese culinary techniques with the vibrant African chili created a dish that’s both comforting and exciting.
What makes Piri Piri Chicken so universally loved? It’s a symphony of flavors the initial heat from the chilies is balanced by the tangy citrus and savory garlic. The grilling process imparts a smoky char that elevates the dish to another level. Beyond the taste, it’s incredibly versatile. Perfect for a casual weeknight dinner or a show-stopping centerpiece for a weekend barbecue, this recipe is surprisingly easy to make. The marinade does most of the work, infusing the chicken with incredible flavor, so you can spend less time in the kitchen and more time enjoying the company of your loved ones. I find that the crispy skin and juicy meat are simply irresistible, and I know you will too!

Ingredients:
- For the Chicken:
- 1 whole chicken (about 3-4 lbs), spatchcocked or cut into pieces
- 2 tablespoons olive oil
- Salt and freshly ground black pepper, to taste
- For the Piri Piri Marinade:
- 8-10 red chilies (such as bird’s eye or Scotch bonnet), stemmed and roughly chopped (adjust to your spice preference!)
- 6 cloves garlic, minced
- 1 red bell pepper, roughly chopped
- 1/2 cup red wine vinegar
- 1/4 cup lemon juice (freshly squeezed is best!)
- 1/4 cup olive oil
- 2 tablespoons smoked paprika
- 1 tablespoon dried oregano
- 1 tablespoon brown sugar (or honey)
- 1 teaspoon salt (or to taste)
- 1/2 teaspoon black pepper
- 1/4 teaspoon cayenne pepper (optional, for extra heat)
- 1/4 cup fresh cilantro, roughly chopped
- 1/4 cup fresh parsley, roughly chopped
- 2 tablespoons Piri-Piri sauce (optional, for an extra kick)
Preparing the Piri Piri Marinade:
- First, let’s tackle the marinade this is where all the magic happens! In a food processor or blender, combine the chopped red chilies, minced garlic, chopped red bell pepper, red wine vinegar, lemon juice, olive oil, smoked paprika, dried oregano, brown sugar (or honey), salt, black pepper, and cayenne pepper (if using).
- Pulse the mixture until it forms a relatively smooth paste. Don’t worry if it’s not perfectly smooth; a little texture is perfectly fine.
- Now, add the fresh cilantro and parsley to the food processor. Pulse a few more times until the herbs are finely chopped and incorporated into the marinade.
- Taste the marinade and adjust the seasoning as needed. If you want it spicier, add more chili or cayenne pepper. If it’s too spicy, add a little more lemon juice or olive oil to balance the heat. If you’re using Piri-Piri sauce, stir it in now.
Marinating the Chicken:
- Pat the chicken dry with paper towels. This will help the marinade adhere better and promote crispy skin during cooking.
- Place the chicken in a large bowl or a resealable plastic bag.
- Pour the Piri Piri marinade over the chicken, making sure to coat it thoroughly. Use your hands to rub the marinade into every nook and cranny, getting it under the skin where possible. This is crucial for maximum flavor!
- Cover the bowl or seal the bag and refrigerate the chicken for at least 4 hours, or preferably overnight. The longer it marinates, the more flavorful and tender it will become. I usually aim for at least 12 hours for the best results.
Cooking the Chicken:
There are several ways to cook Piri Piri chicken, each with its own advantages. I’ll outline my favorite methods: grilling, oven-roasting, and pan-frying. Choose the method that best suits your equipment and preferences.
Grilling:
- Preheat your grill to medium-high heat (about 375-450°F or 190-230°C). Make sure the grates are clean and lightly oiled to prevent sticking.
- Remove the chicken from the marinade and let any excess drip off. You can reserve the marinade for basting later, but be sure to boil it thoroughly first to kill any bacteria.
- Place the chicken on the grill, skin-side down. Grill for about 6-8 minutes, or until the skin is nicely charred and crispy.
- Flip the chicken and continue grilling for another 6-8 minutes, or until the internal temperature reaches 165°F (74°C) in the thickest part of the thigh. Use a meat thermometer to ensure accuracy.
- If you’re using the reserved marinade, brush it over the chicken during the last few minutes of grilling. Be careful not to burn the marinade, as the sugar content can cause it to caramelize quickly.
- Remove the chicken from the grill and let it rest for 5-10 minutes before carving and serving. This allows the juices to redistribute, resulting in a more tender and flavorful chicken.
Oven-Roasting:
- Preheat your oven to 400°F (200°C).
- Remove the chicken from the marinade and place it on a roasting rack set inside a baking sheet. This allows air to circulate around the chicken, promoting even cooking and crispy skin.
- Roast the chicken for about 45-60 minutes, or until the internal temperature reaches 165°F (74°C) in the thickest part of the thigh. Again, use a meat thermometer for accuracy.
- If the skin starts to brown too quickly, you can tent the chicken with aluminum foil to prevent burning.
- During the last 15 minutes of cooking, you can increase the oven temperature to 425°F (220°C) to further crisp up the skin. Keep a close eye on it to prevent burning.
- Remove the chicken from the oven and let it rest for 5-10 minutes before carving and serving.
Pan-Frying:
- This method works best with chicken pieces rather than a whole chicken. Heat 2 tablespoons of olive oil in a large skillet over medium-high heat.
- Remove the chicken pieces from the marinade and let any excess drip off.
- Place the chicken pieces in the skillet, skin-side down. Sear for about 5-7 minutes, or until the skin is golden brown and crispy.
- Flip the chicken pieces and continue cooking for another 5-7 minutes, or until the internal temperature reaches 165°F (74°C) in the thickest part.
- If the chicken starts to brown too quickly, reduce the heat to medium.
- Remove the chicken pieces from the skillet and let them rest for a few minutes before serving.
Serving Suggestions:
Piri Piri chicken is incredibly versatile and pairs well with a variety of sides. Here are a few of my favorite serving suggestions:
- Roasted Potatoes: Toss potato wedges with olive oil, salt, pepper, and herbs like rosemary or thyme, and roast them alongside the chicken.
- Rice: Serve the chicken with fluffy white rice, brown rice, or even coconut rice for a tropical twist.
- Salad: A simple green salad with a vinaigrette dressing provides a refreshing contrast to the spicy chicken.
- Grilled Vegetables: Grill some bell peppers, onions, zucchini, or eggplant to complement the chicken.
- Coleslaw: A creamy coleslaw is a classic pairing with grilled or roasted chicken.
- Corn on the Cob: Grilled or boiled corn on the cob is a simple and delicious side dish.
- Crusty Bread: Serve the chicken with crusty bread for soaking up the flavorful juices.
- Piri-Piri Sauce: Offer extra Piri-Piri sauce on the side for those who like it extra spicy.
Tips and Variations:
- Spice Level: Adjust the amount of chili peppers to your liking. If you’re sensitive to heat, start with fewer chilies and add more as needed. You can also remove the seeds and membranes from the chilies to reduce the heat.
- Marinade Time: While 4 hours is the minimum marinating time, I highly recommend marinating the chicken overnight for the best flavor.
- Chicken Cut: You can use any cut of chicken you prefer, such as bone-in chicken breasts, thighs, or drumsticks. Just adjust the cooking time accordingly.
- Lemon-Herb Variation: For a slightly different flavor profile, add the zest of one lemon and a handful of chopped fresh herbs like rosemary, thyme, or oregano to the marinade.
- Coconut Milk Variation: For a creamier and more exotic flavor, add 1/2 cup of coconut milk to the marinade.
- Beer Marinade: Substitute some of the red wine vinegar with beer for a unique flavor.
- Smoked Paprika: Don’t skip the smoked paprika! It adds a wonderful smoky flavor that complements the other spices.
- Basting: If you’
Conclusion:
So, there you have it! This Piri Piri Chicken recipe is more than just a meal; it’s an experience. It’s a vibrant explosion of flavor that will transport your taste buds straight to Portugal. The combination of smoky char, fiery chilies, and zesty citrus creates a symphony of sensations that’s both incredibly satisfying and utterly addictive. I truly believe this is a must-try recipe for anyone who loves bold, exciting flavors and isn’t afraid of a little heat.
But why is it a must-try? Beyond the incredible taste, it’s also surprisingly versatile and adaptable. It’s perfect for a weeknight dinner, a weekend barbecue, or even a special occasion. The marinade can be prepared in advance, making it a convenient option for busy schedules. Plus, the recipe is easily customizable to suit your spice preference. If you’re sensitive to heat, simply reduce the amount of Piri Piri chilies or remove the seeds before blending. If you’re a spice enthusiast like me, feel free to add even more!
Serving Suggestions & Variations:
The possibilities are endless when it comes to serving this delicious chicken. Here are a few of my favorite ways to enjoy it:
* Classic Piri Piri Chicken with Fries: A simple yet satisfying combination. Serve the chicken with crispy, golden fries and a side of creamy coleslaw for a complete meal.
* Piri Piri Chicken Salad: Shred the cooked chicken and toss it with mixed greens, cherry tomatoes, cucumber, red onion, and a light vinaigrette for a refreshing and flavorful salad.
* Piri Piri Chicken Tacos: Warm tortillas, shredded Piri Piri Chicken, your favorite taco toppings (salsa, guacamole, sour cream, etc.), and a squeeze of lime. These are always a crowd-pleaser!
* Piri Piri Chicken Rice Bowl: Serve the chicken over a bed of fluffy rice with roasted vegetables like bell peppers, onions, and zucchini. Drizzle with a little extra Piri Piri sauce for an extra kick.
* Piri Piri Chicken Sandwich: Grilled Piri Piri Chicken breast on a toasted bun with lettuce, tomato, and your favorite condiments. Add a slice of cheese for extra indulgence.
* Piri Piri Chicken Skewers: Cut the chicken into bite-sized pieces, thread them onto skewers with vegetables, and grill or bake until cooked through. Perfect for appetizers or a light meal.
* Piri Piri Chicken Pizza: Use the Piri Piri Chicken as a topping for homemade or store-bought pizza. Add some red onions, bell peppers, and mozzarella cheese for a delicious and unique pizza experience.Don’t be afraid to get creative and experiment with different serving suggestions and variations. The beauty of this recipe is that it’s a blank canvas for your culinary imagination.
I truly hope you’ll give this Piri Piri Chicken recipe a try. I’m confident that you’ll love it as much as I do. It’s a guaranteed crowd-pleaser that’s sure to impress your family and friends.
Once you’ve made it, I’d love to hear about your experience! Did you make any modifications to the recipe? What serving suggestions did you try? What did your family and friends think? Share your photos and stories in the comments below. I can’t wait to see what you create! Happy cooking! And remember, don’t be afraid to embrace the heat!
Piri Piri Chicken: The Ultimate Spicy Recipe You Need to Try
Fiery Piri Piri Chicken marinated in a vibrant chili-garlic sauce and cooked to juicy perfection. Grill, roast, or pan-fry!
Ingredients
- 1 whole chicken (about 3-4 lbs), spatchcocked or cut into pieces
- 2 tablespoons olive oil
- Salt and freshly ground black pepper, to taste
- 8-10 red chilies (such as bird’s eye or Scotch bonnet), stemmed and roughly chopped (adjust to your spice preference!)
- 6 cloves garlic, minced
- 1 red bell pepper, roughly chopped
- 1/2 cup red wine vinegar
- 1/4 cup lemon juice (freshly squeezed is best!)
- 1/4 cup olive oil
- 2 tablespoons smoked paprika
- 1 tablespoon dried oregano
- 1 tablespoon brown sugar (or honey)
- 1 teaspoon salt (or to taste)
- 1/2 teaspoon black pepper
- 1/4 teaspoon cayenne pepper (optional, for extra heat)
- 1/4 cup fresh cilantro, roughly chopped
- 1/4 cup fresh parsley, roughly chopped
- 2 tablespoons Piri-Piri sauce (optional, for an extra kick)
Instructions
- In a food processor or blender, combine the chopped red chilies, minced garlic, chopped red bell pepper, red wine vinegar, lemon juice, olive oil, smoked paprika, dried oregano, brown sugar (or honey), salt, black pepper, and cayenne pepper (if using).
- Pulse until it forms a relatively smooth paste.
- Add the fresh cilantro and parsley. Pulse a few more times until the herbs are finely chopped and incorporated.
- Taste and adjust the seasoning as needed. Add more chili or cayenne pepper for spicier, or more lemon juice or olive oil to balance the heat. If using Piri-Piri sauce, stir it in now.
- Pat the chicken dry with paper towels.
- Place the chicken in a large bowl or a resealable plastic bag.
- Pour the Piri Piri marinade over the chicken, making sure to coat it thoroughly. Rub the marinade into every nook and cranny, getting it under the skin where possible.
- Cover the bowl or seal the bag and refrigerate for at least 4 hours, or preferably overnight (at least 12 hours for best results).
- Preheat your grill to medium-high heat (about 375-450°F or 190-230°C). Make sure the grates are clean and lightly oiled.
- Remove the chicken from the marinade and let any excess drip off. Reserve the marinade for basting later, but be sure to boil it thoroughly first to kill any bacteria.
- Place the chicken on the grill, skin-side down. Grill for about 6-8 minutes, or until the skin is nicely charred and crispy.
- Flip the chicken and continue grilling for another 6-8 minutes, or until the internal temperature reaches 165°F (74°C) in the thickest part of the thigh. Use a meat thermometer to ensure accuracy.
- If using the reserved marinade, brush it over the chicken during the last few minutes of grilling. Be careful not to burn the marinade, as the sugar content can cause it to caramelize quickly.
- Remove the chicken from the grill and let it rest for 5-10 minutes before carving and serving.
- Preheat your oven to 400°F (200°C).
- Remove the chicken from the marinade and place it on a roasting rack set inside a baking sheet.
- Roast the chicken for about 45-60 minutes, or until the internal temperature reaches 165°F (74°C) in the thickest part of the thigh. Use a meat thermometer for accuracy.
- If the skin starts to brown too quickly, you can tent the chicken with aluminum foil to prevent burning.
- During the last 15 minutes of cooking, you can increase the oven temperature to 425°F (220°C) to further crisp up the skin. Keep a close eye on it to prevent burning.
- Remove the chicken from the oven and let it rest for 5-10 minutes before carving and serving.
- This method works best with chicken pieces rather than a whole chicken. Heat 2 tablespoons of olive oil in a large skillet over medium-high heat.
- Remove the chicken pieces from the marinade and let any excess drip off.
- Place the chicken pieces in the skillet, skin-side down. Sear for about 5-7 minutes, or until the skin is golden brown and crispy.
- Flip the chicken pieces and continue cooking for another 5-7 minutes, or until the internal temperature reaches 165°F (74°C) in the thickest part.
- If the chicken starts to brown too quickly, reduce the heat to medium.
- Remove the chicken pieces from the skillet and let them rest for a few minutes before serving.
Notes
- Spice Level: Adjust the amount of chili peppers to your liking. If you’re sensitive to heat, start with fewer chilies and add more as needed. You can also remove the seeds and membranes from the chilies to reduce the heat.
- Marinade Time: While 4 hours is the minimum marinating time, I highly recommend marinating the chicken overnight for the best flavor.
- Chicken Cut: You can use any cut of chicken you prefer, such as bone-in chicken breasts, thighs, or drumsticks. Just adjust the cooking time accordingly.
- Lemon-Herb Variation: For a slightly different flavor profile, add the zest of one lemon and a handful of chopped fresh herbs like rosemary, thyme, or oregano to the marinade.
- Coconut Milk Variation: For a creamier and more exotic flavor, add 1/2 cup of coconut milk to the marinade.
- Beer Marinade: Substitute some of the red wine vinegar with beer for a unique flavor.
- Smoked Paprika: Don’t skip the smoked paprika! It adds a wonderful smoky flavor that complements the other spices.
- Basting: If you’re grilling or roasting, basting with the reserved marinade (boiled first!) adds extra flavor and moisture.