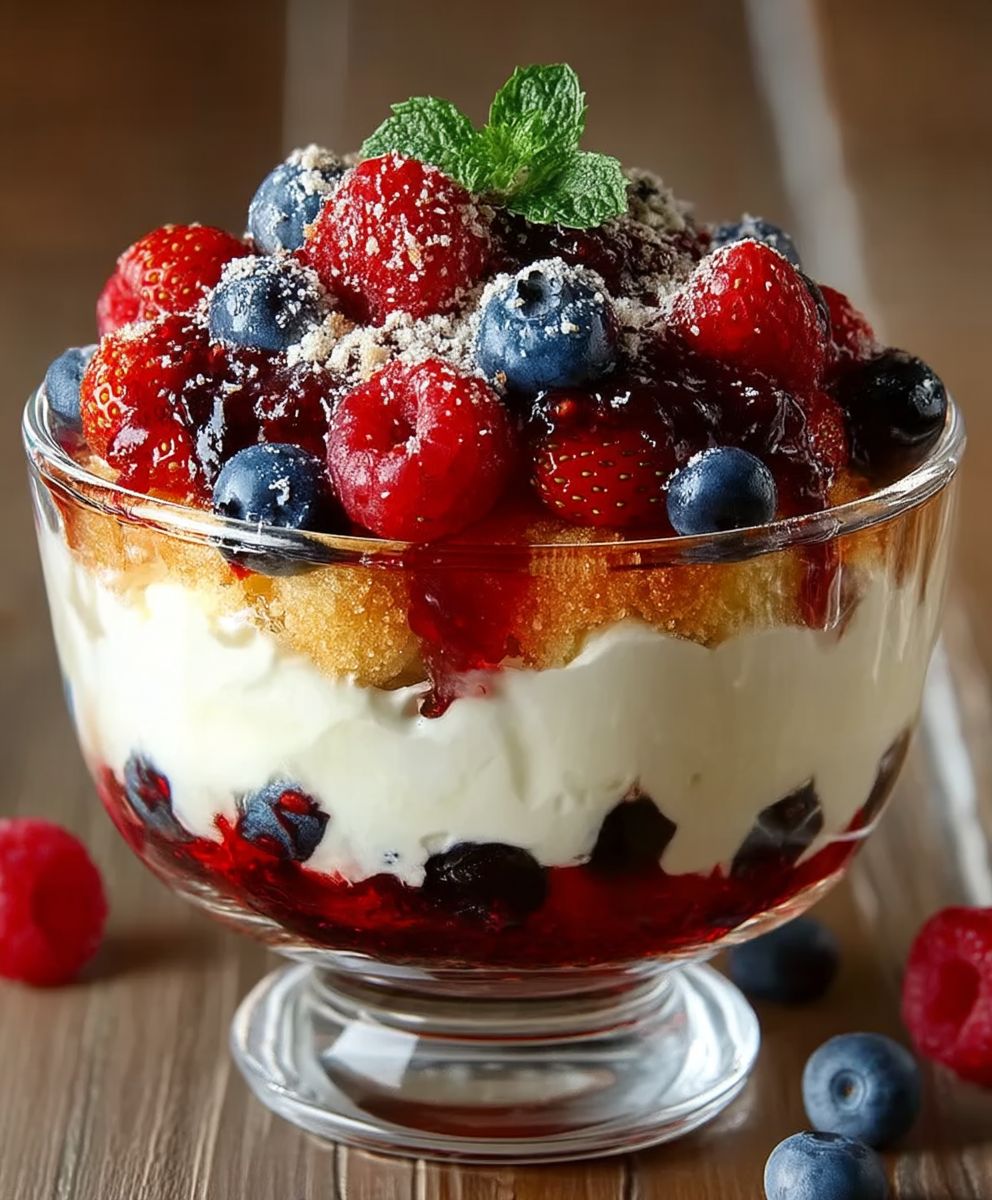
Red White Blue Trifle: the ultimate showstopper dessert for your patriotic celebrations! Imagine layers of fluffy angel food cake, luscious berries bursting with flavor, and creamy vanilla custard, all coming together in a stunning visual display. This isn’t just a dessert; it’s a centerpiece that will have everyone reaching for seconds (and maybe thirds!).
While the exact origins of the trifle are debated, its roots can be traced back to England, evolving from earlier recipes like fools and syllabubs. The beauty of a trifle lies in its adaptability, allowing for endless variations based on seasonal ingredients and personal preferences. Our Red White Blue Trifle takes this classic dessert and gives it a festive, American twist, perfect for Memorial Day, Fourth of July, or any occasion where you want to celebrate in style.
What makes this trifle so irresistible? It’s the delightful combination of textures the soft cake, the juicy berries, and the smooth custard create a symphony in your mouth. Plus, it’s surprisingly easy to assemble, making it a stress-free dessert option for gatherings. The vibrant colors are visually appealing, and the taste is simply divine. Get ready to impress your guests with this delicious and patriotic treat!

Ingredients:
- For the Pound Cake:
- 2 cups all-purpose flour
- 1 teaspoon baking powder
- 1/2 teaspoon baking soda
- 1/4 teaspoon salt
- 1 cup (2 sticks) unsalted butter, softened
- 1 3/4 cups granulated sugar
- 4 large eggs
- 1 teaspoon vanilla extract
- 1 cup sour cream
- For the Berry Layers:
- 4 cups fresh strawberries, hulled and sliced
- 2 cups fresh blueberries
- 2 cups fresh raspberries
- 1/4 cup granulated sugar (for the strawberries)
- 1 tablespoon lemon juice (for the strawberries)
- For the Creamy Filling:
- 4 cups heavy cream
- 1 cup powdered sugar
- 2 teaspoons vanilla extract
- 8 ounces cream cheese, softened
- Optional Garnish:
- Fresh mint leaves
- Extra berries
- Edible glitter (for a festive touch!)
Preparing the Pound Cake:
- Preheat and Prep: First things first, preheat your oven to 350°F (175°C). Grease and flour a 9×5 inch loaf pan. This will prevent the cake from sticking and ensure easy removal later. I like to use baking spray with flour already in it for extra insurance!
- Dry Ingredients: In a medium bowl, whisk together the flour, baking powder, baking soda, and salt. Whisking ensures everything is evenly distributed, which is key for a light and airy cake. Set this aside for now.
- Cream Butter and Sugar: In a large bowl (or the bowl of your stand mixer), cream together the softened butter and granulated sugar until light and fluffy. This usually takes about 3-5 minutes. Don’t rush this step; it’s crucial for incorporating air into the batter.
- Add Eggs: Beat in the eggs one at a time, making sure each egg is fully incorporated before adding the next. Then, stir in the vanilla extract.
- Alternate Wet and Dry: Gradually add the dry ingredients to the wet ingredients, alternating with the sour cream. Begin and end with the dry ingredients. So, add about 1/3 of the dry ingredients, then 1/2 of the sour cream, then another 1/3 of the dry ingredients, then the remaining sour cream, and finally the last 1/3 of the dry ingredients. Mix until just combined. Be careful not to overmix, as this can lead to a tough cake.
- Bake: Pour the batter into the prepared loaf pan and spread it evenly. Bake for 50-60 minutes, or until a wooden skewer inserted into the center comes out clean.
- Cool: Let the cake cool in the pan for 10 minutes before inverting it onto a wire rack to cool completely. This prevents the cake from getting soggy. Once completely cool, wrap it tightly in plastic wrap and refrigerate for at least 2 hours, or preferably overnight. This makes it easier to slice.
Preparing the Berry Layers:
- Prepare Strawberries: Hull and slice the strawberries. In a medium bowl, gently toss them with the 1/4 cup of granulated sugar and the lemon juice. The sugar will help draw out the juices from the strawberries, creating a delicious syrup. Let them sit for about 30 minutes, stirring occasionally.
- Prepare Blueberries and Raspberries: Gently rinse the blueberries and raspberries and pat them dry. No need to add sugar to these, as they are already naturally sweet.
Preparing the Creamy Filling:
- Whip Heavy Cream: In a large bowl (or the bowl of your stand mixer), beat the heavy cream with an electric mixer until soft peaks form.
- Add Sugar and Vanilla: Gradually add the powdered sugar and vanilla extract, and continue beating until stiff peaks form. Be careful not to overwhip, or you’ll end up with butter!
- Incorporate Cream Cheese: In a separate bowl, beat the softened cream cheese until smooth and creamy. Gently fold the whipped cream into the cream cheese until well combined. This creates a stable and flavorful filling.
Assembling the Trifle:
- Slice the Pound Cake: Using a serrated knife, slice the chilled pound cake into 1/2-inch thick slices. You can also cut the slices into cubes if you prefer.
- Layering Begins: Choose a large trifle bowl or a clear glass bowl. Start with a layer of pound cake slices or cubes at the bottom of the bowl.
- Add Strawberries: Spoon a layer of the sugared strawberries over the pound cake, including some of the strawberry syrup.
- Add Creamy Filling: Spread a layer of the creamy filling over the strawberries.
- Add Blueberries: Sprinkle a layer of blueberries over the creamy filling.
- Repeat Layers: Repeat the layers of pound cake, strawberries, creamy filling, and raspberries. You can adjust the thickness of each layer to your liking. I usually aim for 2-3 layers of each.
- Final Layer: For the final layer, top with a generous layer of the creamy filling.
- Garnish (Optional): Garnish the trifle with fresh mint leaves, extra berries, and a sprinkle of edible glitter for a festive touch.
- Chill: Cover the trifle with plastic wrap and refrigerate for at least 4 hours, or preferably overnight. This allows the flavors to meld together and the cake to soften slightly.
- Serve: Before serving, remove the trifle from the refrigerator and let it sit for about 15-20 minutes to soften slightly. This will make it easier to scoop and serve.
Conclusion:
This Red White Blue Trifle isn’t just a dessert; it’s a celebration in a bowl! From the vibrant layers to the burst of fresh flavors, its guaranteed to be the star of any gathering, especially your Fourth of July festivities. I truly believe this recipe is a must-try because it’s incredibly easy to assemble, requires no baking, and is endlessly customizable to suit your preferences. The combination of sweet berries, creamy filling, and light, airy cake creates a symphony of textures and tastes that will leave everyone wanting more.
But the best part? You don’t have to stick to my exact ingredients! Feel free to experiment and make it your own. For a richer flavor, try using a mascarpone cheese mixture instead of whipped cream. Or, if you’re looking for a lighter option, substitute the pound cake with angel food cake. You could even add a layer of lemon curd for a tangy twist that complements the sweetness of the berries beautifully.
Serving suggestions are just as versatile. While this trifle is delicious on its own, it pairs perfectly with a scoop of vanilla ice cream or a dollop of extra whipped cream. For a more sophisticated presentation, consider serving individual trifles in elegant glasses or mason jars. This not only looks stunning but also makes portion control a breeze. And if you’re planning a picnic or outdoor event, be sure to keep the trifle chilled until serving to maintain its freshness and prevent the whipped cream from melting.
Beyond the Fourth of July, this trifle is a fantastic dessert for any occasion. Think birthdays, summer barbecues, or even just a special treat for yourself on a warm evening. The red, white, and blue color scheme can easily be adapted to match other holidays or themes simply by changing the types of berries used. Imagine a green and white trifle for St. Patrick’s Day or a red and green one for Christmas!
I’ve poured my heart into perfecting this recipe, and I’m confident that you’ll love it as much as I do. It’s a crowd-pleaser, a time-saver, and a guaranteed way to impress your friends and family. So, what are you waiting for? Gather your ingredients, put on some music, and get ready to create a dessert masterpiece.
I’m so excited for you to try this Red White Blue Trifle! Once you’ve made it, I’d absolutely love to hear about your experience. Did you make any variations? What did your guests think? Share your photos and stories in the comments below! Your feedback is invaluable, and it helps me continue to create recipes that you’ll love. Don’t forget to rate the recipe too! Happy baking (or rather, assembling!) and enjoy every delicious bite! I can’t wait to see your creations! Let’s spread the trifle love!
Red White Blue Trifle: A Delicious & Festive Dessert Recipe
A stunning trifle with layers of homemade pound cake, fresh berries, and a creamy filling. Perfect for celebrations!
Ingredients
- 2 cups all-purpose flour
- 1 teaspoon baking powder
- 1/2 teaspoon baking soda
- 1/4 teaspoon salt
- 1 cup (2 sticks) unsalted butter, softened
- 1 3/4 cups granulated sugar
- 4 large eggs
- 1 teaspoon vanilla extract
- 1 cup sour cream
- 4 cups fresh strawberries, hulled and sliced
- 2 cups fresh blueberries
- 2 cups fresh raspberries
- 1/4 cup granulated sugar (for the strawberries)
- 1 tablespoon lemon juice (for the strawberries)
- 4 cups heavy cream
- 1 cup powdered sugar
- 2 teaspoons vanilla extract
- 8 ounces cream cheese, softened
- Fresh mint leaves
- Extra berries
- Edible glitter (for a festive touch!)
Instructions
- Preheat oven to 350°F (175°C). Grease and flour a 9×5 inch loaf pan.
- In a medium bowl, whisk together flour, baking powder, baking soda, and salt. Set aside.
- In a large bowl, cream together softened butter and granulated sugar until light and fluffy (3-5 minutes).
- Beat in eggs one at a time, then stir in vanilla extract.
- Gradually add dry ingredients to wet ingredients, alternating with sour cream, beginning and ending with dry ingredients. Mix until just combined.
- Pour batter into prepared loaf pan and spread evenly. Bake for 50-60 minutes, or until a wooden skewer inserted into the center comes out clean.
- Let cake cool in the pan for 10 minutes before inverting it onto a wire rack to cool completely. Wrap tightly in plastic wrap and refrigerate for at least 2 hours, or preferably overnight.
- Hull and slice strawberries. In a medium bowl, gently toss them with 1/4 cup of granulated sugar and lemon juice. Let sit for about 30 minutes, stirring occasionally.
- Gently rinse blueberries and raspberries and pat them dry.
- In a large bowl, beat heavy cream with an electric mixer until soft peaks form.
- Gradually add powdered sugar and vanilla extract, and continue beating until stiff peaks form.
- In a separate bowl, beat softened cream cheese until smooth and creamy. Gently fold the whipped cream into the cream cheese until well combined.
- Slice the chilled pound cake into 1/2-inch thick slices or cubes.
- Choose a large trifle bowl or a clear glass bowl. Start with a layer of pound cake slices or cubes at the bottom of the bowl.
- Spoon a layer of the sugared strawberries over the pound cake, including some of the strawberry syrup.
- Spread a layer of the creamy filling over the strawberries.
- Sprinkle a layer of blueberries over the creamy filling.
- Repeat the layers of pound cake, strawberries, creamy filling, and raspberries.
- For the final layer, top with a generous layer of the creamy filling.
- Garnish with fresh mint leaves, extra berries, and a sprinkle of edible glitter (optional).
- Cover the trifle with plastic wrap and refrigerate for at least 4 hours, or preferably overnight.
- Before serving, remove the trifle from the refrigerator and let it sit for about 15-20 minutes to soften slightly.
Notes
- Refrigerating the pound cake makes it easier to slice.
- Don’t overmix the pound cake batter, or it will be tough.
- Be careful not to overwhip the heavy cream, or it will turn into butter.
- Chilling the trifle allows the flavors to meld together and the cake to soften.