Freezer burritos make ahead are the ultimate solution for busy weeknights and grab-and-go lunches! Imagine a world where a delicious, satisfying meal is always within arm’s reach, ready to be heated and enjoyed in minutes. No more last-minute takeout orders or settling for sad desk lunches.
Burritos, with their humble beginnings in Mexican cuisine, have evolved into a global comfort food. They represent a beautiful blend of flavors and textures, all conveniently wrapped in a warm tortilla. From simple bean and cheese fillings to more elaborate combinations of meats, vegetables, and sauces, the possibilities are endless. The beauty of the burrito lies in its versatility and adaptability to individual tastes.
But let’s face it, even with their inherent convenience, making burritos from scratch every day can be time-consuming. That’s where the magic of making freezer burritos make ahead comes in. People adore this method because it allows them to enjoy the deliciousness of homemade burritos without the daily effort. You can customize your fillings, control the ingredients, and save money compared to buying pre-made options. Plus, knowing you have a stash of tasty, ready-to-eat burritos in your freezer provides a sense of calm and preparedness that’s hard to beat. So, let’s dive into how to create these freezer-friendly wonders!

Ingredients:
- For the Filling:
- 2 tablespoons olive oil
- 1 large onion, chopped
- 2 cloves garlic, minced
- 1 red bell pepper, chopped
- 1 green bell pepper, chopped
- 1 pound ground beef (or ground turkey or chicken)
- 1 teaspoon chili powder
- 1 teaspoon cumin
- 1/2 teaspoon smoked paprika
- 1/4 teaspoon cayenne pepper (optional, for heat)
- 1/2 teaspoon dried oregano
- 1/2 teaspoon salt, or to taste
- 1/4 teaspoon black pepper, or to taste
- 1 (15-ounce) can black beans, rinsed and drained
- 1 (15-ounce) can pinto beans, rinsed and drained
- 1 (15-ounce) can corn, drained
- 1 (10-ounce) can diced tomatoes and green chilies (like Rotel), undrained
- 1/2 cup beef broth (or chicken broth)
- For the Rice (Optional):
- 1 cup long-grain rice
- 2 cups water
- 1/2 teaspoon salt
- For Assembling the Burritos:
- 12 large flour tortillas (10-12 inch)
- 2 cups shredded cheddar cheese (or Monterey Jack, or a blend)
- Optional toppings: sour cream, salsa, guacamole, chopped cilantro
Preparing the Filling:
- Sauté the Aromatics: Heat the olive oil in a large skillet or Dutch oven over medium heat. Add the chopped onion and cook until softened, about 5-7 minutes. Add the minced garlic, chopped red bell pepper, and chopped green bell pepper and cook for another 3-5 minutes, until slightly tender. Make sure you stir frequently to prevent burning!
- Brown the Meat: Add the ground beef (or your choice of ground meat) to the skillet. Break it up with a spoon and cook until browned, making sure to drain off any excess grease. Nobody wants greasy burritos!
- Add the Spices: Stir in the chili powder, cumin, smoked paprika, cayenne pepper (if using), oregano, salt, and pepper. Cook for 1 minute more, allowing the spices to bloom and release their flavors. This step is crucial for a really flavorful filling.
- Incorporate the Beans, Corn, and Tomatoes: Add the rinsed and drained black beans, pinto beans, and corn to the skillet. Pour in the can of diced tomatoes and green chilies (undrained) and the beef broth.
- Simmer the Filling: Bring the mixture to a simmer, then reduce the heat to low, cover, and cook for 15-20 minutes, stirring occasionally. This allows the flavors to meld together and the filling to thicken slightly. You want a nice, cohesive filling that won’t be too watery in your burritos.
- Taste and Adjust: Taste the filling and adjust the seasonings as needed. You might want to add more salt, pepper, chili powder, or even a squeeze of lime juice for extra zing. This is your chance to make it perfect!
Preparing the Rice (Optional):
If you’re adding rice to your burritos, this is how I like to make mine. It’s simple and fluffy!
- Combine Ingredients: In a medium saucepan, combine the rice, water, and salt.
- Bring to a Boil: Bring the mixture to a boil over high heat.
- Simmer and Cook: Once boiling, reduce the heat to low, cover the saucepan, and simmer for 18-20 minutes, or until all the water is absorbed and the rice is tender. Don’t peek! Keeping the lid on is key to perfectly cooked rice.
- Fluff and Cool: Remove the saucepan from the heat and let it stand, covered, for 5 minutes. Then, fluff the rice with a fork and let it cool slightly before adding it to the burritos.
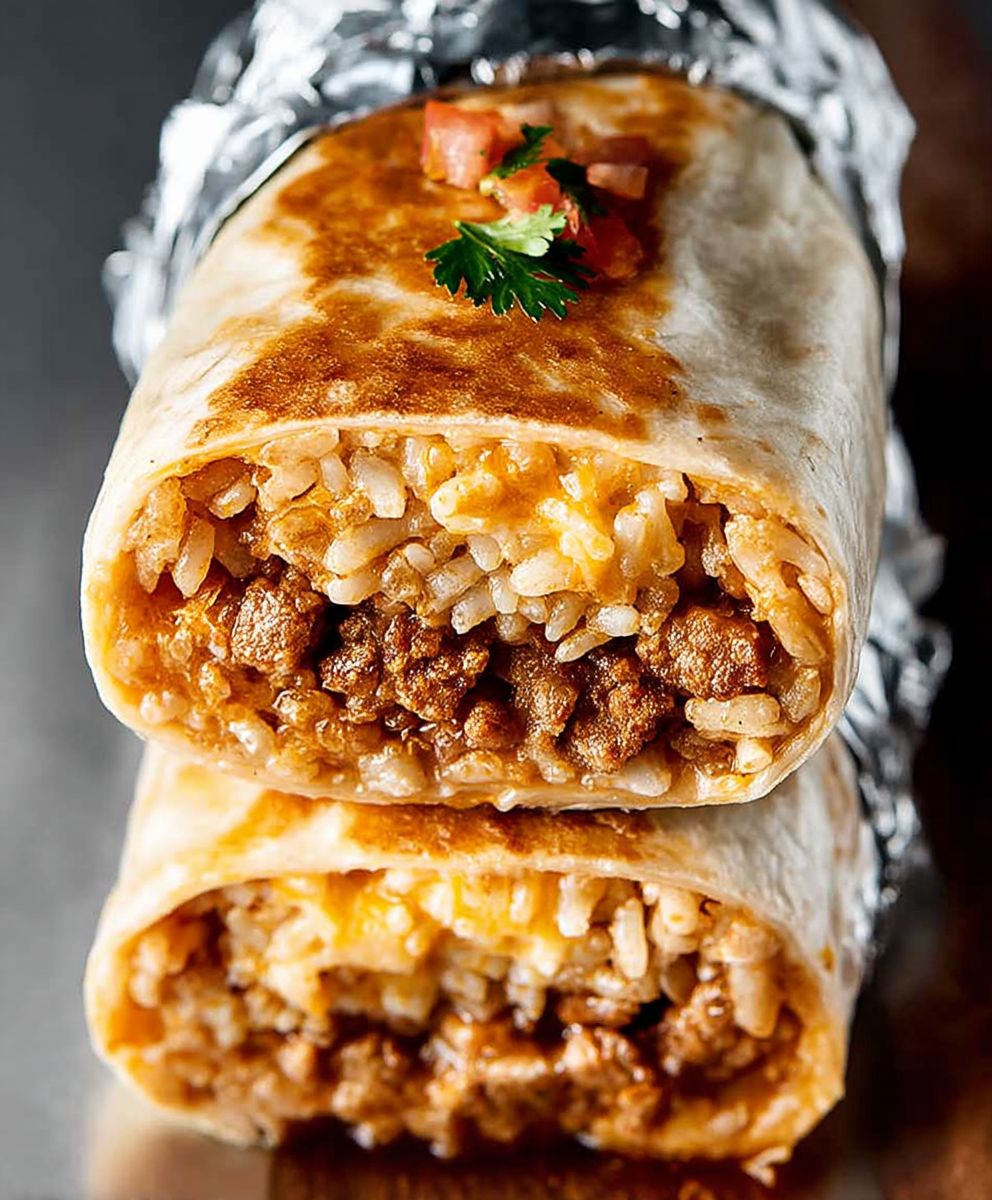
Assembling the Burritos:
This is where the magic happens! Getting the right technique for rolling is important to prevent leaks and ensure your burritos stay sealed.
- Warm the Tortillas: Warm the tortillas slightly to make them more pliable and less likely to tear. You can do this by wrapping them in a damp paper towel and microwaving them for 20-30 seconds, or by heating them in a dry skillet over medium heat for a few seconds per side.
- Lay Out the Tortilla: Place a warm tortilla on a clean, flat surface.
- Add the Filling: Spoon about 1/2 to 3/4 cup of the filling onto the center of the tortilla, leaving about 2 inches of space around the edges. Don’t overfill the tortilla, or it will be difficult to roll and may burst.
- Add Cheese and Rice (if using): Sprinkle about 1/4 cup of shredded cheese over the filling. If you’re using rice, add about 1/4 cup of rice on top of the cheese.
- Fold in the Sides: Fold in the sides of the tortilla towards the center, covering the filling.
- Roll the Burrito: Starting from the bottom edge closest to you, tightly roll the burrito away from you, keeping the sides tucked in. Think of it like rolling a sleeping bag!
- Seal the Burrito: Once rolled, place the burrito seam-side down on a plate or baking sheet. This will help to seal the burrito.
- Repeat: Repeat steps 2-7 with the remaining tortillas and filling.
Freezing the Burritos:
This is the key to having delicious, ready-to-eat burritos whenever you want them!
- Cool the Burritos: Allow the assembled burritos to cool completely before freezing. This will prevent condensation from forming inside the freezer bag, which can lead to freezer burn.
- Wrap Individually: Wrap each burrito tightly in plastic wrap. This will help to prevent freezer burn and keep the burritos fresh.
- Wrap in Foil (Optional): For extra protection against freezer burn, you can wrap each plastic-wrapped burrito in aluminum foil.
- Place in a Freezer Bag: Place the wrapped burritos in a large freezer bag, removing as much air as possible. Seal the bag tightly.
- Label and Date: Label the freezer bag with the date and contents. This will help you keep track of how long the burritos have been in the freezer.
- Freeze: Freeze the burritos for up to 2-3 months.
Reheating the Burritos:
There are several ways to reheat your frozen burritos. Here are my favorite methods:
- Microwave: Remove the burrito from the freezer bag and unwrap it. Wrap the burrito in a damp paper towel and microwave on high for 2-3 minutes, or until heated through. Check the internal temperature to ensure it reaches 165°F.
- Oven: Preheat the oven to 350°F (175°C). Remove the burrito from the freezer bag and unwrap it. Wrap the burrito in aluminum foil and bake for 30-40 minutes, or until heated through. Check the internal temperature to ensure it reaches 165°F. This method takes longer but results in a more evenly heated burrito.
- Skillet: Remove the burrito from the freezer bag and unwrap it. Heat a skillet over medium heat. Place the burrito in the skillet and cook for 3-5 minutes per side, or until heated through and the tortilla is crispy. This method is great for getting a nice, crispy exterior on your burrito.
Serving Suggestions:
Once your burrito is heated, you can enjoy it as is, or you can add some toppings to make it even more delicious!
- Sour Cream: A dollop of sour cream adds a cool and creamy element.
- Salsa: Your favorite salsa will add a burst of flavor and spice.
- Guacamole: Creamy guacamole is always a welcome addition.
- Chopped Cilantro: Fresh cilantro adds a bright and herbaceous flavor.
- Hot Sauce: If you like it spicy, add a few dashes of your favorite hot sauce.
Conclusion:
So, there you have it! These freezer burritos make ahead are truly a game-changer for busy weeknights, hectic mornings, or even just those days when you simply don’t feel like cooking. I know, I know, “freezer food” sometimes gets a bad rap, but trust me on this one. The combination of flavorful fillings, perfectly seasoned rice, and that satisfyingly warm tortilla will have you wondering why you haven’t been making these all along.
Think about it: no more last-minute takeout orders, no more skipping meals because you’re short on time, and no more settling for boring lunches. These burritos are packed with goodness, customizable to your liking, and incredibly convenient. What’s not to love?
But the real magic lies in the versatility. While I’ve shared my go-to recipe, feel free to experiment with different fillings. Craving something spicier? Add a pinch of cayenne pepper or a dash of your favorite hot sauce to the meat mixture. Vegetarian? Swap out the meat for black beans, pinto beans, or even some crumbled tofu. You could also add roasted vegetables like sweet potatoes, corn, or bell peppers for extra flavor and nutrients.
For serving, I personally love to crisp mine up in a skillet with a little bit of oil for that extra golden-brown goodness. A dollop of sour cream, a sprinkle of fresh cilantro, and a side of salsa are always welcome additions. You could also melt some cheese on top for a truly decadent treat. And if you’re feeling adventurous, try dipping them in guacamole or serving them with a side of Mexican rice and refried beans for a complete and satisfying meal.
Don’t be afraid to get creative and make these burritos your own! The possibilities are endless. Think about breakfast burritos with scrambled eggs, sausage, and cheese. Or maybe a southwestern-style burrito with shredded chicken, black beans, corn, and a creamy cilantro-lime dressing. The only limit is your imagination!
I truly believe that these freezer burritos make ahead are a must-try for anyone looking to simplify their meal prep and enjoy delicious, homemade food on the go. They’re perfect for students, busy professionals, families with kids, or anyone who simply appreciates a good, convenient meal.
So, what are you waiting for? Gather your ingredients, put on some music, and get ready to embark on a burrito-making adventure! I promise you won’t regret it. And once you’ve tried them, I’d absolutely love to hear about your experience. Did you make any modifications to the recipe? What were your favorite fillings? What did you serve them with?
Share your photos and stories in the comments below! I’m always looking for new ideas and inspiration, and I’m sure other readers would appreciate hearing about your successes (and even your occasional mishaps!). Let’s build a community of burrito-loving foodies and make meal prep a little bit easier and a lot more fun. Happy cooking! I am confident that you will love these freezer burritos make ahead.
Freezer Burritos Make Ahead: The Ultimate Guide to Easy Meal Prep
Hearty and flavorful homemade burritos filled with seasoned ground beef, beans, corn, and cheese. Perfect for meal prepping and freezing for easy weeknight dinners!
Ingredients
- 2 tablespoons olive oil
- 1 large onion, chopped
- 2 cloves garlic, minced
- 1 red bell pepper, chopped
- 1 green bell pepper, chopped
- 1 pound ground beef (or ground turkey or chicken)
- 1 teaspoon chili powder
- 1 teaspoon cumin
- 1/2 teaspoon smoked paprika
- 1/4 teaspoon cayenne pepper (optional, for heat)
- 1/2 teaspoon dried oregano
- 1/2 teaspoon salt, or to taste
- 1/4 teaspoon black pepper, or to taste
- 1 (15-ounce) can black beans, rinsed and drained
- 1 (15-ounce) can pinto beans, rinsed and drained
- 1 (15-ounce) can corn, drained
- 1 (10-ounce) can diced tomatoes and green chilies (like Rotel), undrained
- 1/2 cup beef broth (or chicken broth)
- 1 cup long-grain rice
- 2 cups water
- 1/2 teaspoon salt
- 12 large flour tortillas (10-12 inch)
- 2 cups shredded cheddar cheese (or Monterey Jack, or a blend)
- Optional toppings: sour cream, salsa, guacamole, chopped cilantro
Instructions
- Heat the olive oil in a large skillet or Dutch oven over medium heat. Add the chopped onion and cook until softened, about 5-7 minutes. Add the minced garlic, chopped red bell pepper, and chopped green bell pepper and cook for another 3-5 minutes, until slightly tender. Stir frequently to prevent burning.
- Add the ground beef (or your choice of ground meat) to the skillet. Break it up with a spoon and cook until browned, making sure to drain off any excess grease.
- Stir in the chili powder, cumin, smoked paprika, cayenne pepper (if using), oregano, salt, and pepper. Cook for 1 minute more, allowing the spices to bloom and release their flavors.
- Add the rinsed and drained black beans, pinto beans, and corn to the skillet. Pour in the can of diced tomatoes and green chilies (undrained) and the beef broth.
- Bring the mixture to a simmer, then reduce the heat to low, cover, and cook for 15-20 minutes, stirring occasionally.
- Taste the filling and adjust the seasonings as needed. You might want to add more salt, pepper, chili powder, or even a squeeze of lime juice for extra zing.
- In a medium saucepan, combine the rice, water, and salt.
- Bring the mixture to a boil over high heat.
- Once boiling, reduce the heat to low, cover the saucepan, and simmer for 18-20 minutes, or until all the water is absorbed and the rice is tender.
- Remove the saucepan from the heat and let it stand, covered, for 5 minutes. Then, fluff the rice with a fork and let it cool slightly before adding it to the burritos.
- Warm the tortillas slightly to make them more pliable and less likely to tear. You can do this by wrapping them in a damp paper towel and microwaving them for 20-30 seconds, or by heating them in a dry skillet over medium heat for a few seconds per side.
- Place a warm tortilla on a clean, flat surface.
- Spoon about 1/2 to 3/4 cup of the filling onto the center of the tortilla, leaving about 2 inches of space around the edges.
- Sprinkle about 1/4 cup of shredded cheese over the filling. If you’re using rice, add about 1/4 cup of rice on top of the cheese.
- Fold in the sides of the tortilla towards the center, covering the filling.
- Starting from the bottom edge closest to you, tightly roll the burrito away from you, keeping the sides tucked in.
- Once rolled, place the burrito seam-side down on a plate or baking sheet.
- Repeat steps 2-7 with the remaining tortillas and filling.
- Allow the assembled burritos to cool completely before freezing.
- Wrap each burrito tightly in plastic wrap.
- For extra protection against freezer burn, you can wrap each plastic-wrapped burrito in aluminum foil.
- Place the wrapped burritos in a large freezer bag, removing as much air as possible. Seal the bag tightly.
- Label the freezer bag with the date and contents.
- Freeze the burritos for up to 2-3 months.
- Remove the burrito from the freezer bag and unwrap it. Wrap the burrito in a damp paper towel and microwave on high for 2-3 minutes, or until heated through. Check the internal temperature to ensure it reaches 165°F.
- Preheat the oven to 350°F (175°C). Remove the burrito from the freezer bag and unwrap it. Wrap the burrito in aluminum foil and bake for 30-40 minutes, or until heated through. Check the internal temperature to ensure it reaches 165°F.
- Remove the burrito from the freezer bag and unwrap it. Heat a skillet over medium heat. Place the burrito in the skillet and cook for 3-5 minutes per side, or until heated through and the tortilla is crispy.
Notes
- Cayenne pepper is optional for adding heat to the filling. Adjust the amount to your preference.
- Feel free to substitute ground beef with ground turkey or chicken.
- Warming the tortillas before rolling makes them more pliable and less likely to tear.
- Don’t overfill the tortillas, or they will be difficult to roll and may burst.
- For extra protection against freezer burn, wrap each burrito in aluminum foil after wrapping in plastic wrap.
- Check the internal temperature of the reheated burritos to ensure they reach 165°F.