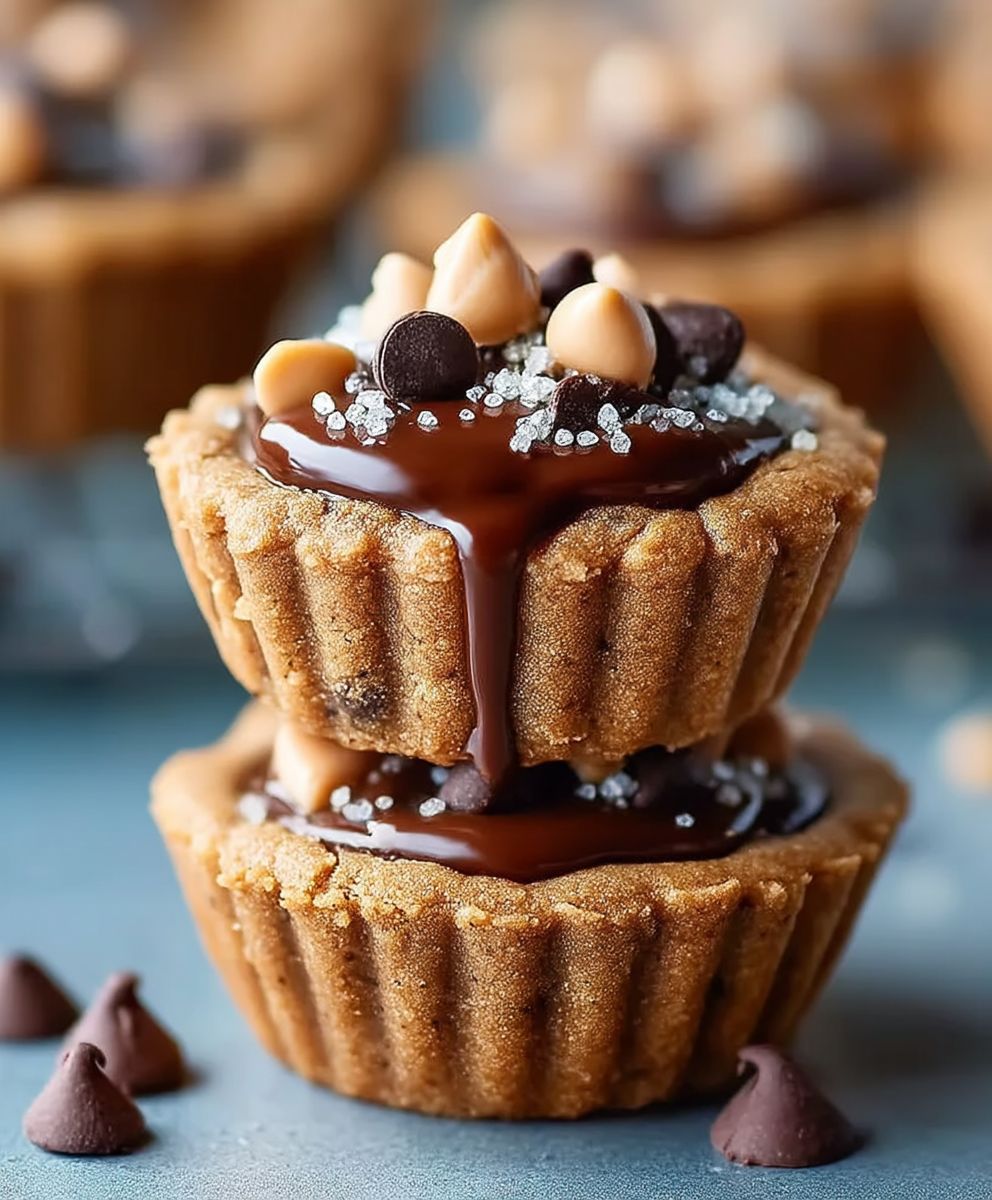
Peanut Butter Cookie Cups: Prepare to be amazed by these delightful little treats that combine the best of both worlds the comforting flavor of peanut butter cookies with the fun and convenience of a perfectly portioned cup! Imagine sinking your teeth into a soft, chewy peanut butter cookie base, topped with a creamy, melt-in-your-mouth filling. These aren’t just cookies; they’re an experience.
While the exact origin of cookie cups is a bit hazy, the concept of transforming classic cookies into individual servings has been around for decades. It’s a brilliant way to elevate a simple cookie into something a bit more special, perfect for parties, potlucks, or simply a satisfying personal dessert. The beauty of Peanut Butter Cookie Cups lies in their versatility. You can customize the filling with chocolate ganache, a dollop of jelly, or even a sprinkle of sea salt to enhance the sweet and savory notes.
People adore these little cups for several reasons. First, the taste is undeniably addictive the rich, nutty flavor of peanut butter is a classic for a reason! Second, the texture is divine, offering a delightful contrast between the soft cookie and the creamy filling. Finally, they are incredibly convenient. No need to slice or share (unless you want to!). Each cup is a perfect, self-contained treat that’s easy to transport and enjoy. So, let’s get baking and create some peanut butter magic!
Ingredients:
- For the Peanut Butter Cookie Dough:
- 1 cup (2 sticks) unsalted butter, softened
- 1 cup granulated sugar
- 1 cup packed brown sugar
- 2 large eggs
- 1 teaspoon vanilla extract
- 1 cup creamy peanut butter
- 2 1/2 cups all-purpose flour
- 1 teaspoon baking soda
- 1/2 teaspoon baking powder
- 1/4 teaspoon salt
- For the Chocolate Filling:
- 1 cup semi-sweet chocolate chips
- 1/2 cup heavy cream
- 1 tablespoon butter
- Pinch of salt
- Optional Toppings:
- Chopped peanuts
- Sea salt flakes
- Mini chocolate chips
Making the Peanut Butter Cookie Dough
- Cream the Butter and Sugars: In a large bowl, or the bowl of your stand mixer, cream together the softened butter, granulated sugar, and brown sugar until light and fluffy. This usually takes about 3-5 minutes. Make sure to scrape down the sides of the bowl occasionally to ensure everything is evenly mixed. This step is crucial for creating a tender cookie.
- Add the Eggs and Vanilla: Beat in the eggs one at a time, mixing well after each addition. Then, stir in the vanilla extract. The eggs help bind the ingredients together and add richness to the dough.
- Incorporate the Peanut Butter: Add the creamy peanut butter and mix until well combined. Ensure the peanut butter is fully incorporated to give the cookies that signature peanut butter flavor. Don’t overmix at this stage.
- Combine Dry Ingredients: In a separate medium bowl, whisk together the all-purpose flour, baking soda, baking powder, and salt. Whisking ensures that the baking soda and baking powder are evenly distributed throughout the flour, which helps the cookies rise properly.
- Gradually Add Dry Ingredients to Wet Ingredients: Gradually add the dry ingredients to the wet ingredients, mixing on low speed until just combined. Be careful not to overmix the dough, as this can result in tough cookies. Overmixing develops the gluten in the flour, leading to a less tender cookie.
- Chill the Dough (Important!): Cover the dough with plastic wrap and chill in the refrigerator for at least 30 minutes. Chilling the dough prevents the cookies from spreading too much during baking and allows the flavors to meld together. You can chill it for longer, even overnight, if needed.
Forming and Baking the Cookie Cups
- Preheat Oven and Prepare Muffin Tin: Preheat your oven to 350°F (175°C). Grease a 24-cup mini muffin tin very well. Alternatively, you can use mini muffin liners. Greasing or using liners will prevent the cookies from sticking and make them easier to remove.
- Shape the Dough: Roll the chilled cookie dough into small balls, about 1 inch in diameter. Place one ball of dough into each mini muffin cup.
- Press the Dough: Use your thumb or the back of a small spoon to press the dough down into the center of each cup, creating a well for the chocolate filling. Be sure to leave a little bit of dough on the sides to form the “cup.”
- Bake the Cookie Cups: Bake for 10-12 minutes, or until the edges are lightly golden brown. Keep a close eye on them, as baking times can vary depending on your oven.
- Cool Slightly: Remove the muffin tin from the oven and let the cookie cups cool in the tin for a few minutes before transferring them to a wire rack to cool completely. This prevents them from breaking apart while they are still warm and soft.
Making the Chocolate Filling
- Heat the Heavy Cream: In a small saucepan, heat the heavy cream over medium heat until it just begins to simmer. Do not boil the cream.
- Pour Over Chocolate Chips: Remove the saucepan from the heat and pour the hot cream over the semi-sweet chocolate chips in a heatproof bowl.
- Let Sit and Stir: Let the mixture sit for about 1 minute to allow the heat from the cream to melt the chocolate chips. Then, gently stir until the chocolate is completely melted and smooth.
- Add Butter and Salt: Stir in the butter and a pinch of salt. The butter adds richness and shine to the ganache, while the salt enhances the flavor.
- Let Cool Slightly: Allow the chocolate filling to cool slightly, about 5-10 minutes, before filling the cookie cups. This will prevent the filling from being too runny.
Assembling the Peanut Butter Cookie Cups
- Fill the Cookie Cups: Spoon the slightly cooled chocolate filling into each of the cooled peanut butter cookie cups. Fill them to the top, or slightly over, if desired.
- Add Toppings (Optional): While the chocolate filling is still soft, sprinkle with your desired toppings, such as chopped peanuts, sea salt flakes, or mini chocolate chips. The toppings will adhere better if added while the chocolate is still wet.
- Chill to Set: Place the filled cookie cups in the refrigerator for at least 30 minutes to allow the chocolate filling to set completely. This will make them easier to handle and prevent the filling from melting.
- Serve and Enjoy: Once the chocolate filling is set, remove the cookie cups from the refrigerator and serve. These are best enjoyed chilled or at room temperature.
Tips for Perfect Peanut Butter Cookie Cups
- Don’t Overmix the Dough: Overmixing develops the gluten in the flour, resulting in tough cookies. Mix until just combined.
- Chill the Dough: Chilling the dough is crucial for preventing the cookies from spreading too much during baking.
- Use a Good Quality Peanut Butter: The quality of your peanut butter will affect the flavor of the cookies. Use a creamy peanut butter that you enjoy.
- Adjust Baking Time as Needed: Baking times can vary depending on your oven. Keep a close eye on the cookies and adjust the baking time as needed.
- Store Properly: Store the cookie cups in an airtight container in the refrigerator for up to 5 days.
Variations
- Add Chocolate Chips to the Dough: For an extra chocolatey treat, add 1/2 cup of chocolate chips to the peanut butter cookie dough.
- Use Different Types of Chocolate: Experiment with different types of chocolate for the filling, such as dark chocolate or white chocolate.
- Add a Caramel Swirl: Swirl a little caramel sauce into the chocolate filling before chilling for a decadent twist.
- Make it Gluten-Free: Substitute the all-purpose flour with a gluten-free all-purpose flour blend.

Conclusion:
And there you have it! These Peanut Butter Cookie Cups are truly a must-try for anyone who loves the classic combination of peanut butter and chocolate, or just appreciates a simple, delicious, and satisfying treat. I know I’ve made them countless times, and they’re always a hit, whether it’s a casual weeknight dessert or a potluck contribution. The ease of preparation, combined with the incredible flavor and adorable presentation, makes them a winner in my book.
But what truly elevates these cookie cups is their versatility. While the recipe I’ve shared is a fantastic starting point, don’t be afraid to experiment and make them your own! For a richer, more decadent experience, try using dark chocolate chips instead of milk chocolate. The slight bitterness of the dark chocolate perfectly complements the sweetness of the peanut butter. Or, if you’re feeling adventurous, swirl a little Nutella into the peanut butter filling before baking for an extra layer of hazelnutty goodness.
Serving suggestions are endless! These Peanut Butter Cookie Cups are delightful on their own, of course, but they’re also fantastic served warm with a scoop of vanilla ice cream. The contrast between the warm, gooey cookie and the cold, creamy ice cream is simply divine. You could also crumble them over a bowl of yogurt or oatmeal for a peanut butter-infused breakfast treat. For a more sophisticated presentation, dust them with powdered sugar or drizzle them with melted chocolate.
If you’re looking for variations, consider adding a sprinkle of sea salt on top before baking to enhance the sweetness and create a salty-sweet sensation. Chopped peanuts or pretzels can also be added for extra crunch and texture. For a festive twist, use holiday-themed sprinkles or candies. And if you’re catering to dietary restrictions, you can easily adapt the recipe to be gluten-free by using gluten-free flour. Just be sure to check the labels of all your ingredients to ensure they are gluten-free certified.
I truly believe that these Peanut Butter Cookie Cups are a recipe that everyone should have in their repertoire. They’re quick, easy, and incredibly satisfying. Plus, they’re so customizable that you can easily adapt them to suit your own taste preferences.
So, what are you waiting for? Get in the kitchen and give these cookie cups a try! I’m confident that you’ll love them as much as I do. And once you’ve made them, I’d love to hear about your experience. Did you try any variations? What did you think of the flavor and texture? Did you serve them with ice cream or something else?
Please, share your thoughts and photos in the comments below! I’m always eager to see how others are enjoying my recipes and to learn new tips and tricks. Your feedback is invaluable and helps me to continue creating delicious and easy-to-follow recipes for you all. Happy baking, and I hope you enjoy these delightful Peanut Butter Cookie Cups! I can’t wait to hear what you think!
Peanut Butter Cookie Cups: The Ultimate Recipe & Baking Guide
Delicious mini peanut butter cookie cups filled with a rich chocolate ganache. Perfect for parties or a sweet treat!
Ingredients
- 1 cup (2 sticks) unsalted butter, softened
- 1 cup granulated sugar
- 1 cup packed brown sugar
- 2 large eggs
- 1 teaspoon vanilla extract
- 1 cup creamy peanut butter
- 2 1/2 cups all-purpose flour
- 1 teaspoon baking soda
- 1/2 teaspoon baking powder
- 1/4 teaspoon salt
- 1 cup semi-sweet chocolate chips
- 1/2 cup heavy cream
- 1 tablespoon butter
- Pinch of salt
- Chopped peanuts
- Sea salt flakes
- Mini chocolate chips
Instructions
- In a large bowl, cream together the softened butter, granulated sugar, and brown sugar until light and fluffy (3-5 minutes). Scrape down the sides of the bowl as needed.
- Beat in the eggs one at a time, mixing well after each addition. Stir in the vanilla extract.
- Add the creamy peanut butter and mix until well combined.
- In a separate medium bowl, whisk together the all-purpose flour, baking soda, baking powder, and salt.
- Gradually add the dry ingredients to the wet ingredients, mixing on low speed until just combined. Do not overmix.
- Cover the dough with plastic wrap and chill in the refrigerator for at least 30 minutes (or longer, even overnight).
- Preheat oven to 350°F (175°C). Grease a 24-cup mini muffin tin very well (or use mini muffin liners).
- Roll the chilled cookie dough into small balls, about 1 inch in diameter. Place one ball of dough into each mini muffin cup.
- Use your thumb or the back of a small spoon to press the dough down into the center of each cup, creating a well for the chocolate filling. Leave a little dough on the sides to form the “cup.”
- Bake for 10-12 minutes, or until the edges are lightly golden brown.
- Remove the muffin tin from the oven and let the cookie cups cool in the tin for a few minutes before transferring them to a wire rack to cool completely.
- In a small saucepan, heat the heavy cream over medium heat until it just begins to simmer. Do not boil.
- Remove the saucepan from the heat and pour the hot cream over the semi-sweet chocolate chips in a heatproof bowl.
- Let the mixture sit for about 1 minute, then gently stir until the chocolate is completely melted and smooth.
- Stir in the butter and a pinch of salt.
- Allow the chocolate filling to cool slightly, about 5-10 minutes, before filling the cookie cups.
- Spoon the slightly cooled chocolate filling into each of the cooled peanut butter cookie cups.
- While the chocolate filling is still soft, sprinkle with your desired toppings (chopped peanuts, sea salt flakes, or mini chocolate chips).
- Place the filled cookie cups in the refrigerator for at least 30 minutes to allow the chocolate filling to set completely.
- Serve and enjoy chilled or at room temperature.
Notes
- Don’t overmix the dough.
- Chilling the dough is crucial.
- Use a good quality peanut butter.
- Adjust baking time as needed.
- Store in an airtight container in the refrigerator for up to 5 days.


