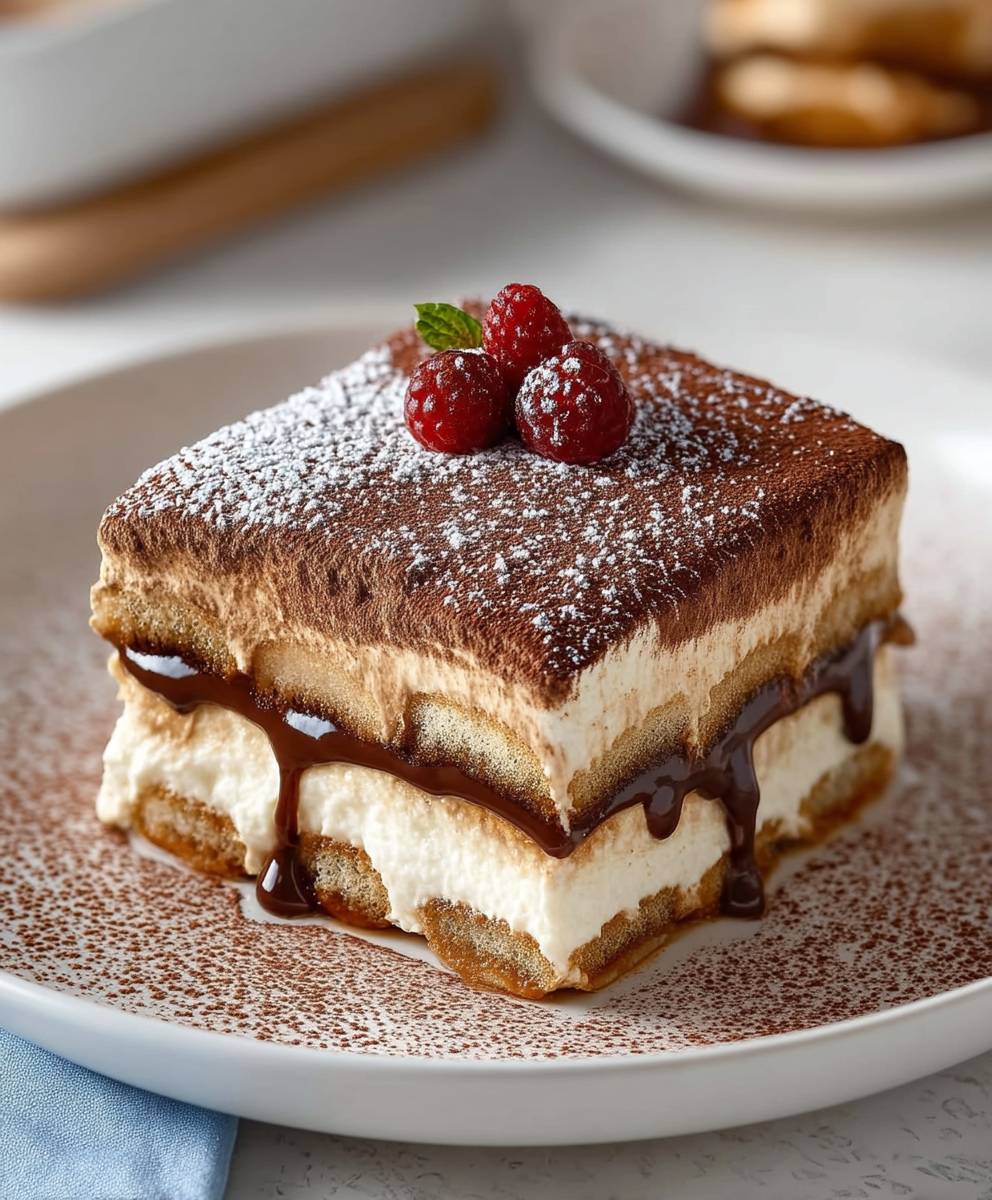
Chocolate Tiramisu, a decadent twist on the classic Italian dessert, is about to become your new favorite indulgence. Imagine layers of coffee-soaked ladyfingers, rich mascarpone cream, and a generous dusting of cocoa powder, but with an added layer of intense chocolate flavor that elevates the experience to a whole new level. Are you ready to experience a symphony of textures and tastes that will leave you craving more?
While the traditional tiramisu boasts a history rooted in the Veneto region of Italy, with tales of its creation dating back to the 1960s or 70s, this Chocolate Tiramisu variation offers a modern and irresistible spin. The original, meaning “pick me up” or “cheer me up,” was designed to be an energizing and delightful treat. This chocolate version stays true to that spirit, offering a comforting and satisfying dessert that’s perfect for any occasion.
People adore tiramisu for its creamy texture, the delightful contrast between the soft ladyfingers and the smooth mascarpone, and the subtle bitterness of the coffee. Adding chocolate amplifies these qualities, creating a richer, more complex flavor profile that’s simply irresistible. This recipe is surprisingly easy to make, requiring no baking and minimal effort, making it an ideal dessert for both casual weeknight treats and elegant dinner parties. Get ready to impress your friends and family with this stunning and delicious dessert!

Ingredients:
- For the Chocolate Ladyfingers:
- 1 cup (120g) all-purpose flour
- 1/4 cup (25g) unsweetened cocoa powder
- 1/4 teaspoon salt
- 4 large eggs, separated
- 1/2 cup (100g) granulated sugar, divided
- 1/4 teaspoon cream of tartar
- 1/4 cup (60ml) milk
- 1 teaspoon vanilla extract
- For the Mascarpone Cream:
- 1 1/2 cups (360ml) heavy cream, cold
- 1/2 cup (100g) granulated sugar
- 16 ounces (450g) mascarpone cheese, softened
- 1 teaspoon vanilla extract
- For the Chocolate Coffee Syrup:
- 1 cup (240ml) strong brewed coffee, cooled
- 1/4 cup (50g) granulated sugar
- 2 tablespoons unsweetened cocoa powder
- 1 tablespoon coffee liqueur (optional, but highly recommended!)
- For Dusting:
- Unsweetened cocoa powder, for dusting
- Chocolate shavings, for garnish (optional)
Preparing the Chocolate Ladyfingers:
- Preheat and Prep: First things first, preheat your oven to 350°F (175°C). Line a large baking sheet with parchment paper. This is crucial, as the ladyfingers will stick if you don’t!
- Dry Ingredients: In a medium bowl, whisk together the flour, cocoa powder, and salt. Make sure everything is well combined to avoid clumps of cocoa later.
- Egg Yolks and Sugar: In a separate large bowl, whisk together the egg yolks and half of the sugar (1/4 cup) until the mixture is pale yellow and slightly thickened. This usually takes about 2-3 minutes with an electric mixer.
- Add Milk and Vanilla: Whisk in the milk and vanilla extract until everything is smooth and well incorporated.
- Combine Wet and Dry: Gradually add the dry ingredients to the egg yolk mixture, mixing on low speed until just combined. Be careful not to overmix, as this can lead to tough ladyfingers.
- Egg Whites and Sugar: In a clean, grease-free bowl, beat the egg whites with an electric mixer until soft peaks form. Add the cream of tartar and gradually add the remaining sugar (1/4 cup), beating until stiff, glossy peaks form. This is a key step for light and airy ladyfingers.
- Folding Time: Gently fold about one-third of the egg white mixture into the egg yolk mixture to lighten it. Then, gently fold in the remaining egg white mixture until just combined. Be careful not to deflate the egg whites!
- Piping the Ladyfingers: Transfer the batter to a piping bag fitted with a large round tip (or just cut the tip off a disposable bag). Pipe the batter onto the prepared baking sheet in 3-inch long strips, about 1 inch apart.
- Dust with Sugar (Optional): For a slightly sweeter and crispier ladyfinger, dust the tops with a little granulated sugar before baking.
- Bake: Bake for 12-15 minutes, or until the ladyfingers are lightly golden brown and spring back when lightly touched.
- Cooling: Let the ladyfingers cool on the baking sheet for a few minutes before transferring them to a wire rack to cool completely.
Making the Mascarpone Cream:
- Whip the Cream: In a large bowl, whip the heavy cream with an electric mixer until soft peaks form.
- Add Sugar: Gradually add the sugar and continue whipping until stiff peaks form. Be careful not to overwhip, or you’ll end up with butter!
- Incorporate Mascarpone and Vanilla: In a separate bowl, gently whisk the softened mascarpone cheese until smooth. Add the vanilla extract and whisk to combine.
- Combine: Gently fold the mascarpone mixture into the whipped cream until just combined. Be careful not to overmix, as this can deflate the cream. The mixture should be light and airy.
- Chill: Cover the mascarpone cream and refrigerate for at least 30 minutes to allow it to firm up slightly. This will make it easier to spread.
Preparing the Chocolate Coffee Syrup:
- Combine Ingredients: In a small saucepan, combine the strong brewed coffee, sugar, and cocoa powder.
- Simmer: Bring the mixture to a simmer over medium heat, stirring constantly until the sugar and cocoa powder are dissolved.
- Cool: Remove from heat and stir in the coffee liqueur (if using). Let the syrup cool completely before using. This is important, as hot syrup will melt the mascarpone cream.
Assembling the Chocolate Tiramisu:
- Layering Time: Choose your serving dish. A 9×13 inch baking dish works well, or you can assemble individual tiramisu in glasses or ramekins.
- Dip the Ladyfingers: Quickly dip each ladyfinger into the cooled chocolate coffee syrup, making sure to soak both sides. Don’t soak them for too long, or they will become soggy. A quick dip is all you need.
- First Layer: Arrange the soaked ladyfingers in a single layer on the bottom of the dish, cutting them as needed to fit.
- Spread the Cream: Spread half of the mascarpone cream evenly over the ladyfinger layer.
- Second Layer: Repeat the process with another layer of dipped ladyfingers.
- Final Layer: Spread the remaining mascarpone cream evenly over the second layer of ladyfingers.
- Dust with Cocoa: Dust the top of the tiramisu generously with unsweetened cocoa powder. Use a fine-mesh sieve for an even coating.
- Garnish (Optional): If desired, garnish with chocolate shavings.
- Chill: Cover the tiramisu and refrigerate for at least 4 hours, or preferably overnight. This allows the flavors to meld together and the ladyfingers to soften.
- Serve: Before serving, dust with a little more cocoa powder if desired. Slice and enjoy!
Tips for Success:
- Don’t Oversoak the Ladyfingers: Soggy ladyfingers are the enemy of a good tiramisu. A quick dip in the coffee syrup is all you need.
- Use High-Quality Mascarpone: The mascarpone cheese is the star of the show, so use the best quality you can find.
- Chill Thoroughly: Chilling the tiramisu for at least 4 hours is essential for the flavors to develop and the ladyfingers to soften.
- Make Ahead: Tiramisu is a great make-ahead dessert. It can be made up to 2 days in advance and stored in the refrigerator.
- Variations: Feel free to experiment with different flavors. You can add a layer of chocolate ganache, use different liqueurs, or add fruit.
Enjoy your delicious Chocolate Tiramisu!
Conclusion:
This Chocolate Tiramisu isn’t just a dessert; it’s an experience. The rich, coffee-soaked ladyfingers, the decadent mascarpone cream, and the intense chocolate notes all come together in a symphony of flavors and textures that will leave you craving more. Trust me, once you take that first bite, you’ll understand why I’m so passionate about this recipe. It’s the perfect balance of sweet, bitter, and creamy, making it an ideal treat for any occasion, from a casual weeknight indulgence to a sophisticated dinner party.
But what truly elevates this recipe to “must-try” status is its surprisingly simple preparation. Don’t let the elegant presentation fool you; this Chocolate Tiramisu is incredibly easy to assemble, even for novice bakers. The steps are straightforward, and the ingredients are readily available, meaning you can whip up this impressive dessert with minimal fuss. Plus, the no-bake aspect makes it a lifesaver when you’re short on time or don’t want to heat up your kitchen.
Looking for serving suggestions? I love to serve this Chocolate Tiramisu chilled, straight from the refrigerator. A dusting of cocoa powder or shaved dark chocolate on top adds a touch of elegance and intensifies the chocolate flavor. For a truly decadent experience, pair it with a scoop of vanilla ice cream or a dollop of whipped cream. And if you’re feeling adventurous, try drizzling a bit of chocolate sauce or caramel over the top.
Want to get creative with variations? You could substitute the coffee liqueur with a different flavor, such as amaretto or hazelnut liqueur, for a unique twist. Or, add a layer of fresh berries, like raspberries or strawberries, for a burst of fruity freshness. You could even incorporate chopped nuts, such as almonds or hazelnuts, for added texture and flavor. Another fun idea is to use different types of cookies instead of ladyfingers, like chocolate wafers or biscotti. The possibilities are endless!
I truly believe that this Chocolate Tiramisu will become a new favorite in your household. It’s a crowd-pleaser that’s guaranteed to impress, and it’s so easy to make that you’ll find yourself reaching for this recipe time and time again.
So, what are you waiting for? Gather your ingredients, follow the simple steps, and prepare to be amazed by the deliciousness of this Chocolate Tiramisu. I’m confident that you’ll love it as much as I do.
And most importantly, I want to hear about your experience! Did you try the recipe? Did you make any variations? What did your family and friends think? Share your photos and stories with me in the comments below. I can’t wait to see your creations and hear your feedback. Happy baking! Let me know if you have any questions, and I’ll do my best to help. Enjoy your journey into the world of decadent, homemade Chocolate Tiramisu!
Chocolate Tiramisu: A Decadent Dessert Recipe You'll Love
Decadent twist on classic tiramisu, featuring homemade chocolate ladyfingers soaked in coffee liqueur syrup, layered with creamy mascarpone, and dusted with cocoa.
Ingredients
- 1 cup (120g) all-purpose flour
- 1/4 cup (25g) unsweetened cocoa powder
- 1/4 teaspoon salt
- 4 large eggs, separated
- 1/2 cup (100g) granulated sugar, divided
- 1/4 teaspoon cream of tartar
- 1/4 cup (60ml) milk
- 1 teaspoon vanilla extract
- 1 1/2 cups (360ml) heavy cream, cold
- 1/2 cup (100g) granulated sugar
- 16 ounces (450g) mascarpone cheese, softened
- 1 teaspoon vanilla extract
- 1 cup (240ml) strong brewed coffee, cooled
- 1/4 cup (50g) granulated sugar
- 2 tablespoons unsweetened cocoa powder
- 1 tablespoon coffee liqueur (optional, but highly recommended!)
- Unsweetened cocoa powder, for dusting
- Chocolate shavings, for garnish (optional)
Instructions
- Preheat your oven to 350°F (175°C). Line a large baking sheet with parchment paper.
- In a medium bowl, whisk together the flour, cocoa powder, and salt.
- In a separate large bowl, whisk together the egg yolks and half of the sugar (1/4 cup) until pale yellow and slightly thickened.
- Whisk in the milk and vanilla extract until smooth.
- Gradually add the dry ingredients to the egg yolk mixture, mixing on low speed until just combined.
- In a clean, grease-free bowl, beat the egg whites with an electric mixer until soft peaks form. Add the cream of tartar and gradually add the remaining sugar (1/4 cup), beating until stiff, glossy peaks form.
- Gently fold about one-third of the egg white mixture into the egg yolk mixture to lighten it. Then, gently fold in the remaining egg white mixture until just combined.
- Transfer the batter to a piping bag fitted with a large round tip (or just cut the tip off a disposable bag). Pipe the batter onto the prepared baking sheet in 3-inch long strips, about 1 inch apart.
- For a slightly sweeter and crispier ladyfinger, dust the tops with a little granulated sugar before baking.
- Bake for 12-15 minutes, or until the ladyfingers are lightly golden brown and spring back when lightly touched.
- Let the ladyfingers cool on the baking sheet for a few minutes before transferring them to a wire rack to cool completely.
- In a large bowl, whip the heavy cream with an electric mixer until soft peaks form.
- Gradually add the sugar and continue whipping until stiff peaks form.
- In a separate bowl, gently whisk the softened mascarpone cheese until smooth. Add the vanilla extract and whisk to combine.
- Gently fold the mascarpone mixture into the whipped cream until just combined.
- Cover the mascarpone cream and refrigerate for at least 30 minutes to allow it to firm up slightly.
- In a small saucepan, combine the strong brewed coffee, sugar, and cocoa powder.
- Bring the mixture to a simmer over medium heat, stirring constantly until the sugar and cocoa powder are dissolved.
- Remove from heat and stir in the coffee liqueur (if using). Let the syrup cool completely before using.
- Choose your serving dish. A 9×13 inch baking dish works well, or you can assemble individual tiramisu in glasses or ramekins.
- Quickly dip each ladyfinger into the cooled chocolate coffee syrup, making sure to soak both sides. Don’t soak them for too long, or they will become soggy. A quick dip is all you need.
- Arrange the soaked ladyfingers in a single layer on the bottom of the dish, cutting them as needed to fit.
- Spread half of the mascarpone cream evenly over the ladyfinger layer.
- Repeat the process with another layer of dipped ladyfingers.
- Spread the remaining mascarpone cream evenly over the second layer of ladyfingers.
- Dust the top of the tiramisu generously with unsweetened cocoa powder. Use a fine-mesh sieve for an even coating.
- If desired, garnish with chocolate shavings.
- Cover the tiramisu and refrigerate for at least 4 hours, or preferably overnight. This allows the flavors to meld together and the ladyfingers to soften.
- Before serving, dust with a little more cocoa powder if desired. Slice and enjoy!
Notes
- Don’t oversoak the ladyfingers.
- Use high-quality mascarpone cheese.
- Chill thoroughly for at least 4 hours.
- Tiramisu can be made up to 2 days in advance.
- Experiment with different flavors and liqueurs.