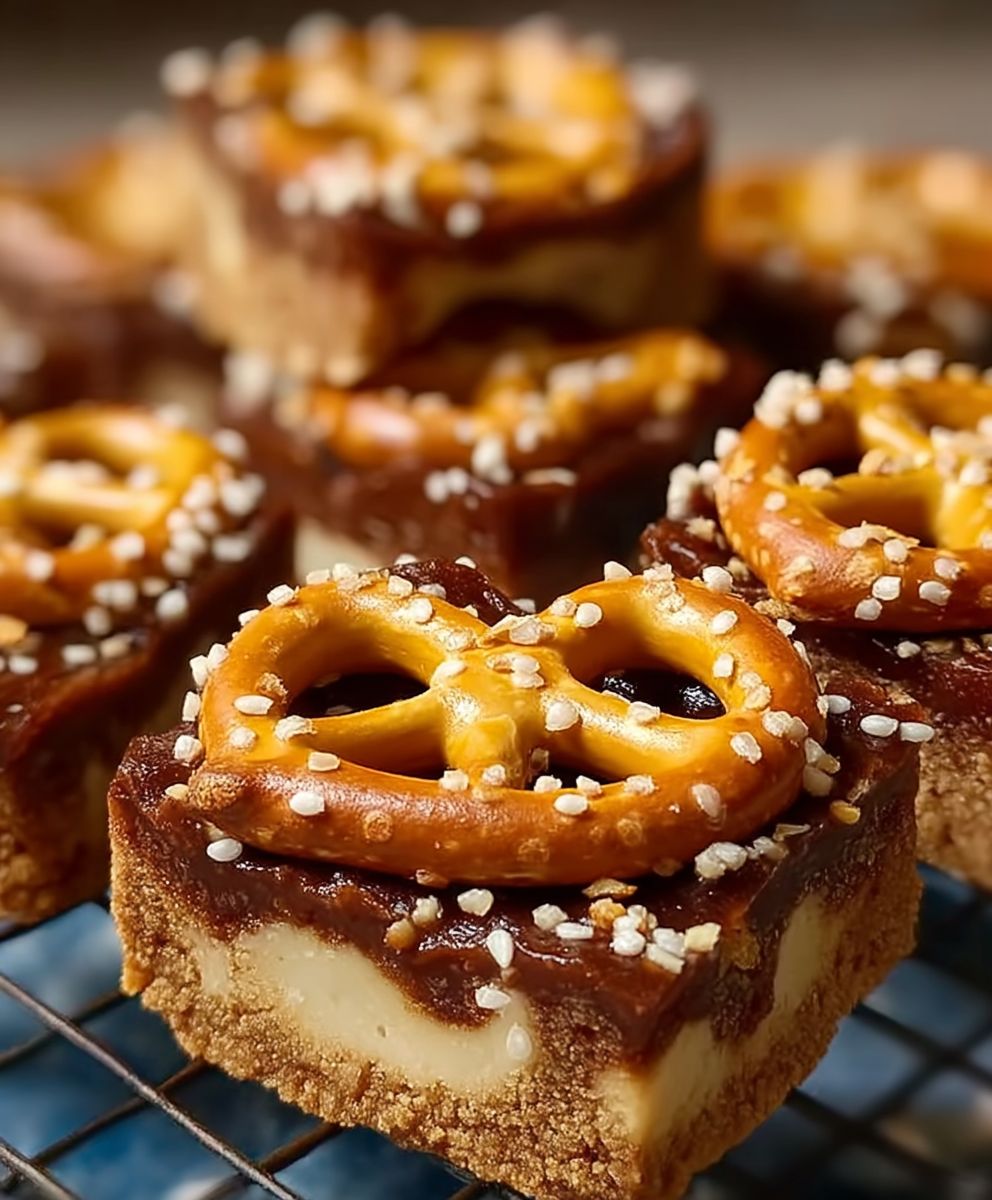
Peanut butter pretzel bars: prepare to meet your new favorite sweet and salty obsession! Imagine this: a buttery, crumbly base, a creamy, dreamy peanut butter filling, and a salty, crunchy pretzel topping, all harmonizing in a symphony of flavor. These bars aren’t just a treat; they’re an experience.
While the exact origins of combining peanut butter and pretzels are shrouded in mystery, the pairing has become a beloved American classic. The salty pretzel perfectly complements the rich, nutty peanut butter, creating a flavor profile that’s both comforting and exciting. Think of it as the culinary equivalent of a perfect friendship two seemingly different elements coming together to create something truly special.
What makes these peanut butter pretzel bars so irresistible? It’s the delightful contrast of textures and tastes. The soft, yielding peanut butter filling against the crisp, salty pretzels is a match made in heaven. Plus, they’re incredibly easy to make! Perfect for potlucks, bake sales, or simply satisfying your own sweet tooth, these bars are guaranteed to be a crowd-pleaser. I promise you, once you try them, you’ll be hooked!

Ingredients:
- For the Crust:
- 1 ½ cups all-purpose flour
- ½ cup (1 stick) unsalted butter, cold and cubed
- ¼ cup granulated sugar
- ¼ teaspoon salt
- 4-6 tablespoons ice water
- For the Peanut Butter Filling:
- 1 cup creamy peanut butter
- ½ cup (1 stick) unsalted butter, softened
- 1 cup powdered sugar
- ½ cup packed light brown sugar
- 1 teaspoon vanilla extract
- ¼ teaspoon salt
- For the Pretzel Topping:
- 2 cups mini pretzels, coarsely crushed
- 4 ounces semi-sweet chocolate, chopped
- 1 tablespoon vegetable oil (or coconut oil)
- Optional: Flaky sea salt, for sprinkling
Preparing the Crust:
- Combine Dry Ingredients: In a large bowl, whisk together the flour, granulated sugar, and salt. This ensures the salt and sugar are evenly distributed throughout the flour, which is crucial for a consistent crust.
- Cut in the Butter: Add the cold, cubed butter to the flour mixture. Using a pastry blender or your fingertips, cut the butter into the flour until the mixture resembles coarse crumbs. The key here is to work quickly so the butter stays cold. Cold butter creates steam during baking, resulting in a flaky crust. If you don’t have a pastry blender, you can use two knives to cut the butter in a criss-cross motion.
- Add Ice Water: Gradually add the ice water, one tablespoon at a time, mixing gently after each addition. Continue adding water until the dough just comes together. Be careful not to overmix, as this will develop the gluten in the flour and result in a tough crust. The amount of water needed can vary depending on the humidity in your kitchen, so start with 4 tablespoons and add more as needed.
- Form the Dough: Gently gather the dough into a ball. Flatten it into a disc, wrap it in plastic wrap, and refrigerate for at least 30 minutes. This chilling time allows the gluten to relax, making the dough easier to roll out and preventing it from shrinking during baking.
- Roll Out the Dough: Preheat your oven to 350°F (175°C). On a lightly floured surface, roll out the chilled dough into a rectangle that’s slightly larger than your baking pan (approximately 9×13 inches).
- Transfer to Pan: Carefully transfer the rolled-out dough to a 9×13 inch baking pan. Gently press the dough into the bottom and up the sides of the pan.
- Pre-Bake the Crust: Prick the bottom of the crust with a fork several times. This prevents the crust from puffing up during baking. Line the crust with parchment paper and fill it with pie weights or dried beans. This will help the crust maintain its shape. Bake for 15 minutes.
- Remove Weights and Bake Again: Remove the parchment paper and pie weights. Bake for another 5-7 minutes, or until the crust is lightly golden brown. Keep a close eye on it to prevent burning. Let the crust cool completely before adding the filling.
Preparing the Peanut Butter Filling:
- Cream Butter and Peanut Butter: In a large bowl, cream together the softened butter and peanut butter until smooth and creamy. Make sure your butter is truly softened, but not melted. This will ensure a smooth and even filling.
- Add Sugars: Gradually add the powdered sugar and brown sugar to the butter mixture, beating until light and fluffy. Start with the mixer on low speed to prevent the powdered sugar from creating a cloud.
- Add Vanilla and Salt: Stir in the vanilla extract and salt until well combined. The vanilla enhances the peanut butter flavor, and the salt balances the sweetness.
- Spread Filling: Spread the peanut butter filling evenly over the cooled crust. Use an offset spatula or the back of a spoon to create a smooth, even layer.
Adding the Pretzel Topping:
- Melt Chocolate: In a heat-safe bowl set over a saucepan of simmering water (double boiler), or in the microwave in 30-second intervals, melt the chopped semi-sweet chocolate with the vegetable oil (or coconut oil), stirring until smooth. The oil helps to create a glossy and pourable chocolate. Be careful not to overheat the chocolate, as it can seize up. If using the microwave, stir well after each interval.
- Drizzle Chocolate: Drizzle the melted chocolate evenly over the peanut butter filling. You can use a spoon or a piping bag for this step.
- Sprinkle Pretzels: Immediately sprinkle the coarsely crushed pretzels over the melted chocolate. Press them lightly into the chocolate so they adhere well.
- Chill: Refrigerate the bars for at least 1 hour, or until the chocolate is set. This will make them easier to cut and prevent the filling from being too soft.
- Cut and Serve: Once the bars are chilled and the chocolate is set, cut them into squares or rectangles. For clean cuts, use a sharp knife and wipe it clean between each cut.
- Optional: Sprinkle with flaky sea salt before serving for an extra burst of flavor. The salt complements the sweetness of the chocolate and peanut butter and adds a nice textural contrast.
Tips for Success:
- Use Cold Butter: For the flakiest crust, make sure your butter is cold when you cut it into the flour.
- Don’t Overmix: Overmixing the dough will develop the gluten and result in a tough crust. Mix only until the dough just comes together.
- Chill Time is Key: Chilling the dough and the finished bars is essential for the best texture and flavor.
- Customize Your Topping: Feel free to experiment with different types of pretzels, chocolate, or even add other toppings like chopped nuts or sprinkles.
- Storage: Store the peanut butter pretzel bars in an airtight container in the refrigerator for up to 5 days.
Conclusion:
So there you have it! These Peanut Butter Pretzel Bars are truly something special, and I wholeheartedly believe you need to experience the salty-sweet symphony for yourself. They’re incredibly easy to make, require minimal baking time, and the payoff is enormous. From the crunchy pretzel base to the creamy peanut butter filling and the decadent chocolate topping, every bite is an explosion of flavor and texture that will leave you wanting more.
But why are these bars a must-try? Beyond the incredible taste, they’re incredibly versatile. Need a quick and easy dessert for a potluck? These bars are your answer. Looking for a satisfying afternoon snack? Look no further. Want to impress your friends and family with your baking skills (without actually spending hours in the kitchen)? These Peanut Butter Pretzel Bars are the secret weapon you’ve been waiting for.
And the best part? You can easily customize them to your liking! For a richer, more intense chocolate experience, use dark chocolate instead of milk chocolate. If you’re feeling adventurous, swirl in some caramel sauce into the peanut butter layer before adding the chocolate topping. Or, for a festive touch, sprinkle some crushed pretzels or sea salt on top of the chocolate while it’s still wet.
Serving suggestions? Oh, the possibilities are endless! These bars are fantastic on their own, of course, but they’re also delicious served with a scoop of vanilla ice cream or a dollop of whipped cream. For a more sophisticated presentation, cut them into smaller squares and arrange them on a platter with fresh berries. And if you’re feeling particularly indulgent, try dipping them in melted chocolate for an extra layer of decadence.
Don’t be afraid to experiment and make these bars your own. Add your favorite nuts, swap out the peanut butter for almond butter, or even try using different types of pretzels. The only limit is your imagination!
I’m so confident that you’ll love these Peanut Butter Pretzel Bars that I urge you to give them a try. Seriously, you won’t regret it! They’re the perfect combination of salty, sweet, and crunchy, and they’re guaranteed to be a crowd-pleaser.
Once you’ve made them (and devoured them, let’s be honest), I’d love to hear about your experience! Did you make any variations? What did you think of the flavor and texture? Did your family and friends love them as much as I do?
Please, share your thoughts and photos in the comments below. I’m always eager to see how my recipes turn out in your kitchens and to hear your creative twists. Your feedback is invaluable, and it helps me to continue creating delicious and easy-to-follow recipes that you’ll love.
So go ahead, grab your ingredients, and get baking! I promise you, these Peanut Butter Pretzel Bars will become a new favorite in your household. Happy baking, and I can’t wait to hear from you! Let me know what you think of this sweet and salty treat!
Peanut Butter Pretzel Bars: The Ultimate Sweet & Salty Recipe
Sweet and salty peanut butter pretzel bars with a flaky crust, creamy peanut butter filling, and a crunchy pretzel-chocolate topping.
Ingredients
- 1 ½ cups all-purpose flour
- ½ cup (1 stick) unsalted butter, cold and cubed
- ¼ cup granulated sugar
- ¼ teaspoon salt
- 4-6 tablespoons ice water
- 1 cup creamy peanut butter
- ½ cup (1 stick) unsalted butter, softened
- 1 cup powdered sugar
- ½ cup packed light brown sugar
- 1 teaspoon vanilla extract
- ¼ teaspoon salt
- 2 cups mini pretzels, coarsely crushed
- 4 ounces semi-sweet chocolate, chopped
- 1 tablespoon vegetable oil (or coconut oil)
- Optional: Flaky sea salt, for sprinkling
Instructions
- In a large bowl, whisk together the flour, granulated sugar, and salt.
- Add the cold, cubed butter to the flour mixture. Using a pastry blender or your fingertips, cut the butter into the flour until the mixture resembles coarse crumbs.
- Gradually add the ice water, one tablespoon at a time, mixing gently after each addition. Continue adding water until the dough just comes together.
- Gently gather the dough into a ball. Flatten it into a disc, wrap it in plastic wrap, and refrigerate for at least 30 minutes.
- Preheat your oven to 350°F (175°C). On a lightly floured surface, roll out the chilled dough into a rectangle that’s slightly larger than your baking pan (approximately 9×13 inches).
- Carefully transfer the rolled-out dough to a 9×13 inch baking pan. Gently press the dough into the bottom and up the sides of the pan.
- Prick the bottom of the crust with a fork several times. Line the crust with parchment paper and fill it with pie weights or dried beans. Bake for 15 minutes.
- Remove the parchment paper and pie weights. Bake for another 5-7 minutes, or until the crust is lightly golden brown. Let the crust cool completely before adding the filling.
- In a large bowl, cream together the softened butter and peanut butter until smooth and creamy.
- Gradually add the powdered sugar and brown sugar to the butter mixture, beating until light and fluffy.
- Stir in the vanilla extract and salt until well combined.
- Spread the peanut butter filling evenly over the cooled crust.
- In a heat-safe bowl set over a saucepan of simmering water (double boiler), or in the microwave in 30-second intervals, melt the chopped semi-sweet chocolate with the vegetable oil (or coconut oil), stirring until smooth.
- Drizzle the melted chocolate evenly over the peanut butter filling.
- Immediately sprinkle the coarsely crushed pretzels over the melted chocolate. Press them lightly into the chocolate so they adhere well.
- Refrigerate the bars for at least 1 hour, or until the chocolate is set.
- Once the bars are chilled and the chocolate is set, cut them into squares or rectangles.
- Sprinkle with flaky sea salt before serving for an extra burst of flavor.
Notes
- Use Cold Butter: For the flakiest crust, make sure your butter is cold when you cut it into the flour.
- Don’t Overmix: Overmixing the dough will develop the gluten and result in a tough crust. Mix only until the dough just comes together.
- Chill Time is Key: Chilling the dough and the finished bars is essential for the best texture and flavor.
- Customize Your Topping: Feel free to experiment with different types of pretzels, chocolate, or even add other toppings like chopped nuts or sprinkles.
- Storage: Store the peanut butter pretzel bars in an airtight container in the refrigerator for up to 5 days.