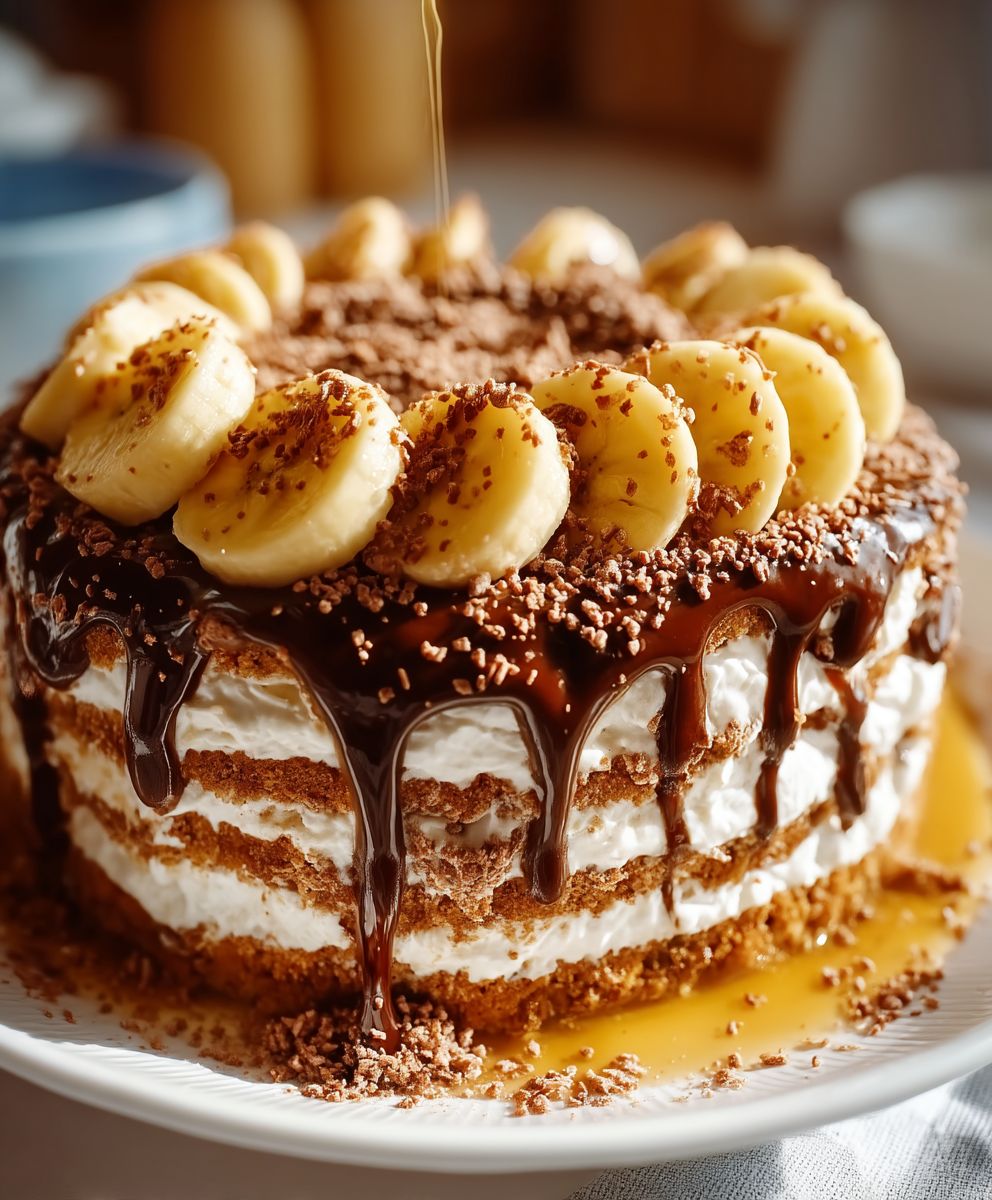
Banoffee pie, a symphony of sweet indulgence, is about to become your new favorite dessert! Imagine sinking your fork into a creamy, dreamy concoction of ripe bananas, rich caramel, and a cloud of whipped cream, all nestled on a buttery biscuit base. It’s a flavor explosion that will leave you craving more.
While its origins are relatively recent, dating back to 1971 at The Hungry Monk Restaurant in East Sussex, England, banoffee pie has quickly become a beloved classic worldwide. The ingenious combination of “banana” and “toffee” (hence, “banoffee”) was a stroke of culinary genius. It perfectly captures the essence of comfort food with a touch of sophistication.
What makes this pie so irresistible? Perhaps it’s the contrasting textures the smooth, velvety caramel against the soft bananas and the crisp biscuit base. Or maybe it’s the perfect balance of sweetness, with the bananas providing a natural sweetness that complements the decadent caramel. Whatever the reason, banoffee pie is a guaranteed crowd-pleaser, perfect for any occasion, from a casual weeknight treat to a celebratory gathering. Get ready to experience dessert heaven!

Ingredients:
- For the Biscuit Base:
- 250g Digestive biscuits
- 125g Unsalted butter, melted
- For the Caramel:
- 100g Unsalted butter
- 100g Light brown soft sugar
- 397g Can of condensed milk
- 1 tbsp Golden syrup
- Pinch of sea salt
- For the Banana Layer:
- 3-4 Ripe bananas
- 2 tbsp Lemon juice (to prevent browning)
- For the Cream Topping:
- 300ml Double cream
- 1 tbsp Icing sugar
- 1 tsp Vanilla extract
- For Decoration:
- Grated chocolate (dark or milk, your preference!)
Preparing the Biscuit Base
Okay, let’s get started with the foundation of our Banoffee Pie the biscuit base! This is super easy and requires minimal effort, which is always a win in my book.
- Crush the Biscuits: First things first, we need to turn those Digestive biscuits into fine crumbs. You can do this in a couple of ways. My preferred method is to pop them into a large ziplock bag, seal it tightly, and then go at them with a rolling pin. Bash them until you have a nice, even crumb. Alternatively, you can use a food processor for a quicker, more consistent result. Just pulse them until they’re finely ground.
- Melt the Butter: Next, melt the butter in a saucepan over low heat or in the microwave in short bursts, stirring in between, until it’s completely melted. Be careful not to overheat it!
- Combine and Mix: Pour the melted butter over the biscuit crumbs in a large bowl. Mix them together really well until all the crumbs are evenly coated in butter. The mixture should resemble wet sand. This is important because it’s what helps the base bind together.
- Press into the Tin: Now, grab your pie dish. I usually use a 23cm (9-inch) loose-bottomed tart tin, as it makes removing the pie later much easier. But any similar-sized dish will work. Pour the biscuit mixture into the tin and use the back of a spoon or a measuring cup to press it firmly and evenly into the base and up the sides of the tin. Make sure it’s nice and compact, as this will be the support for all those delicious layers to come.
- Chill the Base: Once you’ve pressed the base into the tin, pop it into the fridge to chill for at least 30 minutes. This will allow the butter to solidify and the base to firm up, preventing it from crumbling when you add the other layers. You can even chill it for longer, up to a couple of hours, if you have the time.
Making the Caramel (Dulce de Leche)
Now for the star of the show the caramel! This is where the “toff” in Banoffee comes from. We’re making a simple but incredibly delicious caramel from scratch. Don’t be intimidated; it’s easier than you think!
- Combine Ingredients: In a large, heavy-bottomed saucepan, combine the butter, light brown sugar, condensed milk, golden syrup, and a pinch of sea salt. The heavy-bottomed pan is crucial to prevent the caramel from burning.
- Cook Over Low Heat: Place the saucepan over low heat and stir constantly with a wooden spoon. It’s really important to stir continuously to prevent the caramel from sticking to the bottom of the pan and burning.
- Simmer and Stir: As the butter melts and the sugar dissolves, the mixture will start to bubble gently. Continue to simmer and stir constantly for about 20-25 minutes, or until the caramel has thickened and turned a rich, golden brown color. The color is a good indicator of doneness. You want it to be a deep caramel color, but be careful not to let it burn.
- Check for Doneness: To test if the caramel is ready, you can drop a small spoonful into a bowl of cold water. If it forms a soft ball, it’s ready. If it dissolves, it needs to cook for a little longer.
- Cool Slightly: Once the caramel is ready, remove it from the heat and let it cool slightly for about 5-10 minutes before pouring it over the biscuit base. This will prevent the base from melting.
- Pour Over Base: Carefully pour the warm caramel over the chilled biscuit base, spreading it evenly with a spatula. Make sure the entire base is covered in a thick layer of caramel.
- Chill Again: Return the pie to the fridge and chill for at least 1-2 hours, or until the caramel is completely set. This is important to ensure the caramel is firm enough to support the banana layer.
Preparing the Banana Layer
Time for the banana layer! This is where the “ban” in Banoffee comes in. We want perfectly ripe bananas for this, not too hard and not too mushy.
- Slice the Bananas: Just before you’re ready to assemble the pie, peel the bananas and slice them into even rounds, about 1/4 inch thick.
- Prevent Browning: Place the banana slices in a bowl and toss them gently with the lemon juice. This will help prevent them from browning and keep them looking fresh and appealing.
- Arrange on Caramel: Remove the pie from the fridge and arrange the banana slices evenly over the set caramel layer. You can create a single layer or slightly overlap the slices for a more generous banana flavor.
Making the Cream Topping
Now for the final layer the whipped cream! This adds a light and airy contrast to the rich caramel and bananas.
- Chill the Bowl and Whisk: Before you start, make sure your mixing bowl and whisk (or the beaters of your electric mixer) are well-chilled. This will help the cream whip up more quickly and easily. You can even pop them in the freezer for 10-15 minutes before you start.
- Whip the Cream: Pour the double cream into the chilled bowl. Add the icing sugar and vanilla extract.
- Whip to Soft Peaks: Using a whisk or an electric mixer, whip the cream until it forms soft peaks. Be careful not to overwhip it, as it can turn grainy. You want it to be thick and fluffy, but still soft and creamy.
- Spread Over Bananas: Gently spread the whipped cream evenly over the banana layer, covering all the bananas. You can use a spatula or a spoon to create a smooth, even surface.
Decorating and Serving
Almost there! Now for the final touches to make your Banoffee Pie look extra special.
- Grate the Chocolate: Grate some dark or milk chocolate (or a combination of both!) over the top of the whipped cream. The amount is up to you go as chocolatey as you like!
- Chill Before Serving: For the best results, chill the assembled Banoffee Pie in the fridge for at least 30 minutes before serving. This will allow the flavors to meld together and the cream to set slightly.
- Slice and Serve: When you’re ready to serve, carefully remove the pie from the tin (if using a loose-bottomed tin) and slice it into wedges. Serve immediately and enjoy!
Conclusion:
This Banoffee Pie isn’t just a dessert; it’s an experience. The rich, buttery biscuit base, the decadent caramel, the sweet bananas, and the cloud-like whipped cream all come together in perfect harmony. Its a symphony of textures and flavors that will leave you wanting more. Trust me, once you take that first bite, you’ll understand why I call this a must-try recipe. It’s the kind of dessert that makes any occasion feel special, and it’s surprisingly easy to make, even for beginner bakers.
But the best part? You can totally make it your own!
Serving Suggestions and Variations
For a classic presentation, simply slice and serve chilled. A dusting of cocoa powder or grated chocolate on top adds a touch of elegance. But don’t be afraid to get creative!
* Coffee Kick: Add a tablespoon of instant coffee granules to the caramel sauce for a mocha twist. The coffee enhances the sweetness and adds a subtle bitterness that complements the other flavors beautifully.
* Nutty Delight: Sprinkle chopped toasted nuts, like pecans or walnuts, over the whipped cream for added crunch and flavor.
* Chocolate Lover’s Dream: Drizzle melted chocolate over the bananas before adding the whipped cream. Dark chocolate provides a lovely contrast to the sweetness of the bananas and caramel.
* Individual Servings: For a party or gathering, make individual Banoffee pies in small ramekins or glasses. This makes serving a breeze and adds a touch of sophistication.
* Boozy Banoffee: A splash of rum or bourbon in the caramel sauce adds a warm, boozy note that’s perfect for a grown-up treat. Just be sure to cook off the alcohol before adding the bananas.
* Vegan Banoffee: You can easily adapt this recipe to be vegan by using a vegan biscuit base, a dairy-free caramel sauce (made with coconut milk or dates), and coconut whipped cream. It’s just as delicious and satisfying!
I’ve tried all of these variations, and each one is a winner in its own right. The possibilities are endless, so feel free to experiment and find your favorite combination.
This Banoffee Pie is more than just a recipe; it’s an invitation to create something delicious and share it with the people you love. It’s a guaranteed crowd-pleaser, and it’s sure to become a staple in your dessert repertoire.
So, what are you waiting for? Gather your ingredients, preheat your oven (or don’t, if you’re using a no-bake crust!), and get ready to embark on a culinary adventure. I promise you won’t regret it.
And when you do make it, please, please, please share your experience! I’d love to hear what you think, what variations you tried, and how much everyone enjoyed it. Tag me in your photos on social media, leave a comment below, or send me an email. I’m always thrilled to see your creations and hear your feedback. Happy baking (or assembling)! I can’t wait to see your Banoffee Pie masterpieces!
Banoffee Pie: The Ultimate Guide to Making This Delicious Dessert
Buttery biscuit base topped with rich caramel, fresh bananas, and whipped cream, finished with grated chocolate.
Ingredients
- 250g Digestive biscuits
- 125g Unsalted butter, melted
- 100g Unsalted butter
- 100g Light brown soft sugar
- 397g Can of condensed milk
- 1 tbsp Golden syrup
- Pinch of sea salt
- 3-4 Ripe bananas
- 2 tbsp Lemon juice
- 300ml Double cream
- 1 tbsp Icing sugar
- 1 tsp Vanilla extract
- Grated chocolate (dark or milk)
Instructions
- Prepare the Biscuit Base: Crush the Digestive biscuits into fine crumbs using a rolling pin or food processor. Melt the butter and combine it with the biscuit crumbs until evenly coated. Press the mixture firmly into the base and up the sides of a 9-inch pie dish. Chill in the fridge for at least 30 minutes.
- Make the Caramel: In a heavy-bottomed saucepan, combine butter, brown sugar, condensed milk, golden syrup, and salt. Cook over low heat, stirring constantly, for 20-25 minutes, or until the caramel is thick and golden brown. Let cool slightly before pouring over the chilled biscuit base.
- Chill the Caramel: Return the pie to the fridge and chill for at least 1-2 hours, or until the caramel is completely set.
- Add the Banana Layer: Slice the bananas and toss them with lemon juice to prevent browning. Arrange the banana slices evenly over the set caramel layer.
- Make the Cream Topping: Chill your mixing bowl and whisk. Whip the double cream with icing sugar and vanilla extract until soft peaks form. Spread the whipped cream evenly over the banana layer.
- Decorate and Serve: Grate chocolate over the top of the whipped cream. Chill the assembled Banoffee Pie for at least 30 minutes before serving. Slice and enjoy!
Notes
- A loose-bottomed tart tin makes removing the pie easier.
- Use a heavy-bottomed saucepan to prevent the caramel from burning.
- Stir the caramel constantly while cooking.
- Chill the bowl and whisk before whipping the cream for best results.
- Chill the assembled pie before serving to allow the flavors to meld.