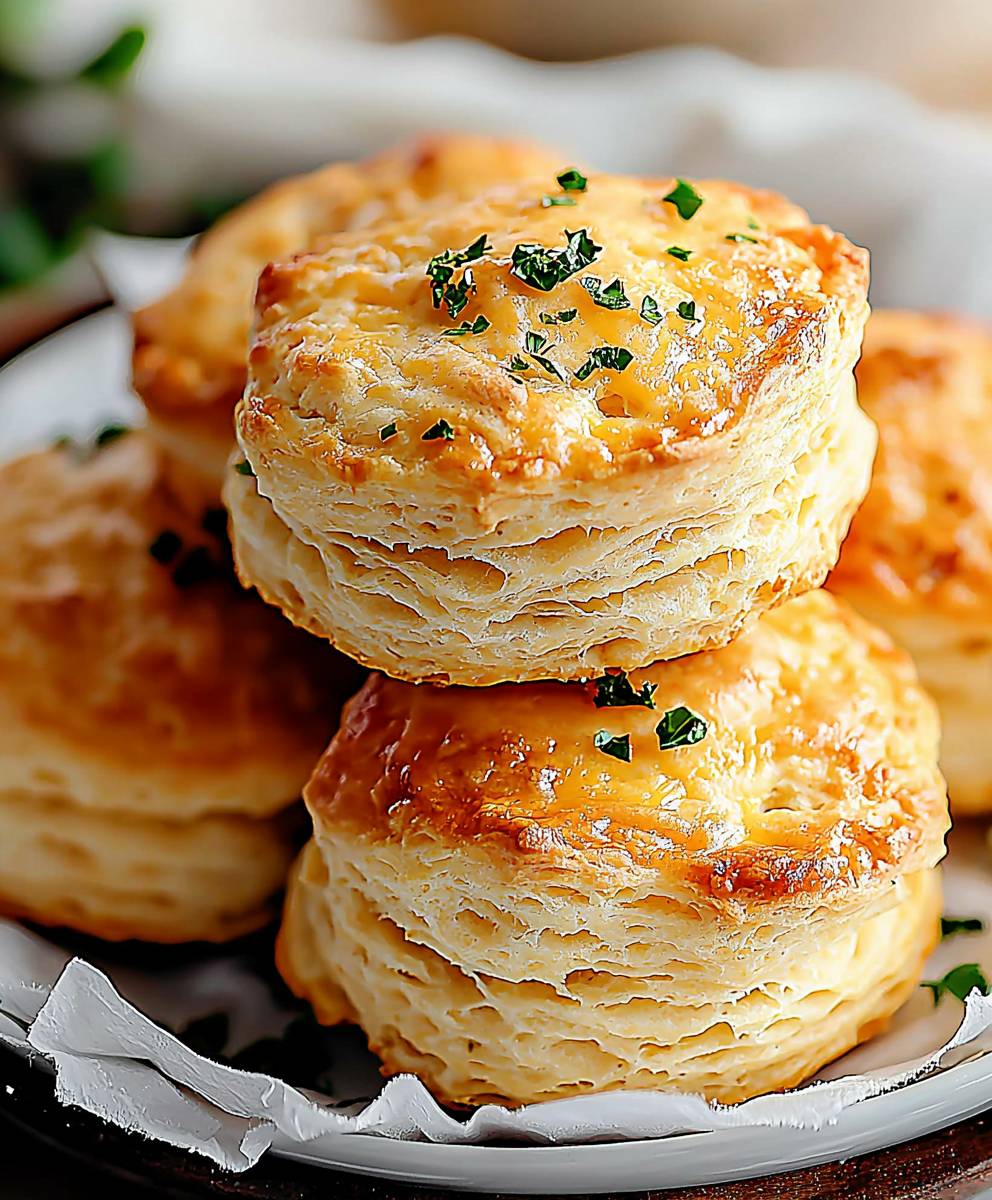
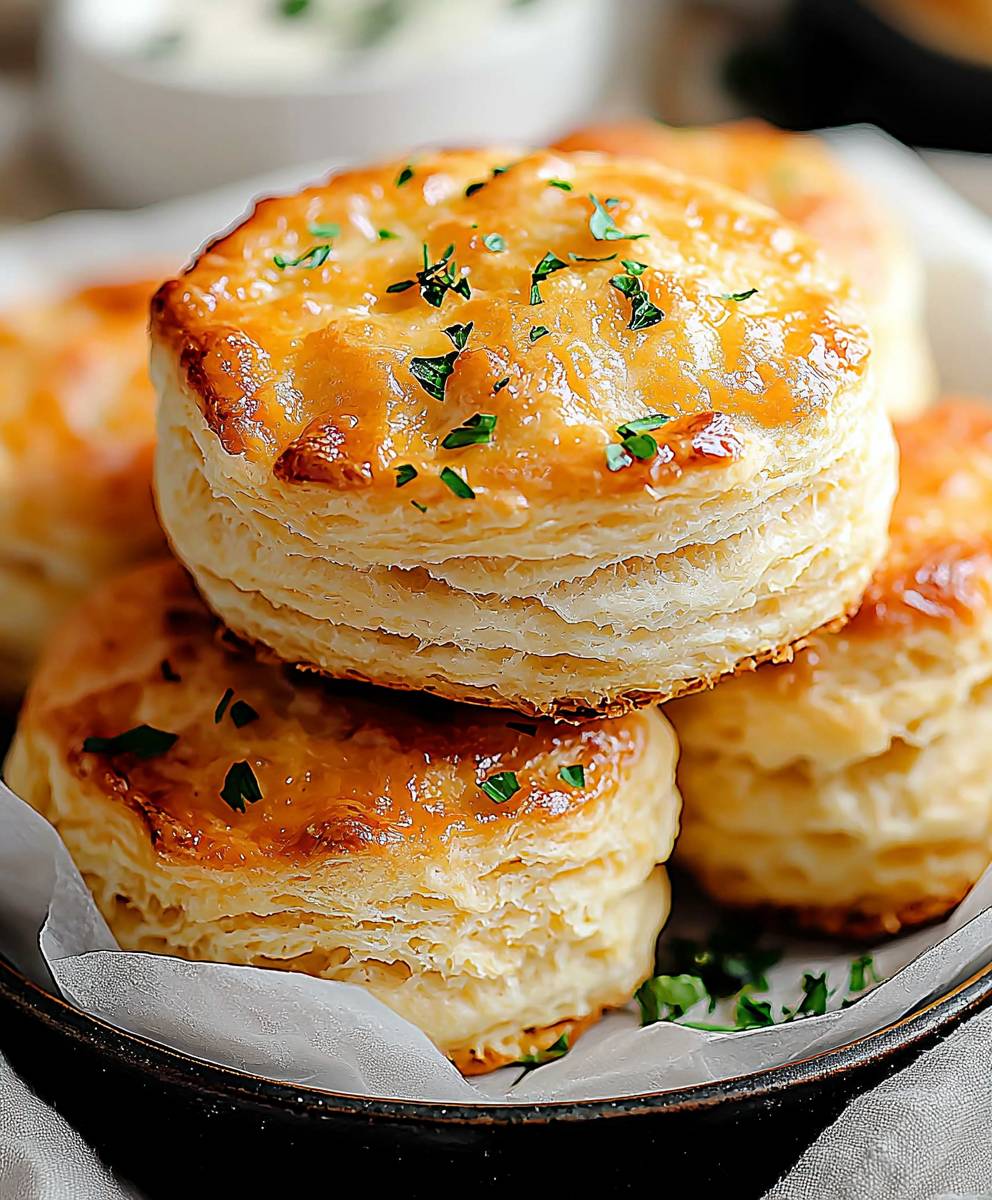
Cheddar Buttermilk Biscuits: Is there anything quite as comforting as a warm, flaky biscuit fresh from the oven? I think not! These aren’t just any biscuits, though. We’re talking about golden-brown, melt-in-your-mouth Cheddar Buttermilk Biscuits, bursting with sharp cheddar flavor and boasting a tender, tangy crumb thanks to the magic of buttermilk.
Biscuits, in their simplest form, have been a staple in various cultures for centuries. However, the fluffy, layered biscuit we know and love today is a distinctly American creation, evolving from harder, ship-faring biscuits into a Southern culinary icon. The addition of cheese elevates this classic to a whole new level of deliciousness!
What makes these biscuits so irresistible? It’s a symphony of textures and tastes. The slight tang of buttermilk perfectly complements the rich, savory cheddar, creating a flavor profile that’s both comforting and exciting. The flaky layers practically melt in your mouth, while the golden-brown exterior offers a satisfyingly crisp bite. Plus, they’re incredibly versatile! Enjoy them warm with a pat of butter, alongside a hearty bowl of soup, or as the base for a delicious breakfast sandwich. Honestly, is there anything these cheesy delights can’t do?
Ingredients:
- 2 cups all-purpose flour, plus more for dusting
- 1 tablespoon baking powder
- 1 teaspoon baking soda
- 1 teaspoon salt
- 1/2 teaspoon granulated sugar
- 1/2 cup (1 stick) cold unsalted butter, cut into 1/2-inch cubes
- 1 cup grated sharp cheddar cheese, plus more for topping
- 1 cup buttermilk, cold
- 2 tablespoons melted butter, for brushing
Preparing the Dough:
- Combine Dry Ingredients: In a large bowl, whisk together the flour, baking powder, baking soda, salt, and sugar. Make sure everything is evenly distributed. This ensures a consistent rise and flavor throughout the biscuits.
- Incorporate the Butter: Add the cold, cubed butter to the flour mixture. Using a pastry blender or your fingertips, cut the butter into the flour until the mixture resembles coarse crumbs. The butter should be in small pieces, about the size of peas. This step is crucial for creating flaky layers in the biscuits. The colder the butter, the better! If you notice the butter starting to soften, pop the bowl into the freezer for a few minutes.
- Add the Cheese: Stir in the grated cheddar cheese. Distribute it evenly throughout the flour and butter mixture. I like to use a sharp cheddar for the best flavor, but you can experiment with other cheeses like Gruyere or Monterey Jack.
- Add the Buttermilk: Pour the cold buttermilk into the bowl. Gently stir until just combined. Be careful not to overmix! Overmixing will develop the gluten in the flour, resulting in tough biscuits. The dough will be shaggy and slightly sticky, and that’s perfectly fine.
- Turn Out and Knead (Gently!): Lightly flour a clean work surface. Turn the dough out onto the floured surface. Gently pat the dough into a 1-inch thick rectangle. Fold the dough in thirds, like you’re folding a letter. This creates layers. Repeat this folding process 3-4 times. This is called laminating the dough, and it’s what gives the biscuits their signature flaky texture. Remember to be gentle and avoid overworking the dough.
- Pat and Cut: After the final fold, gently pat the dough into a 3/4-inch to 1-inch thick rectangle. Use a 2 1/2-inch biscuit cutter (or a sharp knife) to cut out the biscuits. Press straight down with the cutter; avoid twisting, as this can seal the edges and prevent them from rising properly.
- Place on Baking Sheet: Place the biscuits onto a baking sheet lined with parchment paper. Arrange them so that they are just touching each other. This helps them rise higher.
- Chill (Optional but Recommended): For even better results, cover the baking sheet with plastic wrap and chill the biscuits in the refrigerator for at least 30 minutes, or even up to an hour. This allows the gluten to relax and the butter to firm up, resulting in taller, flakier biscuits.
Baking the Biscuits:
- Preheat Oven: Preheat your oven to 425°F (220°C). Make sure your oven is fully preheated before baking the biscuits. A hot oven is essential for a good rise.
- Brush with Butter: Brush the tops of the biscuits with the melted butter. This will give them a beautiful golden-brown color and a rich flavor.
- Add Cheese (Optional): Sprinkle a little extra grated cheddar cheese on top of the biscuits, if desired. This adds a nice cheesy crust.
- Bake: Bake for 15-20 minutes, or until the biscuits are golden brown and cooked through. The baking time may vary depending on your oven, so keep an eye on them.
- Cool Slightly: Let the biscuits cool on the baking sheet for a few minutes before serving.
Serving Suggestions:
These cheddar buttermilk biscuits are delicious served warm with butter, jam, or honey. They’re also great with savory toppings like sausage gravy or scrambled eggs. I love to serve them alongside a hearty soup or stew. They’re also perfect for making breakfast sandwiches. Just split them open and fill them with your favorite breakfast ingredients like bacon, egg, and cheese.
Tips and Tricks:
- Use Cold Ingredients: The key to flaky biscuits is to use cold ingredients, especially the butter and buttermilk. Cold butter creates steam as it bakes, which separates the layers of dough and results in a flaky texture.
- Don’t Overmix: Overmixing the dough will develop the gluten in the flour, resulting in tough biscuits. Mix the dough until just combined.
- Handle the Dough Gently: Be gentle when handling the dough. Avoid overworking it, as this will also make the biscuits tough.
- Chill the Dough: Chilling the dough before baking allows the gluten to relax and the butter to firm up, resulting in taller, flakier biscuits.
- Use a Biscuit Cutter: A biscuit cutter will give you uniform biscuits. If you don’t have a biscuit cutter, you can use a sharp knife.
- Don’t Twist the Cutter: When cutting out the biscuits, press straight down with the cutter; avoid twisting, as this can seal the edges and prevent them from rising properly.
- Arrange Biscuits Close Together: Arrange the biscuits on the baking sheet so that they are just touching each other. This helps them rise higher.
- Bake in a Hot Oven: A hot oven is essential for a good rise. Make sure your oven is fully preheated before baking the biscuits.
- Don’t Overbake: Overbaking the biscuits will make them dry and crumbly. Bake them until they are golden brown and cooked through.
- Experiment with Flavors: Feel free to experiment with different flavors. You can add herbs, spices, or other cheeses to the dough.
Variations:
- Herb Biscuits: Add 1-2 tablespoons of chopped fresh herbs, such as rosemary, thyme, or chives, to the dough.
- Garlic Biscuits: Add 1-2 teaspoons of garlic powder to the dough.
- Spicy Biscuits: Add 1/4-1/2 teaspoon of cayenne pepper to the dough.
- Sweet Biscuits: Add 1-2 tablespoons of sugar to the dough. You can also add a glaze after baking.
- Different Cheeses: Experiment with different cheeses, such as Gruyere, Monterey Jack, or pepper jack.
- Bacon Cheddar Biscuits: Add cooked and crumbled bacon to the dough along with the cheddar cheese.
Storage Instructions:
Store leftover biscuits in an airtight container at room temperature for up to 2 days. For longer storage, you can freeze the biscuits. Wrap them individually in plastic wrap and then place them in a freezer bag. They can be frozen for up to 2 months. To reheat frozen biscuits, bake them in a preheated oven at 350°F (175°C) for 10-15 minutes, or until warmed through.
Why Buttermilk?
Buttermilk is a key ingredient in these biscuits for a few reasons. First, its acidity helps to tenderize the gluten in the flour, resulting in a softer biscuit. Second, it reacts with the baking soda to create carbon dioxide, which helps the biscuits rise. Finally, it adds a subtle tang that complements the cheddar cheese perfectly.
Troubleshooting:
- Biscuits are flat: This could be due to several factors, including using warm butter, overmixing the dough, or not using enough baking powder or baking soda. Make sure to use cold ingredients, mix the dough until just combined, and use fresh baking powder and baking soda.
- Biscuits are tough: This is usually caused by overmixing the dough. Be gentle when handling the dough and mix it until just combined.
- Biscuits are dry: This could be due to overbaking the biscuits. Bake them until they are golden brown and cooked through, but don’t let them get too dry.
- Biscuits are not rising: This could be due to using old baking powder or baking soda. Make sure to use fresh baking powder and baking soda. Also, make sure your oven is fully preheated before baking the biscuits.
Equipment You’ll Need:
- Large mixing bowl
- Pastry blender or your fingertips
- Grater
- Measuring cups and spoons
- Clean work surface
- Biscuit cutter (or sharp knife)
- B
Conclusion:
And there you have it! These Cheddar Buttermilk Biscuits are more than just a side; they’re a warm, cheesy hug on a plate, and I truly believe they’re a must-try for any home baker. The combination of tangy buttermilk, sharp cheddar, and that melt-in-your-mouth texture is simply irresistible. Forget those dry, crumbly biscuits you might have had in the past; these are in a league of their own. They’re quick enough for a weeknight dinner, yet impressive enough for a weekend brunch. Honestly, once you’ve tasted these, you’ll find yourself looking for any excuse to bake another batch.
But the best part? They’re incredibly versatile! While they’re absolutely divine served warm with a pat of butter (who can resist that?), don’t be afraid to get creative. Imagine them split open and filled with crispy bacon, a fried egg, and a drizzle of hot sauce for a truly decadent breakfast sandwich. Or, how about serving them alongside a hearty bowl of chili or stew for the ultimate comfort food experience? They’re also fantastic with a smear of honey butter or a dollop of your favorite jam.
If you’re feeling adventurous, you can easily adapt this recipe to suit your own tastes. Try adding a pinch of garlic powder or onion powder to the dry ingredients for an extra savory kick. Or, for a bit of heat, incorporate some finely chopped jalapeños or a dash of cayenne pepper. You could even experiment with different types of cheese Gruyere, Monterey Jack, or even a smoked Gouda would all be delicious additions. For a sweeter biscuit, consider adding a tablespoon of sugar to the dry ingredients and brushing the tops with melted butter and a sprinkle of cinnamon sugar before baking. The possibilities are truly endless!
I’ve poured my heart into perfecting this recipe, and I’m so excited for you to try it. I’m confident that these Cheddar Buttermilk Biscuits will become a new family favorite. They’re simple enough for even beginner bakers to master, and the results are guaranteed to impress.
So, what are you waiting for? Preheat that oven, gather your ingredients, and get ready to experience biscuit bliss! I promise, you won’t regret it.
And most importantly, I’d love to hear about your baking adventures! Once you’ve tried this recipe, please come back and share your experience in the comments below. Did you make any variations? What did you serve them with? What did your family think? Your feedback is invaluable, and it helps me to continue creating and sharing recipes that you’ll love. Happy baking, and enjoy every cheesy, buttery bite! I can’t wait to hear all about your Cheddar Buttermilk Biscuits success stories!
Cheddar Buttermilk Biscuits: The Ultimate Guide to Fluffy Perfection
Flaky and flavorful cheddar buttermilk biscuits, perfect for breakfast, brunch, or as a side dish.
Ingredients
- 2 cups all-purpose flour, plus more for dusting
- 1 tablespoon baking powder
- 1 teaspoon baking soda
- 1 teaspoon salt
- 1/2 teaspoon granulated sugar
- 1/2 cup (1 stick) cold unsalted butter, cut into 1/2-inch cubes
- 1 cup grated sharp cheddar cheese, plus more for topping
- 1 cup buttermilk, cold
- 2 tablespoons melted butter, for brushing
Instructions
- Combine Dry Ingredients: In a large bowl, whisk together the flour, baking powder, baking soda, salt, and sugar.
- Incorporate the Butter: Add the cold, cubed butter to the flour mixture. Using a pastry blender or your fingertips, cut the butter into the flour until the mixture resembles coarse crumbs.
- Add the Cheese: Stir in the grated cheddar cheese. Distribute it evenly throughout the flour and butter mixture.
- Add the Buttermilk: Pour the cold buttermilk into the bowl. Gently stir until just combined. Be careful not to overmix!
- Turn Out and Knead (Gently!): Lightly flour a clean work surface. Turn the dough out onto the floured surface. Gently pat the dough into a 1-inch thick rectangle. Fold the dough in thirds, like you’re folding a letter. Repeat this folding process 3-4 times.
- Pat and Cut: After the final fold, gently pat the dough into a 3/4-inch to 1-inch thick rectangle. Use a 2 1/2-inch biscuit cutter (or a sharp knife) to cut out the biscuits. Press straight down with the cutter; avoid twisting.
- Place on Baking Sheet: Place the biscuits onto a baking sheet lined with parchment paper. Arrange them so that they are just touching each other.
- Chill (Optional but Recommended): For even better results, cover the baking sheet with plastic wrap and chill the biscuits in the refrigerator for at least 30 minutes, or even up to an hour.
- Preheat Oven: Preheat your oven to 425°F (220°C).
- Brush with Butter: Brush the tops of the biscuits with the melted butter.
- Add Cheese (Optional): Sprinkle a little extra grated cheddar cheese on top of the biscuits, if desired.
- Bake: Bake for 15-20 minutes, or until the biscuits are golden brown and cooked through.
- Cool Slightly: Let the biscuits cool on the baking sheet for a few minutes before serving.
Notes
- Use cold ingredients, especially the butter and buttermilk, for the flakiest biscuits.
- Don’t overmix the dough. Mix until just combined.
- Handle the dough gently.
- Chilling the dough before baking is recommended for taller, flakier biscuits.
- Avoid twisting the biscuit cutter when cutting out the biscuits.
- Arrange biscuits close together on the baking sheet to help them rise higher.
- A hot oven is essential for a good rise.
- Don’t overbake the biscuits.