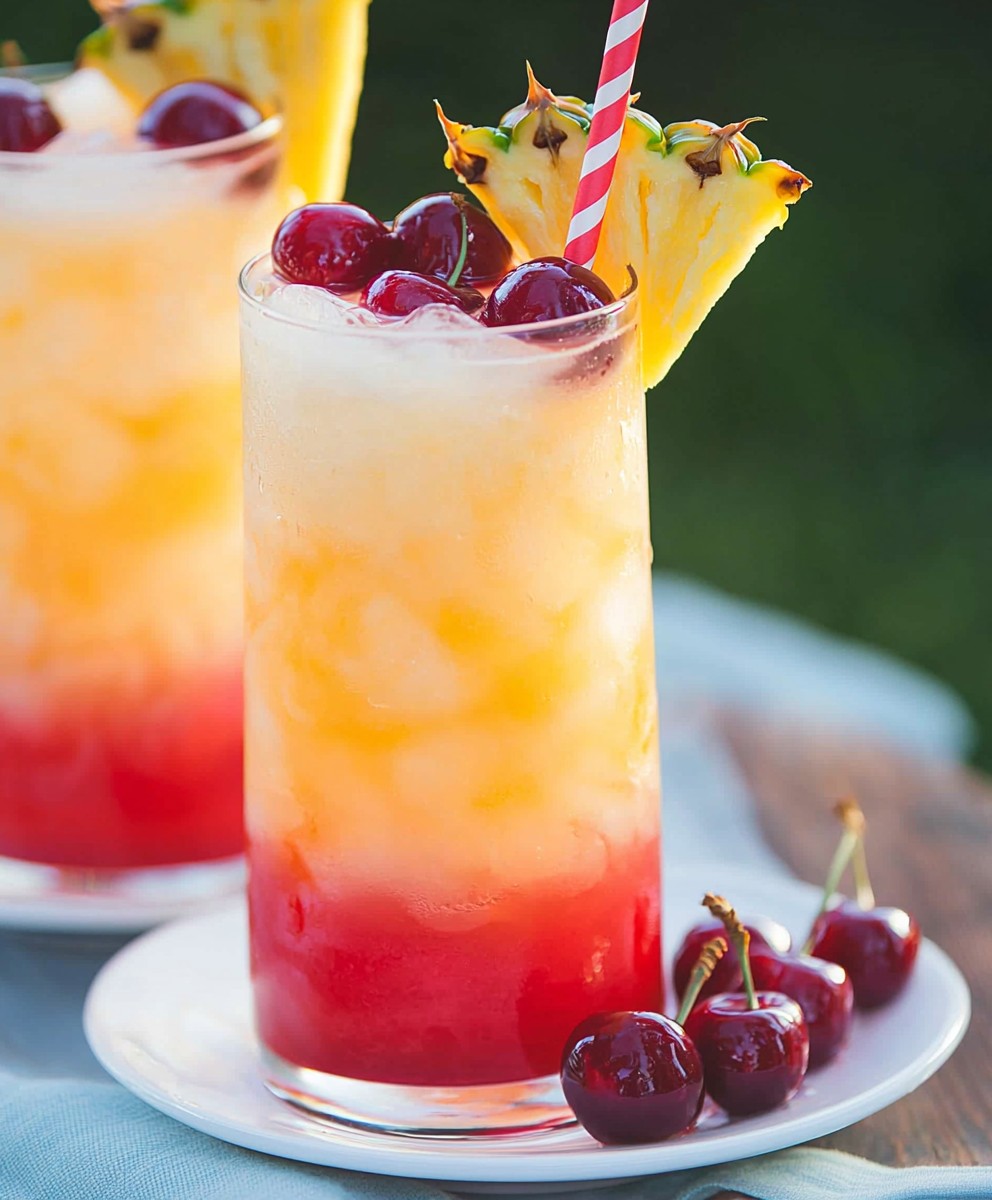
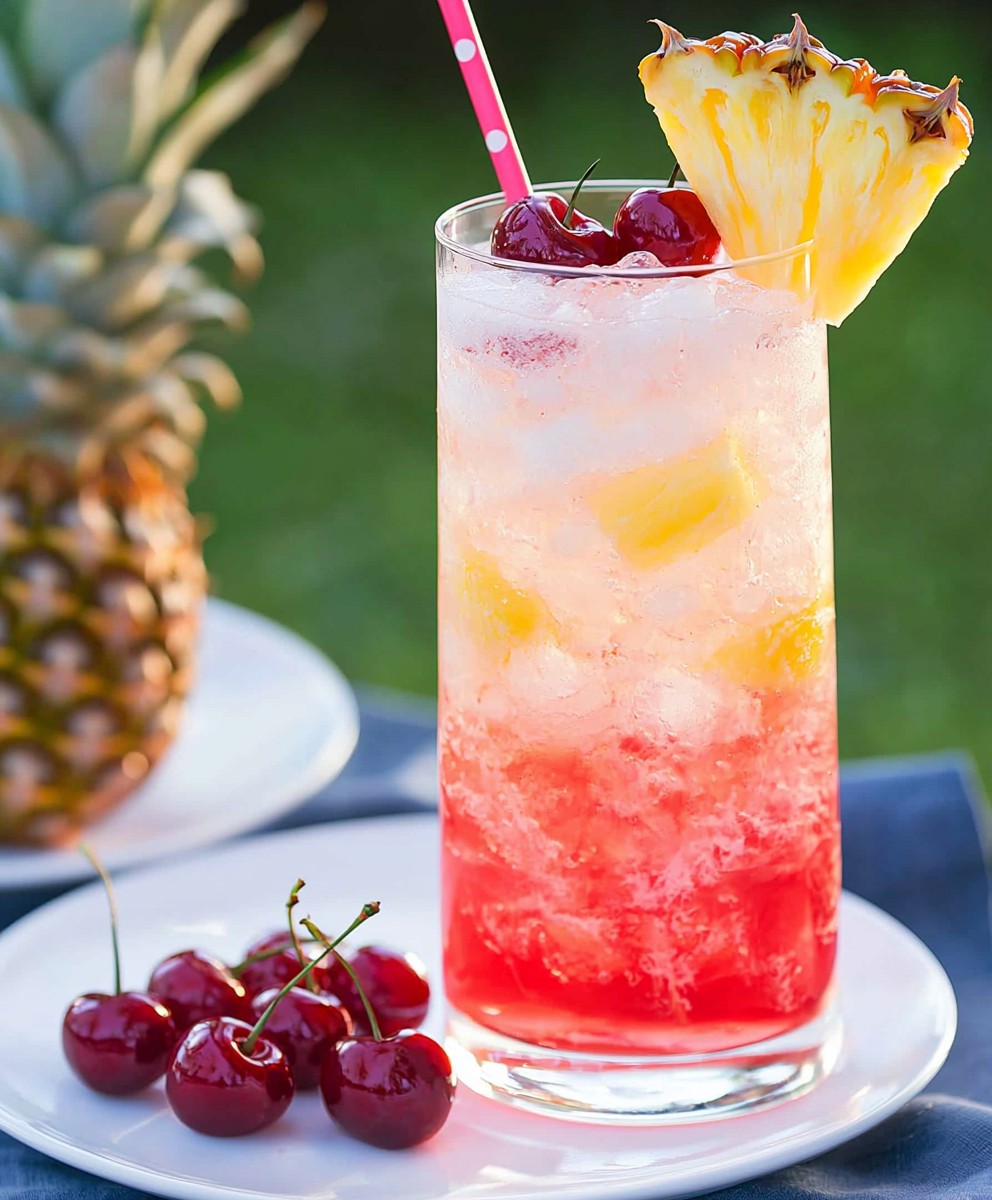
Cherry Pineapple Lemonade: Prepare to be transported to a tropical paradise with every sip of this vibrant and refreshing drink! Forget those sugary, store-bought lemonades; we’re about to embark on a flavor adventure that’s both incredibly easy and utterly irresistible. Imagine the sweet tang of ripe cherries mingling harmoniously with the tropical zest of pineapple, all perfectly balanced by the classic tartness of lemonade. It’s a symphony of flavors that will tantalize your taste buds and leave you craving more.
Lemonade itself boasts a rich history, dating back centuries and enjoyed in various forms across cultures. But the addition of cherry and pineapple elevates it to a whole new level of deliciousness. This particular combination, while not steeped in ancient tradition, has quickly gained popularity for its unique and delightful flavor profile. It’s the perfect beverage for warm summer days, backyard barbecues, or simply when you need a little pick-me-up.
What makes this Cherry Pineapple Lemonade so universally loved? It’s the perfect balance of sweet, tart, and fruity. The cherries provide a deep, rich sweetness, while the pineapple adds a tropical twist and a hint of acidity. The lemonade base ties it all together, creating a refreshing and thirst-quenching drink that’s both satisfying and invigorating. Plus, it’s incredibly easy to make, requiring only a few simple ingredients and minimal effort. So, ditch the artificial flavors and embrace the real deal your taste buds will thank you!
Ingredients:
- For the Cherry Syrup:
- 2 cups fresh or frozen pitted cherries
- 1 cup granulated sugar
- 1/2 cup water
- 1 tablespoon lemon juice
- For the Pineapple Lemonade:
- 6 cups water, divided
- 1 cup fresh lemon juice (about 6-8 lemons)
- 1 cup pineapple juice
- 1/2 cup granulated sugar (adjust to taste)
- Ice cubes, for serving
- Fresh cherries and pineapple wedges, for garnish (optional)
Making the Cherry Syrup:
This homemade cherry syrup is the star of our lemonade! It adds a beautiful color and a deep, fruity flavor that complements the tartness of the lemons and the tropical sweetness of the pineapple. Don’t skip this step it’s worth the effort!
- Combine the ingredients: In a medium saucepan, combine the pitted cherries, granulated sugar, water, and lemon juice.
- Simmer the mixture: Place the saucepan over medium heat and bring the mixture to a simmer, stirring occasionally until the sugar dissolves completely.
- Cook down the syrup: Once simmering, reduce the heat to low and continue to simmer for about 15-20 minutes, or until the cherries have softened and the syrup has thickened slightly. Stir occasionally to prevent sticking. You’ll know it’s ready when the syrup coats the back of a spoon.
- Strain the syrup: Remove the saucepan from the heat and let the mixture cool slightly. Then, pour the mixture through a fine-mesh sieve or cheesecloth-lined colander into a bowl. Press down on the cherries with a spoon to extract as much juice as possible. Discard the cherry solids (or save them for another use, like topping ice cream!).
- Cool and store: Let the cherry syrup cool completely before using. Store the syrup in an airtight container in the refrigerator for up to 2 weeks.
Preparing the Pineapple Lemonade:
Now that our cherry syrup is ready, it’s time to make the lemonade base! This part is super simple and refreshing. We’re using fresh lemon juice and pineapple juice for the best flavor, but you can use bottled juice in a pinch.
- Make a simple syrup (optional): If you prefer a smoother lemonade, you can make a simple syrup by combining 1 cup of water and 1/2 cup of sugar in a small saucepan. Heat over medium heat, stirring until the sugar dissolves completely. Let it cool before using. This helps the sugar dissolve more easily in the cold lemonade. If you don’t mind a little bit of sugar settling at the bottom, you can skip this step and just add the sugar directly to the lemonade.
- Combine the liquids: In a large pitcher, combine the remaining 5 cups of water, fresh lemon juice, and pineapple juice.
- Sweeten to taste: Add the simple syrup (if using) or granulated sugar to the pitcher. Stir well until the sugar is completely dissolved. Taste and adjust the sweetness as needed. You might want to add more sugar if you prefer a sweeter lemonade, or more lemon juice if you prefer a tarter one.
- Chill the lemonade: Cover the pitcher and refrigerate for at least 30 minutes to allow the flavors to meld together. This step is important for a truly refreshing lemonade!
Assembling the Cherry Pineapple Lemonade:
This is where the magic happens! We’re combining the cherry syrup and pineapple lemonade to create a beautiful and delicious drink. Get ready to impress your friends and family with this vibrant concoction!
- Fill glasses with ice: Fill each glass with ice cubes.
- Add cherry syrup: Pour about 2-3 tablespoons of cherry syrup into each glass. Adjust the amount to your liking, depending on how cherry-flavored you want your lemonade to be.
- Top with lemonade: Slowly pour the pineapple lemonade over the cherry syrup and ice, filling each glass almost to the top.
- Stir gently: Gently stir the lemonade to combine the cherry syrup and lemonade. Be careful not to over-stir, as this can dilute the flavors.
- Garnish (optional): Garnish each glass with fresh cherries and pineapple wedges for a beautiful and festive presentation. You can also add a lemon slice or a sprig of mint for extra flair.
- Serve immediately: Serve the Cherry Pineapple Lemonade immediately and enjoy!
Tips and Variations:
- Adjust sweetness: The amount of sugar in both the cherry syrup and the lemonade can be adjusted to your taste. Start with the recommended amounts and then add more as needed.
- Use different fruits: Feel free to experiment with other fruits in the syrup, such as raspberries, strawberries, or blackberries.
- Make it sparkling: For a sparkling lemonade, substitute some of the water with club soda or sparkling water.
- Add alcohol: For an adult version, add a shot of vodka, rum, or tequila to each glass.
- Freeze for later: Pour leftover lemonade into popsicle molds for a refreshing frozen treat.
- Infuse the water: For an extra layer of flavor, infuse the water with lemon slices, cucumber, or mint before making the lemonade.
- Make a large batch: This recipe can easily be doubled or tripled for parties or gatherings.
- Use frozen fruit: If fresh cherries are not in season, you can use frozen cherries for the syrup. Just make sure to thaw them slightly before using.
- Lemon Variety: Meyer lemons are sweeter and less acidic than regular lemons, so using them will result in a sweeter lemonade. Adjust the sugar accordingly.
- Pineapple Prep: If using fresh pineapple juice, make sure to remove the core, as it can be quite tough.
Serving Suggestions:
This Cherry Pineapple Lemonade is perfect for:
- Summer barbecues
- Pool parties
- Picnics
- Birthday parties
- Any occasion that calls for a refreshing and delicious drink!
It also pairs well with:
- Grilled chicken or fish
- Salads
- Sandwiches
- Desserts
Enjoy your homemade Cherry Pineapple Lemonade! I hope you love it as much as I do!
Conclusion:
This Cherry Pineapple Lemonade isn’t just a drink; it’s a burst of sunshine in a glass, a mini-vacation for your taste buds, and a guaranteed crowd-pleaser. I truly believe this recipe is a must-try because it perfectly balances the tartness of lemons with the sweetness of cherries and the tropical tang of pineapple. It’s refreshing, vibrant, and incredibly easy to make what more could you ask for? Why is this lemonade a game-changer? Because it’s so much more than your average lemonade. The cherry and pineapple elevate it to a whole new level of deliciousness, creating a complex flavor profile that’s both familiar and exciting. Its the perfect drink to serve at summer barbecues, pool parties, or even just a relaxing afternoon on the porch. Forget the store-bought stuff; once you taste this homemade version, you’ll never go back! But the best part? It’s incredibly versatile! Feel free to experiment with different variations to suit your own taste. For a sparkling twist, try topping it off with some club soda or sparkling water right before serving. If you’re feeling adventurous, add a splash of rum or vodka for a delightful adult beverage. For a creamier texture, blend in a scoop of vanilla ice cream or a dollop of coconut cream. You could even freeze it into popsicles for a refreshing treat on a hot day! Serving Suggestions: * Serve chilled with plenty of ice. * Garnish with fresh cherries, pineapple wedges, and lemon slices. * Rim the glasses with sugar for an extra touch of sweetness. * Pair it with grilled foods, salads, or light desserts. * For a festive touch, add a sprig of mint or rosemary. Variations to Explore: * Spicy Cherry Pineapple Lemonade: Add a pinch of cayenne pepper or a few slices of jalapeño for a kick. * Herbal Cherry Pineapple Lemonade: Infuse the lemonade with fresh basil or mint for a refreshing twist. * Frozen Cherry Pineapple Lemonade Slush: Blend the lemonade with ice for a frosty treat. * Cherry Pineapple Lemonade Mocktail: Add a splash of grenadine and a maraschino cherry for a fancy mocktail. * Adult Cherry Pineapple Lemonade: Add your favorite spirit, such as rum, vodka, or tequila, for a delicious cocktail. I’m confident that you’ll love this Cherry Pineapple Lemonade as much as I do. It’s the perfect way to quench your thirst and brighten your day. So, go ahead, gather your ingredients, and give this recipe a try. I promise you won’t be disappointed! And most importantly, I’d love to hear about your experience! Did you make any variations? What did you think of the flavor? Share your photos and comments with me I can’t wait to see your creations and hear your feedback. Happy sipping! Let me know if you have any questions, and I’ll be happy to help. Enjoy! Print
Cherry Pineapple Lemonade: A Refreshing Summer Drink Recipe
- Total Time: 35 minutes
- Yield: 6–8 servings 1x
Description
Vibrant Cherry Pineapple Lemonade with homemade cherry syrup, fresh lemon and pineapple juice. Perfect for summer!
Ingredients
- 2 cups fresh or frozen pitted cherries
- 1 cup granulated sugar
- 1/2 cup water
- 1 tablespoon lemon juice
- 6 cups water, divided
- 1 cup fresh lemon juice (about 6–8 lemons)
- 1 cup pineapple juice
- 1/2 cup granulated sugar (adjust to taste)
- Ice cubes, for serving
- Fresh cherries and pineapple wedges, for garnish (optional)
Instructions
- Combine the ingredients: In a medium saucepan, combine the pitted cherries, granulated sugar, water, and lemon juice.
- Simmer the mixture: Place the saucepan over medium heat and bring the mixture to a simmer, stirring occasionally until the sugar dissolves completely.
- Cook down the syrup: Once simmering, reduce the heat to low and continue to simmer for about 15-20 minutes, or until the cherries have softened and the syrup has thickened slightly. Stir occasionally to prevent sticking. You’ll know it’s ready when the syrup coats the back of a spoon.
- Strain the syrup: Remove the saucepan from the heat and let the mixture cool slightly. Then, pour the mixture through a fine-mesh sieve or cheesecloth-lined colander into a bowl. Press down on the cherries with a spoon to extract as much juice as possible. Discard the cherry solids (or save them for another use, like topping ice cream!).
- Cool and store: Let the cherry syrup cool completely before using. Store the syrup in an airtight container in the refrigerator for up to 2 weeks.
- Make a simple syrup (optional): If you prefer a smoother lemonade, you can make a simple syrup by combining 1 cup of water and 1/2 cup of sugar in a small saucepan. Heat over medium heat, stirring until the sugar dissolves completely. Let it cool before using. This helps the sugar dissolve more easily in the cold lemonade. If you don’t mind a little bit of sugar settling at the bottom, you can skip this step and just add the sugar directly to the lemonade.
- Combine the liquids: In a large pitcher, combine the remaining 5 cups of water, fresh lemon juice, and pineapple juice.
- Sweeten to taste: Add the simple syrup (if using) or granulated sugar to the pitcher. Stir well until the sugar is completely dissolved. Taste and adjust the sweetness as needed. You might want to add more sugar if you prefer a sweeter lemonade, or more lemon juice if you prefer a tarter one.
- Chill the lemonade: Cover the pitcher and refrigerate for at least 30 minutes to allow the flavors to meld together. This step is important for a truly refreshing lemonade!
- Fill glasses with ice: Fill each glass with ice cubes.
- Add cherry syrup: Pour about 2-3 tablespoons of cherry syrup into each glass. Adjust the amount to your liking, depending on how cherry-flavored you want your lemonade to be.
- Top with lemonade: Slowly pour the pineapple lemonade over the cherry syrup and ice, filling each glass almost to the top.
- Stir gently: Gently stir the lemonade to combine the cherry syrup and lemonade. Be careful not to over-stir, as this can dilute the flavors.
- Garnish (optional): Garnish each glass with fresh cherries and pineapple wedges for a beautiful and festive presentation. You can also add a lemon slice or a sprig of mint for extra flair.
- Serve immediately: Serve the Cherry Pineapple Lemonade immediately and enjoy!
Notes
- Adjust the sweetness of both the cherry syrup and the lemonade to your taste.
- Experiment with other fruits in the syrup, such as raspberries, strawberries, or blackberries.
- For a sparkling lemonade, substitute some of the water with club soda or sparkling water.
- For an adult version, add a shot of vodka, rum, or tequila to each glass.
- Pour leftover lemonade into popsicle molds for a refreshing frozen treat.
- Infuse the water with lemon slices, cucumber, or mint before making the lemonade.
- This recipe can easily be doubled or tripled for parties or gatherings.
- If fresh cherries are not in season, you can use frozen cherries for the syrup. Just make sure to thaw them slightly before using.
- Meyer lemons are sweeter and less acidic than regular lemons, so using them will result in a sweeter lemonade. Adjust the sugar accordingly.
- If using fresh pineapple juice, make sure to remove the core, as it can be quite tough.
- Prep Time: 15 minutes
- Cook Time: 20 minutes