Peanut Butter Spider Cookies Recipe
The crisp autumn air always makes me crave something a little bit spooky and a lot delicious. Peanut Butter Spider Cookies are perfect for that. They combine the comforting, classic flavor of peanut butter cookies with a fun, festive twist that kids and adults alike will adore. The secret to their delightful chewiness is using creamy, processed peanut butter – not the natural kind that separates. And the Whoppers? They make the perfect little spider bodies peeking out from the cookie. Ingredients: 1 ½ cups all-purpose flour ½ tsp baking soda ½ tsp baking powder ½ cup salted butter (softened) ½ cup granulated sugar ½ cup brown sugar 1 egg ½ cup creamy peanut butter (not natural) 1 tsp vanilla 44 whoppers 1 cup semi-sweet chocolate chips ((6 ounces)) 1 small tube white cake decorating gel ¼ cup granulated sugar (for rolling) Making the Cookie Dough First things first, let’s get our dry ingredients ready. In a medium bowl, whisk together the 1 ½ cups of all-purpose flour, ½ teaspoon of baking soda, and ½ teaspoon of baking powder. Whisking them well ensures that the leavening agents are evenly distributed, which means your cookies will bake up with a nice, consistent texture. Set this bowl aside for now. Now, for the wet ingredients and the star of the show: peanut butter. In a large bowl, cream together the ½ cup of softened salted butter, ½ cup of granulated sugar, and ½ cup of packed brown sugar. I like to use a stand mixer with the paddle attachment to get this mixture light and fluffy. Beat it on medium speed until it looks pale yellow and airy, about 3-4 minutes. Then, add the egg and ½ cup of creamy peanut butter and the 1 teaspoon of vanilla extract. Beat again until everything is well combined, scraping down the sides of the bowl as needed. Don’t overmix at this stage; we want tender cookies, not tough ones. This combination creates that signature chewy peanut butter cookie base that holds up to the fun spider decorations. Preparing the Dough for Baking Now it’s time to bring the wet and dry ingredients together. Gradually add the flour mixture to the butter and peanut butter mixture, mixing on low speed until just combined. Be careful not to overmix the dough once the flour is added. Overmixing develops the gluten too much, leading to tough cookies. Stop mixing as soon as you don’t see any more dry flour streaks. The dough will be soft but should hold its shape. Next, stir in the 1 cup of semi-sweet chocolate chips. This adds little pockets of melted chocolate throughout the cookie, making them even more irresistible. Cover the bowl with plastic wrap and refrigerate the dough for at least 30 minutes. Chilling the dough is an important step. It helps the cookies hold their shape better when baking, preventing them from spreading too much, and it also allows the flavors to meld together. Assembling the Spider Cookies Once the dough is chilled, preheat your oven to 350°F (175°C). Line baking sheets with parchment paper. Take the chilled dough and roll it into 1-inch balls. You can use a cookie scoop for uniform size. Then, gently roll each ball in the ¼ cup of granulated sugar. This gives the cookies a slight crunch and a sweet coating. Place the sugar-coated dough balls about 2 inches apart on the prepared baking sheets. Now for the spider effect: take one Whopper and gently press it into the top center of each dough ball. This will be the spider’s body. Bake the cookies for 10-12 minutes, or until the edges are lightly golden and the centers are still slightly soft. They will continue to cook a little on the baking sheet after you remove them from the oven. Let the cookies cool on the baking sheets for 5 minutes before transferring them to a wire rack to cool completely. While the cookies are cooling, melt the 1 cup of semi-sweet chocolate chips. You can do this in a microwave-safe bowl in 30-second intervals, stirring after each, or use a double boiler. Once melted and smooth, transfer the melted chocolate into a small piping bag or a zip-top bag with a corner snipped off. Use the white cake decorating gel to draw eight thin legs radiating from the Whopper body on each cookie. Then, use the melted chocolate to draw two small dots on the Whopper for eyes. The white gel adds a great contrast and makes the spider legs look distinct. Allow the decorations to set before serving or storing.
Peanut Butter Spider Cookies
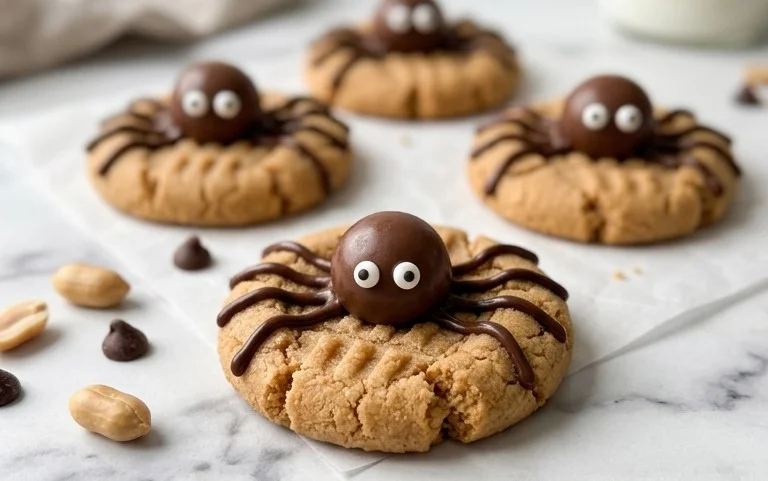
The crisp autumn air always makes me crave something a little bit spooky and a lot delicious. Peanut Butter Spider Cookies are perfect for that. They combine the comforting, classic flavor of peanut butter cookies with a fun, festive twist that kids and adults alike will adore. The secret to their delightful chewiness is using creamy, processed peanut butter – not the natural kind that separates. And the Whoppers? They make the perfect little spider bodies peeking out from the cookie.
Ingredients:
- 1 ½ cups all-purpose flour
- ½ tsp baking soda
- ½ tsp baking powder
- ½ cup salted butter (softened)
- ½ cup granulated sugar
- ½ cup brown sugar
- 1 egg
- ½ cup creamy peanut butter (not natural)
- 1 tsp vanilla
- 44 whoppers
- 1 cup semi-sweet chocolate chips ((6 ounces))
- 1 small tube white cake decorating gel
- ¼ cup granulated sugar (for rolling)
Making the Cookie Dough
First things first, let’s get our dry ingredients ready. In a medium bowl, whisk together the 1 ½ cups of all-purpose flour, ½ teaspoon of baking soda, and ½ teaspoon of baking powder. Whisking them well ensures that the leavening agents are evenly distributed, which means your cookies will bake up with a nice, consistent texture. Set this bowl aside for now.
Now, for the wet ingredients and the star of the show: peanut butter. In a large bowl, cream together the ½ cup of softened salted butter, ½ cup of granulated sugar, and ½ cup of packed brown sugar. I like to use a stand mixer with the paddle attachment for this, but you can absolutely do it by hand with a sturdy spatula or wooden spoon. You want to beat these until the mixture is light and fluffy. This creaming process is really important because it incorporates air into the dough, which contributes to the cookie’s texture. Then, add the egg and beat until just combined. Next, stir in the ½ cup of creamy peanut butter and 1 teaspoon of vanilla extract. Make sure you’re using creamy peanut butter that doesn’t need stirring; natural peanut butter can make the dough oily. Beat or stir until everything is well combined and smooth. It should smell wonderfully peanut buttery.
Gradually add the dry ingredients to the wet ingredients, mixing on low speed (if using a mixer) or stirring until just combined. Be careful not to overmix the dough at this stage. Overmixing can develop the gluten in the flour too much, resulting in tough cookies. You want to stop mixing as soon as you don’t see any more streaks of dry flour.
Preparing for Baking and Adding the Spiders
Now, it’s time to prepare your baking sheets. Line them with parchment paper or silicone baking mats. This prevents the cookies from sticking and makes cleanup a breeze. You’ll also want to preheat your oven to 375°F (190°C).
Take the cookie dough and roll about 1 tablespoon of it into a ball. Then, roll each ball in the ¼ cup of granulated sugar you’ve set aside. This sugar coating will give the cookies a slightly crisp exterior. Place the sugared dough balls onto the prepared baking sheets, leaving about 2 inches between them to allow for spreading.
Here’s where the fun part comes in. Gently press one Whopper candy into the center of each cookie dough ball. This will be the spider’s body. Once you’ve got all your Whoppers in place, it’s time to bake.
Baking and Decorating the Spiders
Bake the cookies for 9 to 11 minutes, or until the edges are lightly golden brown and the centers look slightly underdone. They will continue to bake a bit on the hot baking sheet after you take them out of the oven. Let the cookies cool on the baking sheets for about 5 minutes before carefully transferring them to a wire rack to cool completely. This resting period on the baking sheet is important for the cookies to set up properly and not fall apart when you move them.
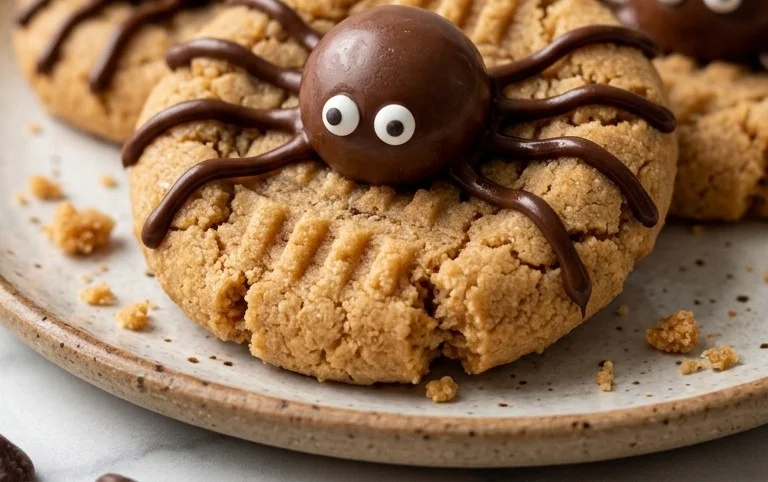
Once the cookies have completely cooled, it’s time to add the spider legs and eyes. Grab your small tube of white cake decorating gel. You can use black gel too, but white provides a nice contrast against the dark Whopper and the cookie. Using the gel, draw eight thin lines radiating out from the Whopper on each cookie to represent the spider legs. Get creative with the length and placement of these lines. For the eyes, simply add two small dots of white gel on the Whopper itself. If you like, you can also add a couple of extra little legs or a tiny dot for a mouth if you’re feeling extra artistic.
Tips for Perfect Spider Cookies
If you don’t have Whoppers, you could try using other round, dark candies like malted milk balls or even chocolate-covered raisins for a different look and taste. Just be sure they are roughly the same size as a Whopper. For a slightly flatter cookie, you can press down on the dough balls a little before adding the Whopper. If you prefer a chewier cookie, be sure to slightly underbake them. They should look just a little soft in the center when you take them out of the oven.
Storing these cookies is straightforward. Once they are completely cooled and decorated, you can keep them in an airtight container at room temperature for up to 3-4 days. They are perfect for Halloween parties, school treats, or just a fun baking project with the kids. The combination of soft peanut butter cookie, crunchy malted Whopper, and sweet chocolate is truly delightful. Enjoy your spooky, delicious creations!
Conclusion:
These Peanut Butter Spider Cookies are a spooky, fun, and delicious treat perfect for Halloween or any fall gathering. The combination of chewy peanut butter cookie and the chocolatey Whopper spider is a guaranteed hit with everyone. They’re surprisingly simple to make, bringing together classic flavors with a playful design that’s sure to impress. The slight crisp from the sugar coating and the melty chocolate chips inside make each bite a delight. You can serve these cookies as they are, or with a cold glass of milk for a classic pairing. For variations, try using different candy for the spider bodies, like malted milk balls or even mini chocolate donuts. You could also add a sprinkle of sea salt on top after baking for a sweet and salty kick. Don’t be afraid to get creative with the spider legs using different colored decorating gels! Give these Peanut Butter Spider Cookies a try; they’re a fantastic way to add some homemade charm and festive fun to your dessert table.
Frequently Asked Questions:
Can I use natural peanut butter?
It’s best to use creamy, processed peanut butter for these cookies. Natural peanut butter, the kind that separates into oil and solids, has a different fat content and texture. It can make the cookies spread too much and result in a greasier texture, and the flavor might be too intense. Stick with standard creamy peanut butter for the best chewiness and structure.
How do I store these cookies?
Once completely cooled and the decorations are set, store the Peanut Butter Spider Cookies in an airtight container at room temperature. They will stay fresh and chewy for up to 4-5 days. Avoid storing them in the refrigerator, as this can make the cookies hard.
What if I don’t have Whoppers?
If you can’t find Whoppers, you can substitute them with other similar round, chocolate-covered malted milk balls. Alternatively, you could use mini chocolate donuts cut in half, or even large chocolate chips for a smaller spider body. Just press them into the dough before baking as you would the Whoppers.
Peanut Butter Spider Cookies
Spooky and delicious peanut butter cookies decorated to look like spiders, perfect for Halloween or any time you want a fun treat.
Ingredients
-
1 ½ cups all-purpose flour
-
½ tsp baking soda
-
½ tsp baking powder
-
½ cup salted butter (softened)
-
½ cup granulated sugar
-
½ cup brown sugar
-
1 egg
-
½ cup creamy peanut butter (not natural)
-
1 tsp vanilla
-
44 whoppers
-
1 cup semi-sweet chocolate chips ((6 ounces))
-
1 small tube white cake decorating gel
-
¼ cup granulated sugar (for rolling)
Instructions
-
Step 1
Preheat oven to 350°F (175°C). Line baking sheets with parchment paper. In a small bowl, whisk together flour, baking soda, and baking powder. -
Step 2
In a large bowl, cream together softened butter, granulated sugar, and brown sugar until light and fluffy. Beat in the egg and vanilla. -
Step 3
Stir in the creamy peanut butter until well combined. -
Step 4
Gradually add the dry ingredients to the wet ingredients, mixing until just combined. Do not overmix. -
Step 5
Roll dough into 1-inch balls and then roll each ball in the ¼ cup granulated sugar for rolling. Place on prepared baking sheets. -
Step 6
Bake for 9-11 minutes, or until edges are lightly golden. Let cool on baking sheets for a few minutes before transferring to a wire rack to cool completely. -
Step 7
Once cookies are cool, melt the semi-sweet chocolate chips. Dip one side of each Whopper into the melted chocolate and place it on a cookie for the spider’s body. You may need to hold it in place for a moment. -
Step 8
Use the white cake decorating gel to draw eight legs extending from the Whopper onto the cookie, and two eyes on the Whopper.
Important Information
Nutrition Facts (Per Serving)
It is important to consider this information as approximate and not to use it as definitive health advice.
Allergy Information
Please check ingredients for potential allergens and consult a health professional if in doubt.