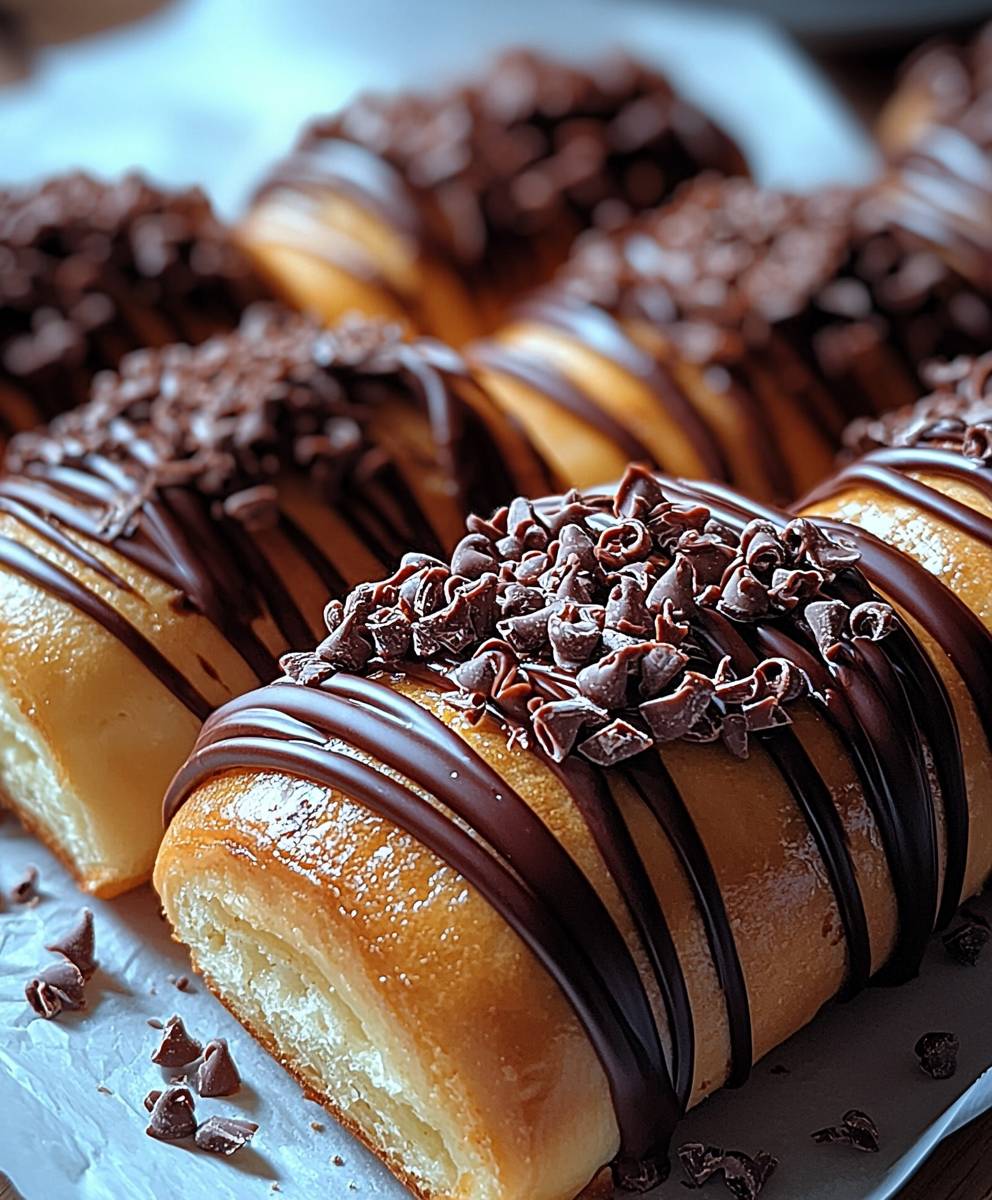
Fluffy chocolate rolls, warm from the oven, are a simple pleasure that can transform any morning into a special occasion. Imagine biting into a cloud of soft, sweet dough, swirled with rich, decadent chocolate it’s a truly irresistible experience! Have you ever wondered about the origins of this delightful treat? While variations exist across cultures, the concept of sweet, enriched dough rolled with fillings dates back centuries, evolving into the comforting baked good we know and love today.
What makes fluffy chocolate rolls so universally appealing? It’s a combination of factors, really. The pillowy texture is incredibly satisfying, and the contrast between the slightly crisp exterior and the melt-in-your-mouth interior is simply divine. Then, of course, there’s the chocolate! Who can resist the allure of that rich, cocoa flavor? Beyond the taste and texture, these rolls offer a sense of nostalgia and comfort. They’re perfect for a weekend brunch, a cozy afternoon snack, or even a simple dessert. Plus, with a little practice, they’re surprisingly easy to make at home, allowing you to customize the filling and frosting to your liking. So, are you ready to bake up a batch of happiness? Let’s get started!
Ingredients:
- For the Dough:
- 3 ½ cups (420g) all-purpose flour, plus more for dusting
- ¼ cup (50g) granulated sugar
- 2 ¼ teaspoons (7g) active dry yeast (1 packet)
- ½ teaspoon salt
- 1 cup (240ml) whole milk, warmed to 110-115°F (43-46°C)
- ¼ cup (60ml) unsalted butter, melted
- 2 large eggs, lightly beaten
- For the Chocolate Filling:
- ½ cup (115g) unsalted butter, softened
- ¾ cup (150g) granulated sugar
- ½ cup (45g) unsweetened cocoa powder
- 1 teaspoon ground cinnamon
- ¼ teaspoon salt
- 1 cup (170g) chocolate chips (semi-sweet or dark, your choice!)
- For the Cream Cheese Glaze:
- 4 ounces (113g) cream cheese, softened
- ¼ cup (57g) unsalted butter, softened
- 1 ½ cups (180g) powdered sugar
- 2-3 tablespoons milk, or more as needed for desired consistency
- ½ teaspoon vanilla extract
Preparing the Dough:
- Activate the Yeast: In a large bowl (or the bowl of your stand mixer), combine the warm milk, sugar, and yeast. Give it a gentle stir and let it sit for 5-10 minutes, or until the yeast is foamy. This step is crucial to ensure your yeast is alive and kicking! If it doesn’t foam, your yeast might be old, and you’ll need to start over with fresh yeast.
- Combine Wet and Dry Ingredients: Add the melted butter and beaten eggs to the yeast mixture. Whisk everything together until well combined.
- Gradually Add the Flour: Gradually add the flour and salt to the wet ingredients, mixing on low speed with the dough hook attachment (if using a stand mixer) or with a wooden spoon (if mixing by hand). Add the flour about ½ cup at a time, mixing well after each addition.
- Knead the Dough: Once the dough comes together, increase the speed to medium-low and knead for 6-8 minutes if using a stand mixer, or 8-10 minutes if kneading by hand. The dough should be smooth, elastic, and slightly tacky but not sticky. If it’s too sticky, add a tablespoon of flour at a time until it reaches the right consistency.
- First Rise: Lightly grease a large bowl with oil or cooking spray. Place the dough in the bowl, turning to coat all sides. Cover the bowl with plastic wrap or a clean kitchen towel and let it rise in a warm place for 1-1.5 hours, or until doubled in size. This is where the magic happens! The dough needs time to develop its flavor and airy texture.
Preparing the Chocolate Filling:
- Cream the Butter and Sugar: In a medium bowl, cream together the softened butter and sugar until light and fluffy. You can use a hand mixer or do this by hand with a sturdy spoon.
- Add Cocoa, Cinnamon, and Salt: Add the cocoa powder, cinnamon, and salt to the butter mixture. Mix until everything is well combined and there are no lumps of cocoa powder.
- Incorporate Chocolate Chips: Gently fold in the chocolate chips. I like to use a spatula for this to avoid overmixing.
Assembling and Baking the Rolls:
- Punch Down the Dough: Once the dough has doubled in size, gently punch it down to release the air.
- Roll Out the Dough: Turn the dough out onto a lightly floured surface. Roll it out into a large rectangle, about 12×18 inches.
- Spread the Filling: Spread the chocolate filling evenly over the entire surface of the dough, leaving a small border along one of the long edges. This will help seal the rolls.
- Roll Up the Dough: Starting from the long edge opposite the border, tightly roll up the dough into a log.
- Cut the Rolls: Use a sharp serrated knife or unflavored dental floss to cut the log into 12 equal slices. I find that dental floss works really well for clean cuts!
- Arrange the Rolls: Grease a 9×13 inch baking dish. Place the rolls in the prepared dish, spacing them evenly apart.
- Second Rise: Cover the dish with plastic wrap or a clean kitchen towel and let the rolls rise in a warm place for 30-45 minutes, or until they have puffed up slightly.
- Preheat the Oven: While the rolls are rising, preheat your oven to 350°F (175°C).
- Bake the Rolls: Bake the rolls for 25-30 minutes, or until they are golden brown and cooked through. A toothpick inserted into the center of a roll should come out clean.
- Cool Slightly: Let the rolls cool in the baking dish for about 10-15 minutes before frosting.
Preparing the Cream Cheese Glaze:
- Cream the Cream Cheese and Butter: In a medium bowl, cream together the softened cream cheese and butter until smooth and creamy.
- Add Powdered Sugar: Gradually add the powdered sugar, mixing on low speed until combined.
- Add Milk and Vanilla: Add the milk, one tablespoon at a time, until the glaze reaches your desired consistency. Stir in the vanilla extract.
Frosting and Serving:
- Frost the Rolls: Generously spread the cream cheese glaze over the warm rolls.
- Serve and Enjoy: Serve the rolls warm and enjoy! These are best enjoyed fresh, but they can be stored in an airtight container at room temperature for up to 2 days. You can also reheat them in the microwave for a few seconds before serving.

Conclusion:
And there you have it! These fluffy chocolate rolls are more than just a recipe; they’re an experience, a warm hug on a plate, and a guaranteed crowd-pleaser. I truly believe this is a must-try recipe for anyone who loves the comforting aroma of freshly baked bread and the irresistible allure of chocolate. The soft, pillowy texture combined with the rich, decadent chocolate filling creates a symphony of flavors and textures that will leave you wanting more. But why is this recipe so special? It’s the perfect balance of simplicity and indulgence. The dough is surprisingly easy to work with, even for beginner bakers, and the chocolate filling is customizable to your own preferences. Whether you prefer dark chocolate, milk chocolate, or even a hint of spice, you can easily adapt this recipe to create your perfect chocolate roll. Beyond the incredible taste and texture, these rolls are incredibly versatile. They’re perfect for breakfast, brunch, dessert, or even a late-night snack. Imagine waking up on a weekend morning to the smell of these baking in the oven pure bliss! They’re also a fantastic addition to any potluck or gathering. Trust me, these fluffy chocolate rolls will be the first thing to disappear from the table. Looking for serving suggestions? A simple dusting of powdered sugar is always a classic choice. Or, for an extra touch of indulgence, try drizzling them with a simple glaze made from powdered sugar and milk. You could even add a sprinkle of chopped nuts or chocolate shavings for added texture and flavor. For a truly decadent experience, serve them warm with a scoop of vanilla ice cream. And don’t be afraid to experiment with variations! Try adding a layer of cream cheese filling for a cheesecake-inspired twist. Or, incorporate some chopped nuts or dried fruit into the chocolate filling for added texture and flavor. You could even try using a different type of chocolate, such as white chocolate or peanut butter chips. The possibilities are endless! I’m so confident that you’ll love this recipe that I urge you to give it a try. Don’t be intimidated by the thought of baking bread this recipe is surprisingly easy and forgiving. Just follow the instructions carefully, and you’ll be rewarded with a batch of the most delicious and satisfying fluffy chocolate rolls you’ve ever tasted. Once you’ve made them, I would absolutely love to hear about your experience! Did you make any variations? What did you think of the taste and texture? Share your photos and comments with me I’m always eager to see your creations and hear your feedback. Baking is a journey, and I’m so happy to share this recipe with you. So go ahead, preheat your oven, gather your ingredients, and get ready to bake some magic! I promise, you won’t regret it. Happy baking! And remember, the secret ingredient is always love (and maybe a little extra chocolate!). Let me know how your fluffy chocolate rolls turn out! Print
Fluffy Chocolate Rolls: The Ultimate Guide to Baking Perfection
- Total Time: 180 minutes
- Yield: 12 rolls 1x
Description
Warm, gooey chocolate cinnamon rolls with a tangy cream cheese glaze. A perfect treat for breakfast, brunch, or dessert!
Ingredients
- 3 ½ cups (420g) all-purpose flour, plus more for dusting
- ¼ cup (50g) granulated sugar
- 2 ¼ teaspoons (7g) active dry yeast (1 packet)
- ½ teaspoon salt
- 1 cup (240ml) whole milk, warmed to 110-115°F (43-46°C)
- ¼ cup (60ml) unsalted butter, melted
- 2 large eggs, lightly beaten
- ½ cup (115g) unsalted butter, softened
- ¾ cup (150g) granulated sugar
- ½ cup (45g) unsweetened cocoa powder
- 1 teaspoon ground cinnamon
- ¼ teaspoon salt
- 1 cup (170g) chocolate chips (semi-sweet or dark, your choice!)
- 4 ounces (113g) cream cheese, softened
- ¼ cup (57g) unsalted butter, softened
- 1 ½ cups (180g) powdered sugar
- 2–3 tablespoons milk, or more as needed for desired consistency
- ½ teaspoon vanilla extract
Instructions
- Activate the Yeast: In a large bowl (or the bowl of your stand mixer), combine the warm milk, sugar, and yeast. Give it a gentle stir and let it sit for 5-10 minutes, or until the yeast is foamy. If it doesn’t foam, your yeast might be old, and you’ll need to start over with fresh yeast.
- Combine Wet and Dry Ingredients: Add the melted butter and beaten eggs to the yeast mixture. Whisk everything together until well combined.
- Gradually Add the Flour: Gradually add the flour and salt to the wet ingredients, mixing on low speed with the dough hook attachment (if using a stand mixer) or with a wooden spoon (if mixing by hand). Add the flour about ½ cup at a time, mixing well after each addition.
- Knead the Dough: Once the dough comes together, increase the speed to medium-low and knead for 6-8 minutes if using a stand mixer, or 8-10 minutes if kneading by hand. The dough should be smooth, elastic, and slightly tacky but not sticky. If it’s too sticky, add a tablespoon of flour at a time until it reaches the right consistency.
- First Rise: Lightly grease a large bowl with oil or cooking spray. Place the dough in the bowl, turning to coat all sides. Cover the bowl with plastic wrap or a clean kitchen towel and let it rise in a warm place for 1-1.5 hours, or until doubled in size.
- Cream the Butter and Sugar (Filling): In a medium bowl, cream together the softened butter and sugar until light and fluffy. You can use a hand mixer or do this by hand with a sturdy spoon.
- Add Cocoa, Cinnamon, and Salt (Filling): Add the cocoa powder, cinnamon, and salt to the butter mixture. Mix until everything is well combined and there are no lumps of cocoa powder.
- Incorporate Chocolate Chips (Filling): Gently fold in the chocolate chips.
- Punch Down the Dough: Once the dough has doubled in size, gently punch it down to release the air.
- Roll Out the Dough: Turn the dough out onto a lightly floured surface. Roll it out into a large rectangle, about 12×18 inches.
- Spread the Filling: Spread the chocolate filling evenly over the entire surface of the dough, leaving a small border along one of the long edges.
- Roll Up the Dough: Starting from the long edge opposite the border, tightly roll up the dough into a log.
- Cut the Rolls: Use a sharp serrated knife or unflavored dental floss to cut the log into 12 equal slices.
- Arrange the Rolls: Grease a 9×13 inch baking dish. Place the rolls in the prepared dish, spacing them evenly apart.
- Second Rise: Cover the dish with plastic wrap or a clean kitchen towel and let the rolls rise in a warm place for 30-45 minutes, or until they have puffed up slightly.
- Preheat the Oven: While the rolls are rising, preheat your oven to 350°F (175°C).
- Bake the Rolls: Bake the rolls for 25-30 minutes, or until they are golden brown and cooked through. A toothpick inserted into the center of a roll should come out clean.
- Cool Slightly: Let the rolls cool in the baking dish for about 10-15 minutes before frosting.
- Cream the Cream Cheese and Butter (Glaze): In a medium bowl, cream together the softened cream cheese and butter until smooth and creamy.
- Add Powdered Sugar (Glaze): Gradually add the powdered sugar, mixing on low speed until combined.
- Add Milk and Vanilla (Glaze): Add the milk, one tablespoon at a time, until the glaze reaches your desired consistency. Stir in the vanilla extract.
- Frost the Rolls: Generously spread the cream cheese glaze over the warm rolls.
- Serve and Enjoy: Serve the rolls warm and enjoy! These are best enjoyed fresh, but they can be stored in an airtight container at room temperature for up to 2 days. You can also reheat them in the microwave for a few seconds before serving.
Notes
- Make sure your milk is warm enough to activate the yeast, but not too hot, or it will kill the yeast.
- If your dough is too sticky, add flour one tablespoon at a time until it reaches the right consistency.
- Dental floss works great for cutting the rolls cleanly.
- For a richer flavor, use dark chocolate chips in the filling.
- Store leftover rolls in an airtight container at room temperature for up to 2 days. Reheat in the microwave for a few seconds before serving.
- Prep Time: 45 minutes
- Cook Time: 30 minutes