Valentines Pink Hot Chocolate: Prepare to fall head over heels for the most romantic and delicious drink of the season! Forget the chocolates and flowers; this year, show your love with a mug of creamy, dreamy pink hot chocolate. It’s not just a drink; it’s an experience, a warm hug in a cup, and the perfect way to celebrate Valentine’s Day with your sweetheart or even just treat yourself!
Hot chocolate, in its various forms, has a rich history dating back to the ancient Mayan and Aztec civilizations, where it was a bitter, spiced beverage reserved for royalty and religious ceremonies. Over time, it evolved into the sweeter, more indulgent drink we know and love today. This Valentines Pink Hot Chocolate takes that evolution a step further, adding a touch of whimsy and romance to a classic comfort.
But what makes this pink version so irresistible? Well, beyond its stunning visual appeal, it’s the perfect blend of rich, velvety chocolate, a hint of sweetness, and that delightful pink hue that just screams “celebration!” People adore hot chocolate for its comforting warmth, its ability to soothe the soul on a chilly day, and its sheer deliciousness. This pink twist elevates it to a whole new level, making it a memorable and Instagram-worthy treat that’s sure to impress. So, grab your favorite mug, and let’s get ready to make some magic!

Ingredients:
- 4 cups milk (whole milk recommended for richness, but any milk will work)
- 1/4 cup heavy cream (optional, but adds extra creaminess)
- 4 ounces white chocolate, finely chopped
- 2 tablespoons unsweetened cocoa powder
- 1/4 teaspoon salt
- 1/2 teaspoon vanilla extract
- Pink food coloring (gel food coloring recommended for vibrant color)
- Whipped cream, for topping (optional)
- Pink sprinkles, for topping (optional)
- Mini marshmallows, for topping (optional)
- Chocolate shavings, for topping (optional)
Preparing the Pink Hot Chocolate Base
Okay, let’s get started! This Valentine’s Pink Hot Chocolate is so easy to make, and it’s guaranteed to impress your loved ones (or just yourself!). The key to a truly decadent hot chocolate is using good quality ingredients, especially the white chocolate. Don’t skimp on this it makes a huge difference!
- Combine Milk and Cream: In a medium saucepan, pour in the milk and heavy cream (if using). Whisk them together gently. This ensures the cream is evenly distributed and prevents it from clumping later on.
- Heat the Mixture: Place the saucepan over medium heat. You want to heat the milk mixture until it’s steaming, but not boiling. Keep a close eye on it, as milk can scorch easily. Stir frequently to prevent a skin from forming on the surface. We’re aiming for a temperature of around 170-180°F (77-82°C). If you have a kitchen thermometer, now’s the time to use it!
- Add White Chocolate: Once the milk mixture is hot, reduce the heat to low. Add the finely chopped white chocolate to the saucepan. It’s important that the chocolate is finely chopped, as this will help it melt more quickly and evenly.
- Whisk Until Smooth: Using a whisk, continuously stir the mixture until the white chocolate is completely melted and the hot chocolate is smooth and creamy. This might take a few minutes, so be patient. Don’t stop whisking, as the chocolate can stick to the bottom of the pan and burn.
- Incorporate Cocoa Powder and Salt: Add the unsweetened cocoa powder and salt to the hot chocolate mixture. The cocoa powder will add a subtle chocolatey depth to the white chocolate, and the salt will enhance the sweetness and balance the flavors.
- Whisk Again: Continue whisking until the cocoa powder is fully incorporated and there are no lumps. The mixture should be smooth and homogenous.
- Stir in Vanilla Extract: Remove the saucepan from the heat and stir in the vanilla extract. The vanilla extract will add a warm and aromatic note to the hot chocolate.
- Add Pink Food Coloring: Now for the fun part! Add a few drops of pink food coloring to the hot chocolate. Start with a small amount, as you can always add more to achieve your desired shade of pink. I recommend using gel food coloring, as it’s more concentrated and won’t water down the hot chocolate. Stir well until the color is evenly distributed.
Adjusting for Flavor and Consistency
Now that we have the base of our pink hot chocolate, it’s time to taste and adjust the flavors to your liking. This is where you can really personalize the recipe and make it your own!
- Taste and Adjust Sweetness: Take a small sip of the hot chocolate and see if it’s sweet enough for your taste. If you prefer a sweeter hot chocolate, you can add a little bit of sugar, honey, or maple syrup. Start with a teaspoon at a time and stir well until dissolved. Taste again and repeat until you reach your desired level of sweetness.
- Adjust Chocolate Intensity: If you want a more intense chocolate flavor, you can add a little bit more cocoa powder. Again, start with a small amount (about 1/2 teaspoon) and stir well until dissolved. Taste and repeat until you achieve the desired chocolate intensity.
- Thinning the Hot Chocolate (If Needed): If the hot chocolate is too thick for your liking, you can thin it out by adding a little bit more milk. Add a tablespoon at a time and stir well until you reach your desired consistency.
- Thickening the Hot Chocolate (If Needed): If the hot chocolate is too thin, you can thicken it by simmering it over low heat for a few minutes, stirring constantly. This will allow some of the liquid to evaporate, resulting in a thicker hot chocolate. Be careful not to boil it, as this can cause the milk to scorch.
Serving and Garnishing Your Pink Hot Chocolate
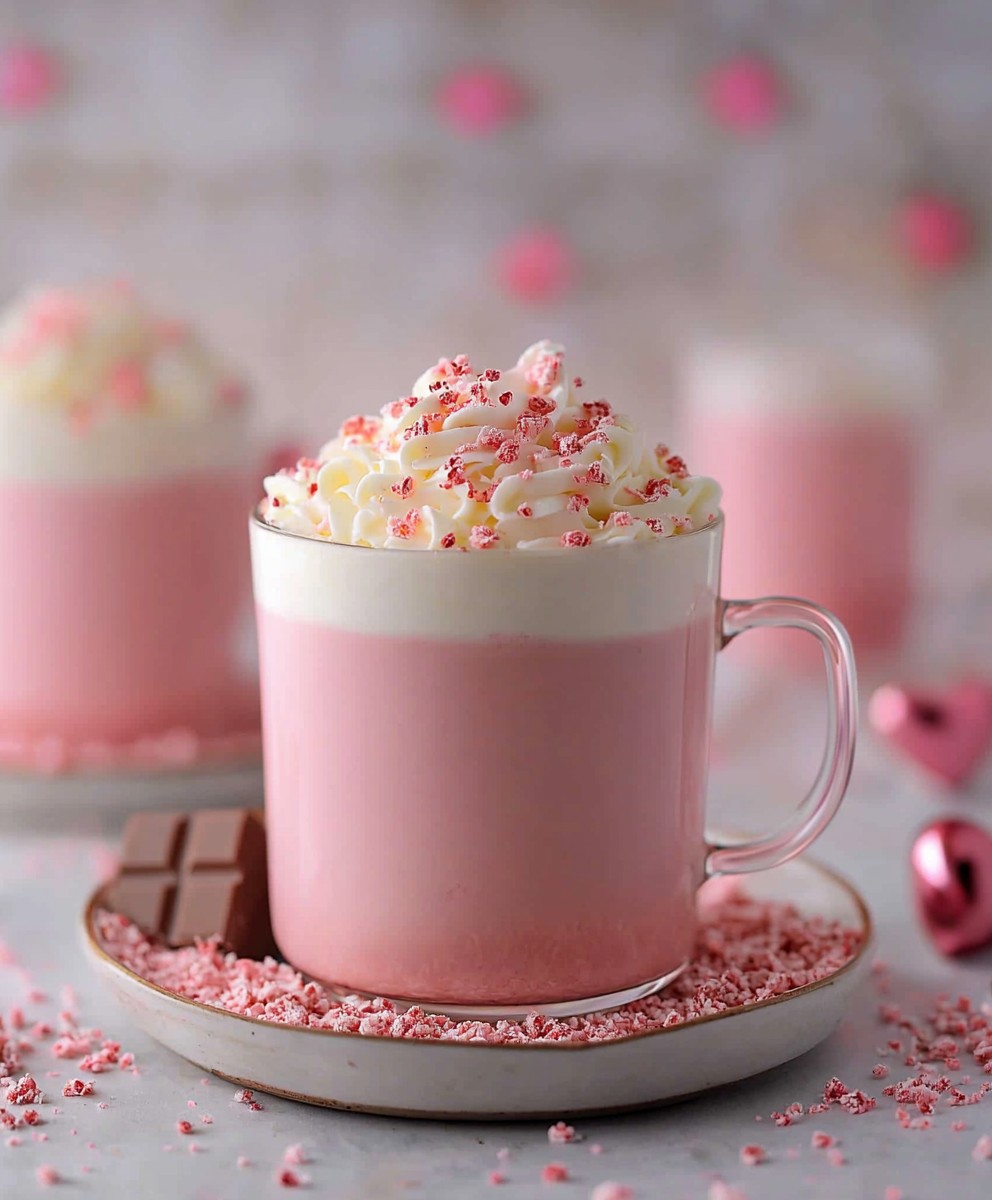
The final step is to serve and garnish your beautiful pink hot chocolate! This is where you can really get creative and add your own personal touch. I love to use a variety of toppings to make it extra special.
- Pour into Mugs: Carefully pour the hot chocolate into your favorite mugs. I like to use clear glass mugs so you can see the pretty pink color.
- Top with Whipped Cream: Add a generous dollop of whipped cream on top of each mug. You can use store-bought whipped cream or make your own. Homemade whipped cream is always a treat!
- Sprinkle with Pink Sprinkles: Sprinkle pink sprinkles over the whipped cream for a festive touch. You can use any kind of sprinkles you like, but I think pink sprinkles are especially appropriate for Valentine’s Day.
- Add Mini Marshmallows: Add a few mini marshmallows on top of the whipped cream. Marshmallows are a classic hot chocolate topping, and they add a touch of sweetness and fluffiness.
- Garnish with Chocolate Shavings: For an extra touch of chocolatey goodness, garnish with chocolate shavings. You can use a vegetable peeler to shave chocolate from a bar of dark, milk, or white chocolate.
- Serve Immediately: Serve the hot chocolate immediately while it’s still hot and creamy. Enjoy!
Tips and Variations
Here are a few extra tips and variations to help you customize your Valentine’s Pink Hot Chocolate:
- For a Vegan Version: Use plant-based milk (such as almond milk, soy milk, or oat milk) and vegan white chocolate. You can also use vegan whipped cream and marshmallows.
- For a Dairy-Free Version: Use dairy-free milk and dairy-free white chocolate.
- Add a Peppermint Twist: Add a few drops of peppermint extract to the hot chocolate for a refreshing and festive twist.
- Make it Spicy: Add a pinch of cayenne pepper to the hot chocolate for a subtle kick.
- Add a Shot of Espresso: Add a shot of espresso to the hot chocolate for a mocha-inspired drink.
- Make it Ahead: You can make the hot chocolate base ahead of time and store it in the refrigerator for up to 2 days. Reheat gently before serving.
- Use Different Food Coloring: Feel free to experiment with different food coloring to create different colors of hot chocolate. You could make a red hot chocolate for Christmas, or a green hot chocolate for St. Patrick’s Day.
- Add Liqueur: For an adult version, add a shot of your favorite liqueur, such as Baileys Irish Cream, Kahlua, or Amaretto.
Enjoy Your Delicious Pink Hot Chocolate!
I hope you enjoy this recipe for Valentine’s Pink Hot Chocolate! It’s the perfect way to celebrate Valentine’s Day or any special occasion. It’s also a great way to warm up on a cold winter day. Don’t be afraid to get creative and experiment with different flavors and toppings to make it your own. Happy Valentine’s Day!
Conclusion:
This Valentine’s Pink Hot Chocolate isn’t just a drink; it’s an experience, a warm hug in a mug, and a delightful way to celebrate love whether it’s romantic love, self-love, or simply a love for delicious things! I truly believe this recipe is a must-try because it’s so much more than your average hot chocolate. The vibrant pink hue, the creamy texture, and the subtle sweetness make it incredibly special and memorable. It’s the perfect treat to brighten up a chilly evening and add a touch of magic to your Valentine’s Day celebrations, or any day you need a little extra cheer. But the best part? It’s incredibly easy to make! You don’t need to be a master chocolatier to whip up this decadent drink. With just a few simple ingredients and a few minutes of your time, you can create a truly stunning and delicious beverage that will impress your loved ones (or yourself!). The natural sweetness from the white chocolate and the subtle tang from the raspberry powder create a flavor profile that’s both comforting and exciting. It’s a delightful twist on a classic favorite that’s sure to become a new tradition. Serving Suggestions and Variations: The possibilities are truly endless when it comes to enjoying this Valentine’s Pink Hot Chocolate. For an extra touch of indulgence, top it with a generous dollop of whipped cream and a sprinkle of pink sprinkles or edible glitter. You could also add a few mini marshmallows for a classic hot chocolate experience. If you’re feeling adventurous, try adding a splash of raspberry liqueur or a dash of vanilla extract for an extra layer of flavor. For a vegan version, simply substitute the dairy milk with your favorite plant-based milk, such as almond milk, oat milk, or soy milk. Just be sure to choose a plant-based milk that’s creamy and has a neutral flavor so it doesn’t overpower the other ingredients. You can also use vegan white chocolate chips to keep it completely plant-based. Another fun variation is to make pink hot chocolate bombs! Simply melt the white chocolate, mix in the raspberry powder, and pour it into silicone molds. Once hardened, fill them with hot chocolate mix, mini marshmallows, and sprinkles. Drop them into a mug of hot milk for a fun and interactive treat. For a truly decadent experience, serve your Valentine’s Pink Hot Chocolate with a side of homemade cookies or a slice of rich chocolate cake. It’s the perfect pairing for a cozy night in. You can even use it as a base for a pink hot chocolate milkshake by blending it with ice cream. Now it’s your turn! I’m so excited for you to try this recipe and experience the magic of Valentine’s Pink Hot Chocolate for yourself. I truly believe you’ll love it as much as I do. Don’t be afraid to get creative and experiment with different variations to find your perfect cup. Once you’ve made it, I’d love to hear about your experience! Share your photos and comments on social media using [Your Hashtag] so I can see your creations. Let me know what variations you tried and what you thought of the recipe. I’m always looking for new ideas and inspiration. So go ahead, grab your ingredients, and get ready to create a truly special and delicious treat. I promise, this Valentine’s Pink Hot Chocolate will be a hit! Happy sipping! Print
Valentines Pink Hot Chocolate: A Delicious & Romantic Treat
- Total Time: 15 minutes
- Yield: 4 servings 1x
Description
Creamy, dreamy Valentine’s Pink Hot Chocolate! Easy to make, perfect for celebrations or chilly days. Made with white chocolate and a touch of pink, it’s a delightful, festive beverage.
Ingredients
- 4 cups milk (whole milk recommended)
- 1/4 cup heavy cream (optional)
- 4 ounces white chocolate, finely chopped
- 2 tablespoons unsweetened cocoa powder
- 1/4 teaspoon salt
- 1/2 teaspoon vanilla extract
- Pink food coloring (gel recommended)
- Whipped cream, for topping (optional)
- Pink sprinkles, for topping (optional)
- Mini marshmallows, for topping (optional)
- Chocolate shavings, for topping (optional)
Instructions
- Combine Milk and Cream: In a medium saucepan, pour in the milk and heavy cream (if using). Whisk them together gently.
- Heat the Mixture: Place the saucepan over medium heat. Heat the milk mixture until it’s steaming, but not boiling (around 170-180°F or 77-82°C). Stir frequently.
- Add White Chocolate: Reduce the heat to low. Add the finely chopped white chocolate to the saucepan.
- Whisk Until Smooth: Continuously stir the mixture until the white chocolate is completely melted and the hot chocolate is smooth and creamy.
- Incorporate Cocoa Powder and Salt: Add the unsweetened cocoa powder and salt to the hot chocolate mixture.
- Whisk Again: Continue whisking until the cocoa powder is fully incorporated and there are no lumps.
- Stir in Vanilla Extract: Remove the saucepan from the heat and stir in the vanilla extract.
- Add Pink Food Coloring: Add a few drops of pink food coloring to the hot chocolate. Stir well until the color is evenly distributed.
- Taste and Adjust: Taste and adjust sweetness or chocolate intensity to your liking. Thin or thicken as needed.
- Pour into Mugs: Carefully pour the hot chocolate into your favorite mugs.
- Top with Whipped Cream: Add a generous dollop of whipped cream on top of each mug.
- Sprinkle with Pink Sprinkles: Sprinkle pink sprinkles over the whipped cream for a festive touch.
- Add Mini Marshmallows: Add a few mini marshmallows on top of the whipped cream.
- Garnish with Chocolate Shavings: For an extra touch of chocolatey goodness, garnish with chocolate shavings.
- Serve Immediately: Serve the hot chocolate immediately while it’s still hot and creamy. Enjoy!
Notes
- Use good quality white chocolate for the best flavor.
- Gel food coloring is recommended for vibrant color.
- Adjust sweetness and chocolate intensity to your preference.
- For a vegan version, use plant-based milk and vegan white chocolate.
- Get creative with toppings!
- Prep Time: 5 minutes
- Cook Time: 10 minutes